Saturday, March 15, 2025
And just like that, we are starting the third part of the third major trek in the third month of the year. With all of those threes, it would have been a crime not to reference this blog as a trilogy of sorts. The more I think about this trek, the more thankful I actually am. You see, my creativity was starting to really fall apart about this time last year. It became the longest-term slump that I have ever worked through as a photographer. There were two slumps that lasted longer, but one of them had me selling off all of my camera gear while the other saw everything tucked away in the closet for about a year while I concentrated on cycling. Knowing this about myself and embracing the ebbs and flows of creativity allowed me to stick with photography during about seven months during 2024 when I just wasn’t feeling it at all. Things are going much better this year for the time being, but I will say that my creativity is getting a bit exhausted because of the tempo that I have been working.
Let’s take a moment to look back at the previous two parts of this amazing month of rust. Here are a collection of links that will take you through each stage of what has become the trilogy of rust.
It all started with a shoot done largely out of convenience in Hays, near Traphill.
Two Strikes and a Grand Slam (Part 1)
Two Strikes and a Grand Slam (Part 2)
Two Strikes and a Grand Slam (Part 3)
That trek was followed up a week later with a trek that had been a year in the making but still surprised me for the number of subjects that I was able to photograph in Hays.
It Finally Worked Out (Part 1)
It Finally Worked Out (Part 2)
It Finally Worked Out (Part 3)
That brings us to this trek which if you haven’t read through the first two parts, I highly recommend that you do so before getting into this one.
Trilogy of Rust (Part 3) —– Will continue below
As you can see, I have been quite busy in essentially the first half of March. I don’t know where the second half will take me, and I certainly have no idea where the rest of the year will lead, but I do know I am in a much better headspace to look forward to more treks with more photos added to my collection and portfolio. I’m thrilled to have each of you along with me during that journey and hope that you enjoy the stories as well as the photos along the way.
As we wrap this story up, I would like to mention the sponsor for this blog entry, which is Greg Kiser Photography. This is your one-stop spot for one of a kind fine art photographic prints. I specialize in landscape and decay photography, but you will often see some off the wall things like architecture, and studio work. If people are more your thing, I do offer a full-service portrait side as well as boudoir sessions, with a full studio at my disposal. I am also able to go to specific locations to capture your memories. I can do corporate headshots for individuals and businesses. In addition, I am perfectly happy shooting automotive subjects for the automotive enthusiast crowd. If you are a photographer, looking to improve on your skills and techniques, I do both mentorships for that one-to-one attention, or workshops for group learning. I even have several prepared presentations that I can do for groups such as camera clubs, or photography classrooms. There is a lot going on here and I’m happy to partner with you for your next creative project.
So, where were we when we last spoke. Oh yeah, I was pretty sure that I was done for the day. It was right at 2pm when the rain was supposed to be getting started, but everything was dry at the moment. I had been shooting for nearly two hours and was starting to get a little tired. Knowing that I had gone through the first half of the day in a rush because I was a little overwhelmed at all that I was seeing, I really wanted to go back and give it one more look now that the pressure was off. I had 69 frames captured on the camera and knew that I was looking at a pretty good hit rate because I wasn’t shooting a lot of repeat compositions. There was no pressure to get any more photos, but there was a very good chance that I might be able to improve on what I had already shot because the sky was starting to change a little with some more texture in the clouds.
I grabbed my bag and started to make my way back to the rear lot where all the great cars were located. However, as I was rounding the side of the building I was struck by the way the two Grand Prixes….Prixs…..Pries……Prixises….the two Pontiacs were looking. They were probably only a year apart in age and had slightly different characteristics, but they were immediately recognizable as being siblings. By this point in the day, I was less concerned with “clean” images without extra elements because I was feeling a little daring and willing to experiment a bit. Because of this new take on things, the Mercedes Benz car topper was not the issue that it once had been (like 30 minutes ago), and the canoe somehow didn’t bother me as much. What can I say, I was getting soft in my old age over the last half hour.
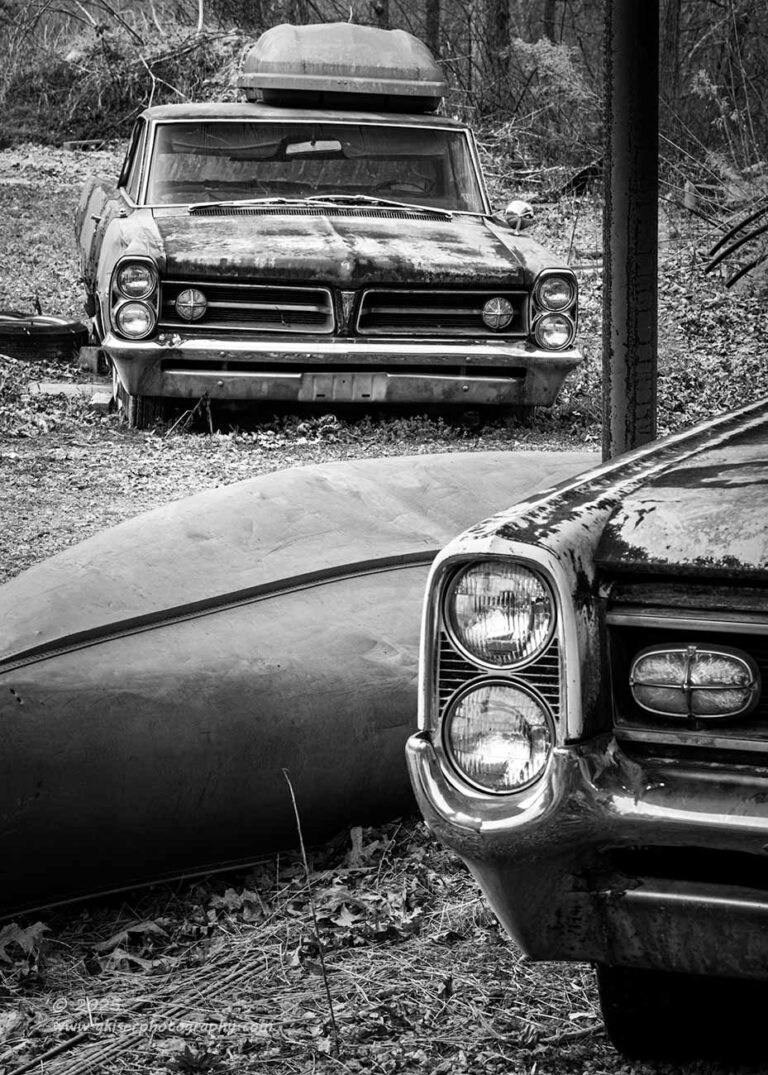
There was something between these two cars that I hadn’t considered as a photograph until now. I stopped where I was and evaluated the scene to see if there was a composition available to me. It was not something that came easily though as I had to mitigate as many of the distractions as I could. There was really no way of getting a composition that flowed between the two cars if I captured them both in their entirety, but I wasn’t willing to leave it there. Instead, I started to look at something like what I had done earlier with the Oldsmobile and the Pontiac headlight. At the time, I was still sold on that concept and felt that I could do something along those lines here. Had it not been for the canoe, I might have been able to superimpose the closer pair of lights over the further car’s corner. However, I saw something else that might actually work better, while establishing each car as its own unique element.
I could use the support beam of the building, which was going to be in the shot regardless, along with the canoe to frame the car in the background. This left the foreground open for the closer car which would just provide enough visually to show what it was and the connection to the car behind. I know that there are several of you out there right now wanting to tell me about all these great features of Photoshop and even Lightroom when it comes to removing objects in a scene. With just a couple of seconds, I could remove that post and replace it with a reasonable representation of the ground. Heck, I could even remove the canoe in the same way. That would change up the photo tremendously and make it much easier to compose.
Yes, I could do that. The problem with removing objects that large is that you will see evidence that they have been removed and the bigger the image is printed, the more glaring those removals become. I have no problem pulling out small objects, but when it comes to something as prominent as the offending objects in the frame above, I would rather leave them or compose the image differently. It all comes down to getting it as close to right in the camera and where my time is best spent. Knowing that is how I prefer to operate, I didn’t even linger on the possibility of removing these things in the composition and decided to compose the shot in a way where the objects added to the scene. This was where the idea of using them as a frame for the car in the background came from. Now, these items are not a distraction at all, they work in conjunction with the two main subjects and provide visual structure for the image as a whole.
By using the telephoto lens, I was able to get a good amount of compression to the scene which basically meant that the scaling between the two cars was not too different. If I had gotten in close and used a wider angle lens, the rear car would have been much smaller and would have not carried the visual weight needed for the shot to work. The actual focal length that I shot this at was 130mm which seems like a crazy focal length for something that I could step up and touch, but it was exactly what was needed to maintain the visual balance.
The next creative hurdle I faced was the depth of field that I chose. I had a couple of options here, and I again I chose to spend the time in the field to get it right. My basic choices were to have both cars in focus, the near one only, or the far one only. There was also the question of degrees of focus and how much blur to introduce into the blurred car. My first shot of the composition was to have both of the cars in focus. Now, I could have done focus stacking for tack sharp focus front to back, but that was going to make it feel a little overly done. I much preferred to work the depth of field through the camera by selecting f/22 which was a stop wider than fully stopped down for that lens. I then worked out the hyperfocal distance that I needed to make sure that everything was in focus with a slight edge on the car in front. That focus point turned out to be the far edge of the canoe which was where I focused the shot. This gave me the right depth of field to have it all appear sharp. I go through all of this because it was the first shot that ended up being the keeper that you see here. The remaining four attempts at the composition focused on one or the other car with variations on how blurred the other car became. I just didn’t like these nearly as much when I looked on the computer.
If you are asking why I didn’t embrace the bokeh as a “real photographer” would have, my answer is simple. It wasn’t staying in line with my vision as the photographer. For me, having a dominant foreground such as the headlights on the near car pretty much required them to be in focus. This was the subject that was the closest and invited you to look at the details. With that in mind, it makes sense to lock the focus on the near car and let the one in the background go soft. Well, when I did that, I kept wanting more focus on the rear car because it was the one that was fully represented, and the argument needs to be made that it was the main subject of the photo. Any amount of blur that obscured the details became a distraction, and if the details started to be visible, I wanted the car sharp. Taking that into consideration, I changed the focus point to the rear car and kept it tack sharp as the main element of the photo. Now that the front car was blurred, I didn’t like it totally blurred because it blended into the canoe and made no sense to the composition. As I increased the depth of field and sharpened the foreground car a bit, it became a distraction because my eyes wanted to see the detail and texture as I was looking through the image. That texture helped to break it apart from the canoe as well. In the end, the hyperfocal focusing won the day for this image and in a single shot I was able to capture both subjects in appreciable focus with the background brush going soft within the frame.
And you thought that photography was all about point and click. You just had a lesson in how to focus your shots creatively along with the thought process behind the outcome.
The last bit of the puzzle was in the presentation of the image. It made it through the culling stages and into post where I was going to make the final call on whether or not I wanted to keep this photo or not. When I looked at it in color, it was fair, but not a strong image. I found that the aluminum canoe tended to dominate the scene because of how bright it was in relation to the other elements. The colors in the scene were also largely warm tones that were rather analogous except for the canoe, which again stood out too much for my liking. I decided to make this a black and white because I could then trade the bland analogous colors for tones that I could brighten in order to compete with the canoe. There was also a bit of burning on the canoe to darken it. The end result was an image that had a much more logical visual flow which forced the eyes to look at the two cars and almost completely bypass the canoe and the post. Those had been relegated to providing a framework for the rear car and the canoe added to the diagonal element introduced by the nearest car. What had started as a completely experimental composition had turned into a very strong image and a great example of why I do a second run through properties like this after I get the logical shots out of the way.
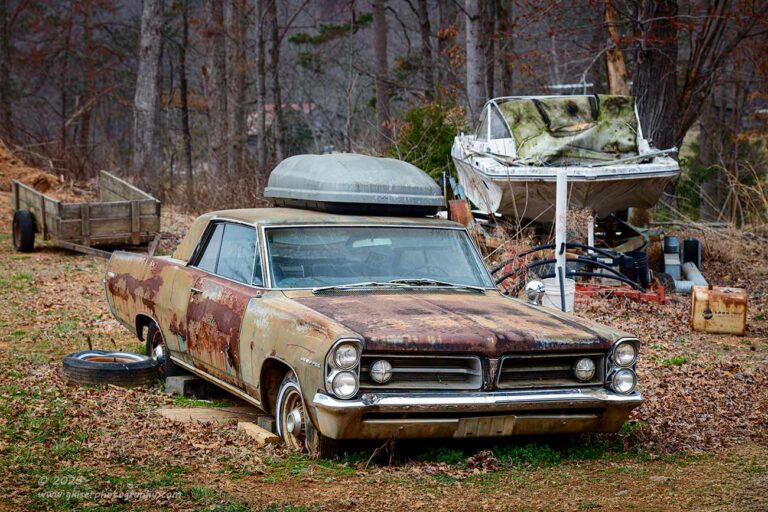
After spending some quality time embracing some of the extraneous elements within the scene, I felt that I was ready to work an overall composition of the Pontiac in the rear. When I had first seen it, and even when I was first photographing it, I had dismissed the idea of getting a full shot of the car because it was kind of crowded into the scene and I really didn’t like the car topper at all. Having photographed the car with the topper, I was feeling a little less opposed to it. I had grown a lot in the last 45 minutes it would appear.
I moved around to that car once again and started to take stock of the scene. The parts that really got in my way and I felt that would be too dominant to remove in post were the boat and the trailer. I could compose a shot that eliminated one of them but would then place the other in a position near the car that would not allow for separation. Only by including both of those elements could I get the separation between the elements that was needed for a photo. In short, it was going to be an all or nothing. I had a car, a small trailer, a boat, and a car topper which I didn’t really like in the scene, so I had to figure out a storyline where all of these items could exist and add to the story. Everything that I was seeing could be a part of travel and vacation type activities. It was almost like the car was choosing between the options prior to hitting the road. That became the narrative to this piece, and with that idea in mind, the spare tire beside the car made sense to me, and even the pile of stuff at the front of the boat. We all have that person in the family that overpacks. If you can’t think of who that is in your family, consider taking less the next time you go on a trip.
Now that I had the photo figured out, the composition actually came pretty easily. The first two frames that I shot I ended up finding an issue with. There wasn’t enough separation between the car and the boat, so I needed to elevate the camera a bit more which I did. I fired off two more shots with two different aperture values to give me a choice for depth of field. I was liking how it was looking with the background going a bit soft and figured that f/5.6 was going to be the winner. It did turn out that way, but it wasn’t that shot where I made that choice. What I found when I was looking at the image in detail was that the wagon was now too close to the edge of the frame, and I needed a bit more breathing room on that side. I panned the camera over to the left about one degree which gave a better balance to the scene, and I repeated the f/5.6 and f/8 exposures to make sure that I had a choice in depth of field. My goal was to keep the whole car in focus while the background went soft. The elements were kind of close together, but since I was still shooting with the long lens, I had a bit better control over the depth of field this way.
I was pretty well happy with what I had captured with the three Pontiacs up front and it was time to move back to the rear of the property once again. As I passed by the two Ford Falcons I paused and started to consider another composition with them. I was also looking at some of the other cars right there at the entrance for some ideas. This was the creative part of the day, so I had that ability to sit back and ponder the shots. As I was pondering, I got the sensation that somebody was walking up on me, so I turned to find Robbie walking towards me. I remember him asking, I think kind of seriously, if this was as far as I had gotten. I had been here for quite a while, so I answered that I was just getting started and was looking forward to the first few photos. Of course, I corrected myself and let him know that I was just starting the second run through the property after getting a bunch of images to start with.
We chatted for about a half hour and he told me more about the property and the cars that were on it. I learned a lot about his background and future plans and even learned that he had been a photographer in his younger years. He had shot film cameras and enjoyed things like waterfalls with the long exposures. Hmmm, sounds familiar to how I got started in photography. We actually got along quite well talking with each other. As we were talking, I was starting to see that the sky was turning very interesting with lots of textures in the clouds. I was also starting to see a composition with the two Fords that I hadn’t really seen before. When I’m in these creative modes, I do tend to always be “on” in terms of looking for compositions. Seeing that the sky was rapidly changing, I didn’t want to miss out on a chance at the end of the conversation, so while we were talking, I swapped my telephoto lens out for my standard zoom so that I could get the sky.
The conversation was winding down at this point and I let him know that while talking with him I had gotten an idea for the Fords that we had been standing near but that I wanted to run out and get a quick few photos that included the sky while the clouds were looking good before the rain hit. He went on back to the shop and I went out in the field once again. I knew of a couple of shots that would probably look really good with the sky. The first one was of the two cars situated all by themselves on the ridge. I decided to get them at an angle that omitted any of the buildings from view in the background. The idea was that this was going to be the most simple and direct composition possible. The downside was that the cars were both shot broadside which wasn’t flattering for either of them.
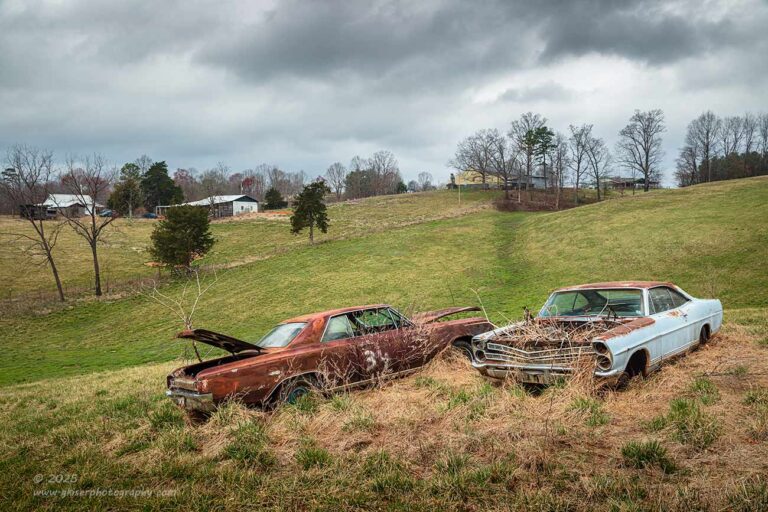
Feeling that the broadside shot was just too simple and showed no depth, I decided to go for a different angle that would show off more of the personality of the cars. Of course, by doing this, I was going to be capturing some of the buildings and barns along the top of the property by the main road. This wasn’t too terrible because the barns actually fit the scene, and the other buildings could be rendered kind of small in comparison. Just like with the two Grand Prixes…Pixies…ah crap!! Two Pontiacs from before, focal length was the answer. I opened the lens all the way to 24mm and started to move into the cars until they filled the right portion of the scene. I then moved around until the background elements were in the best places within the frame. This was where I set the tripod down and then fine-tuned the composition. In doing that, I brought the lens back to 26mm to get the right framing on the ridge to avoid dips in the trees while still including the full background elements that I had chosen to keep. I moved a little to the left in order to kick the cars out of the center of the lower half of the frame for a bit of visual tension. There happened to be a little recess on the distant hill that ran right between the cars that effectively linked the foreground and the background. I dropped the camera kind of low (I was on a hill, so already elevated above the cars) to reduce the distance between the foreground and background to keep them related. After all of this compositional waltzing, I managed to get this composition which I really loved.
I did a series of images using aperture values of f/5.6, f/8, and f/16 to give me a variety on depths of field. I knew that the changes would be subtle because of the distance to the foreground, but it did give me just a bit of wiggle room on how soft the background went. There was very little difference in the two wider apertures, and it was the f/8 shot that had the best looking clouds. That turned into the keeper of the bunch that I shot here. I really like how it turned out especially because the grass nearest to the cars was yellow which offered a very nice contrast to the colors in the scene. The best part was that it was so much better than the photo I had shot a couple of hours earlier under a much flatter sky. Had I not had this sky happen, I would have been fine with the first shot, but it would have most certainly needed to be done in black and white to get the sky looking right. This one worked perfectly in full color and had that added benefit of having much more visual drama with that sky.
ADD moment alert!!!
“Had I not had this sky happen, I would have been fine with the first shot, but it would have most certainly needed to be done in black and white to get the sky looking right.”
You remember that sentence? Come on….it was like two seconds ago for you. It was more like 15 minutes ago for me though. You see as I was typing that sentence out, I was thinking back to when I was culling the images. As you know from other blogs that I have done, I will cull from the last to the first image with the logic that the later images will usually be better which means that looking at the better images first will make my culling much more efficient. It does, but there are times that I lose sight of what I wanted to do with the earlier photos that might have been shot under different conditions. As I wrote that sentence above my mind diverted from the task at hand which was typing. I still did it, but I was thinking about what the photo would have looked like had I processed it.
I knew that the RAW file had a dead white sky, and it looked rather blah. I also knew that there was plenty of information in in the digital file to pull the bit of interest in the sky that I had seen at the time. Well, as they say, curiosity killed the cat, and I took a break from typing to go back into Lightroom to look at what information I had captured. I went through the first three shots of the day which were of the two cars on that ridge. I really wanted to make this a learning opportunity for me to help me understand the limits of my equipment, skills, and techniques. This is what I started with.

As you can tell, there wasn’t much visible in the sky, but I could tell by looking at the histogram in the camera that the RAW data was far from being clipped. The addition of the grad filter really helped to keep that part of the exposure within reason while I got the shadow detail that I needed with the cars in the foreground. I don’t usually include the RAW images, but once again I am listening to Toni who suggested that I do some training on how to work a photo like this. Consider this the feeler for whether or not I decide to do something online to show the process I used to get this photo edited. There are several things that you can see straight away with this completely original file when compared to the edited version that I am about to show you. The first and most glaring thing is that when it comes to my compositions, I do those in the field and not later on in post. There is just a slight tweak to the left side where I had to bring it in slightly to address the ridge in the treeline to the extreme left that I missed when looking through the camera. That little dip was a bit of a distraction, so I moved the crop in a few pixels and from the bottom to keep the aspect ratio the same. The second thing that you will notice is that there was nothing here that needed to be cloned out or removed. I embraced all aspects of the composition and framed it in a way that left nothing to distract from the main interest.

After only 15 minutes of playing with this photo and doing some pretty intense dodging and burning throughout the frame, I found myself looking in awe of what I had created. To make sure that I wasn’t falling victim to spending too much time in front of the computer, I called for Toni to come down and look at the new edit. You know she is a great judge of whether or not my black and white photos are any good and when it comes to this kind of subject, if she likes the photo even a little bit, it has to be really good. Well, she loved it and pointed right to the sky saying that was her favorite part. She wasn’t wrong at all. It was the sky that was going to make or break the shot, and I knew that when I framed up the composition in the first place. I had managed to pull all the detail out of the clouds that I had intended with just a handful of local masks.
Since the sky was her favorite part, I toggled between the original and the processed version to show her what I had started with. That was when she got really impressed with how it had turned out and suggested that I do a demonstration with it at some point. It would actually be a great example of showing not only how to get the most out of your edit, but also to amplify the point of getting the right image captured in the camera that gives you the data that is needed to create the final image.
It is funny that here I am on the last blog entry talking about the second round of photography for this property and I just got to thinking about a photo that had been shot in the first few minutes of the day which I had completely dismissed during the first round of culling. The photo was shot quickly while I was still in a panic mode for having so much in front of me and not knowing how the weather was going to turn out in the near future. Now that I am looking back on it and not really thinking too much about how the later versions of the compositions turned out I really see a lot of merit in this original shot, especially when done in black and white. As far as mood goes, I think I like this one better than the latter version. It all comes down to reaction, and why we have to listen to our gut when engaged in photography. My logical plan was to start at the bottom of the hill to allow for no sky in the photos, however, as I walked out into the field, I was drawn to this shot that was going to be very dependent on the sky. There was just enough detail in it to be able to see with my eyes, but nothing dramatic. I did know what I would be able to do in post with that sky though and that was what made that composition make sense at the time. I was seeing a moody piece which was different from the more dramatic version with the stronger sky. They both said completely different things and I think would affect a wall and space very differently for those that would choose to have a print of this scene shot about two and a half hours apart.
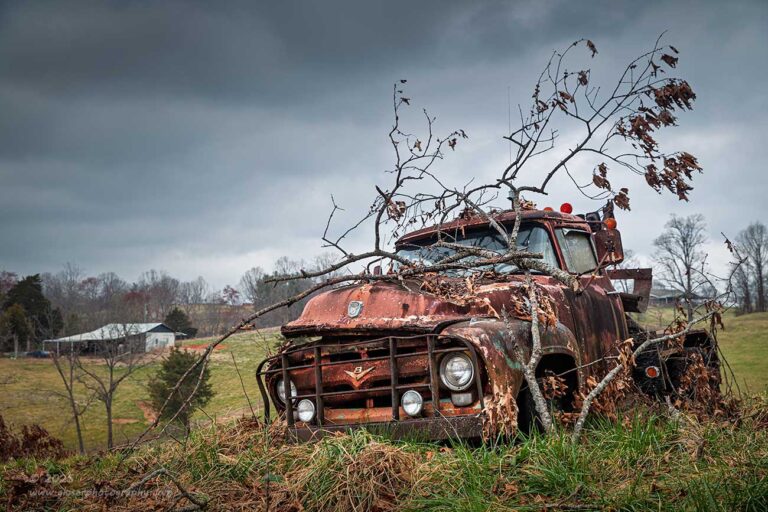
OK, I’m done with that quick interlude, and I hope that you understand why I decided to add in that new photo to what was already a pretty image intensive day. I’m back on track with where this blog was headed in the first place. Now that I had successfully captured the two cars on the ridge, I decided to move back up the hill to the tow truck that I had spent so much time with at the start of the day. Because of the fact that the truck was sitting so high up on the hill, there was going to be a lot of sky included in the shot and I needed that texture to make it work. The original version was set up in a very similar way to how the black and white one was done with the two cars. I shot it knowing that I could bring more detail into the clouds and give it that same kind of look.
Hang on while I go back into Lightroom and see how that edit would look.
I’m kidding, I’m not going to do another edit on an early photo. First of all because the sky takes up too much of the shot and I think it would just not work as well as the color version. Second of all, I messed the shot up as I was trying to minimize the sky at the time. I clipped one of the branches at the top of the frame. It wasn’t bad, but I wasn’t able to see it at the time because of how low the camera was and the angle that I was looking. It would have been easy enough to digitally trim the branch, but I didn’t think that the juice would be worth the squeeze for that one. It was the shot that I was working on at this point in the day that I knew was going to be a winner.
I got in roughly the same position as I had been before and slid in the same grad filter that I had used with the last shot to control the sky. I carefully framed up the shot, although I was a bit wider this time to capture more of the sky, so I didn’t have the issue that I had with the original attempt. There was a total of four frames captured here as the clouds moved across the sky. I knew that I would get a different look with each passing moment, so I stuck with it for a while. It was that last shot that I made where I felt that the clouds were as good as they were going to get with the brighter area centered behind the truck. This is why I do my culling from the last frame to the first frame. Each of these shots were very good, but it was that last one that I felt was good enough to move on. That was the first one that I went through culling and the previous three were no better, so I didn’t mark them for any follow-up looks. You would be amazed at how doing it in that order cuts out a lot of unnecessary time spent going through the entire library of images from the day.
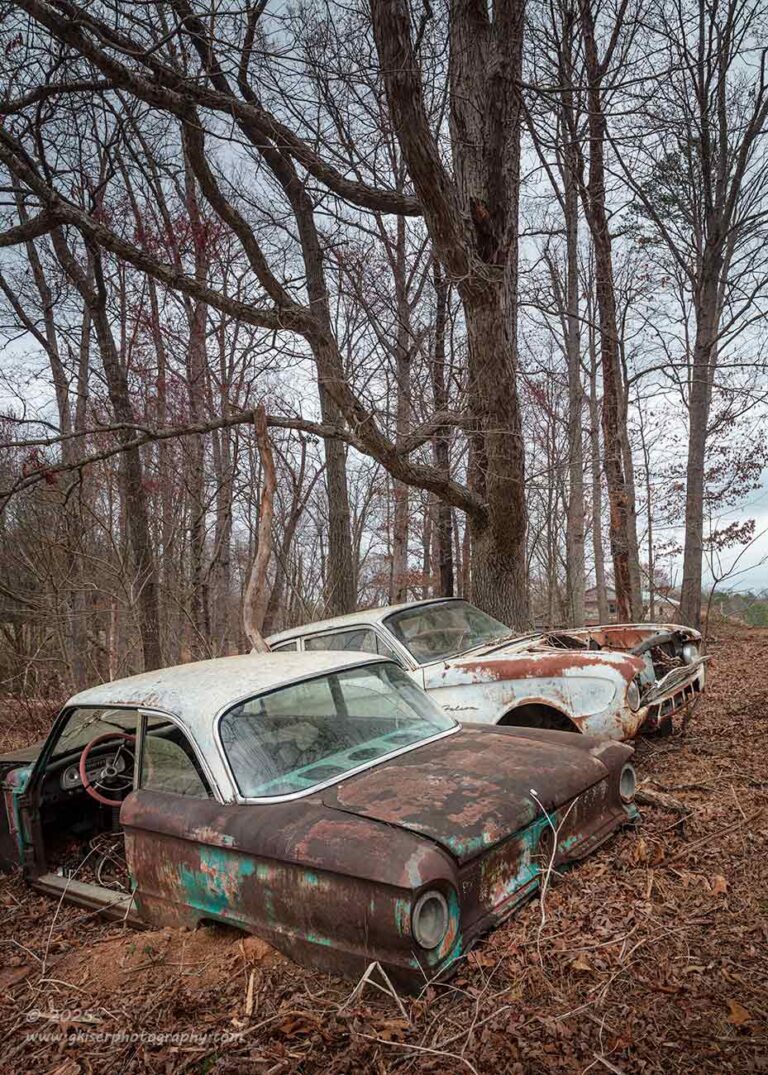
Now that I had the two photos that I wanted of the sky done, I decided to go back to the two Falcons that were at the entrance to the rear part of the property. These were the cars that I was looking at when Robbie came out to chat with me. There were actually three cars close together, but I don’t remember what the third one was. What I do remember was that there was no way of getting the nearest Falcon photographed as an entire car with that other car in the way. The idea that I had for the two Fords was a tight crop that clipped the missing fender on the nearest Falcon but concentrating on the open door and steering wheel for a framing element for the composition. The other Falcon would be positioned in a way that allowed the fender emblem to show between the two cars. It was a small detail, but I wanted to have that included since both of the cars were Falcons. Of course, the composition at this point was a little off balance without the front of the nearest car being included, so I needed to pull the attention from that aspect by including something else in the frame. It was the tall trees that had come to mind while I was talking with Robbie.
There was one tree in particular that was more dominant than the others which would become a focal point for the whole composition. It also dictated a strong vertical frame for the shot to put more emphasis on the tree. This took a lot of the visual weight off of the nearest car and therefore the fact that I had to crop in tight to the front of the car. The composition became less about the one car and more about the pair of cars which neither could be seen in their entirety. The focus of the frame became the line of glass that led up to the tree and into the sky. It was an elegant solution to a compositional issue caused by the car just out of the frame to the left.
An interesting side note for this one also comes from the book of the Photo Wench. When I was going through the photos for her on that first night, she looked at this one and said that there looked to be a nest in the tree the way it was shaped. She added that she thought that it should be titled “Nesting.” Having not seen anything that looked like a nest in the photo, I initially thought that the title was a bit random, but as I considered it further, I started to like it. The cars were both Falcons which are birds that live in nests. They were packed closely together which is kind of the definition of nesting. Nests happen in the trees, and these two birds were cuddled right in there with the trees. The title made sense, but I did have another photo with that same title, so I made a slight change to make it unique to this one. So, once again, we have Toni to thank for another aspect of this trek.
Now that I was fully involved in the back area of this property, I went back down the hill to look at the one Pontiac that I had shot earlier that was partially sunken in the dirt. I didn’t like how I had left it earlier with the post in the middle of the door and a pretty bland broadside composition. I went down there just knowing that I could figure out something else to do with it. When I got down to the car, I was a little turned off looking at it. There wasn’t really much else that I could do with it that I hadn’t already tried. It was kind of landlocked in a way that there were no choices on angles to work. In the end, I didn’t even get further than trying to figure out rough compositions with it. I ended up walking past it to check out to other cars in the woods a bit further into the property. These were kind of in a similar position with no good angles available which would give a clear view of the car.
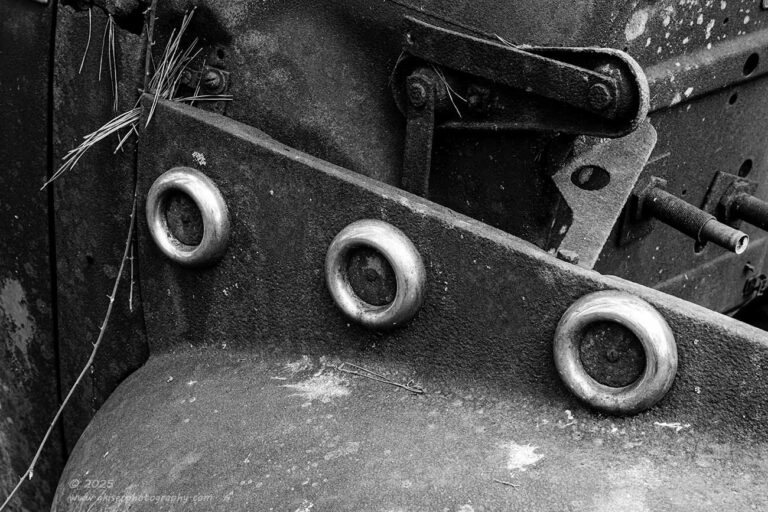
It was seeming like I was about done with the day and had shot everything that I wanted to. I started to look through the 94 frames that I had captured up to this point as a refresher of all the compositions that I had shot. There were a lot of different photos that I had already forgotten about, and a few that looked better than I remembered. One of the ones that I came across was a closeup of the fender and hood hinge of a Chevrolet with maybe a bit of Buick mixed in, or the other way around. I had two different compositions from that area of the car, and neither was really all that strong, but I saw a chance to blend the two compositions together for something a good bit stronger. Since that car was about 100 feet away from me, I walked over to it and made my way through the brush one more time.
I was using the same lens as I had the first time, but I took the angle from of the photos, and the framing from the other to come up with a hybrid shot that represented both of the previous ones. I liked this one much better and the cropping points made a lot more sense with this framing. I also liked the diagonal aspect of the three rings along the top of the fender. The few pine needles really set it off and told a lot more of the story than I had originally anticipated. Of course, because this shot was largely monochromatic in full color, I decided to make it black and white to concentrate on the tonal variations rather than the slight color shifts. This worked very well and really brought attention to the textures of the rusted metal.

Now that I was happy with the close up shot, I worked my way back out of the woods and started up the hill. I was looking at the two cars on that ridge and kept wishing that there was a way to get a more simple shot of a single car there rather than the two parked opposing each other. Then it hit me. From the angle that I was looking, there was a decent chance that I could use the Galaxie to completely mask the other car. This had not been a possibility earlier under the really bland sky, but now that the clouds were present… I moved over to the car and got in close to the Ford so that I could get a nice wide-angle shot which would shrink the car further away. I then got the camera placed really low to the ground and started to play with the angles.
The long and swoopy body of the Ford didn’t really like the wide-angle perspective as it amplified the length of the car. I had to really work the camera position to keep it flattering and to keep the other car out of the shot. You can’t tell it, but both the trunk and the front of the car lined up perfectly with the top edges of the Ford and I had to work the camera down to that precise spot when the rear car dropped completely out of view. Any lower and the Ford started to look odd, any higher and the other car was seen. Any closer and the Ford would look very distorted while if I moved back any more, the other car would be visible right over the top of the Ford. I’m really good at this composition waltz, and it is the only dance that I can do….trust me on that.
Now that I had the composition and the camera placement figured out, I slipped in a 2-stop grad filter because I didn’t need much help with the sky, but I didn’t want it to be brighter than the car. It was already going to be a similar color which would make it compete with the car visually. If it were brighter too, it would just win out for the visual attention and force the eyes out of the frame. By lowering the exposure of the sky, I was able to keep the attention on the car more. In post, I pulled down the saturation in the sky which put more emphasis on the car. By adding to the clarity of the car for contrast, the car won out as the place where the eyes went first in the frame.
I really love this shot for its simplicity and elegant lines within the frame. I also count it as a huge accomplishment for visually eliminating a car that was just as big and parked very near this one. It was a game of millimeters to get everything in the right position, but it was well worth the effort and time spent for this end result. Had it not been for the sky, there would have been no way for this one to have worked out though because the sky was such an important part of the scene and filled up so much of the frame.
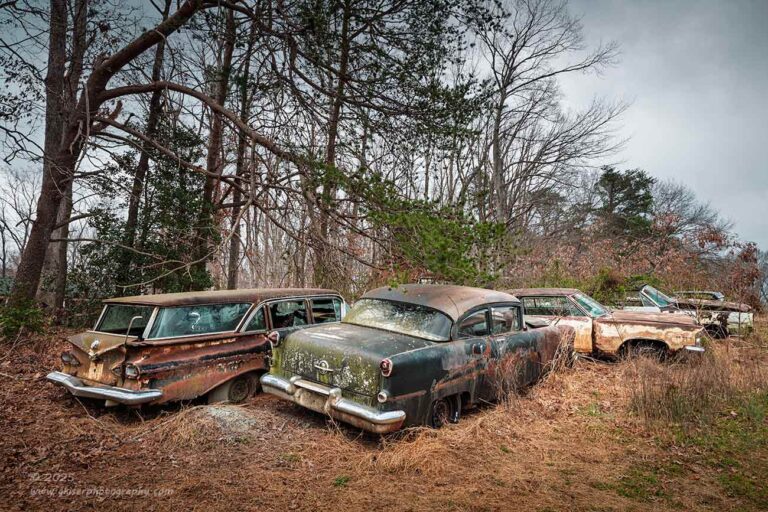
After getting that Galaxie photographed I went back up to the Oldsmobile that I had shot previously with the Grand Prix right in the front. I still wanted to get another view of this car, but it was in such a tight place that I wasn’t sure I would be able to do so. I had the right angles before which allowed me to get the entire car. There wasn’t much there that I wanted to get isolations of which left me with the question of what I wanted to photograph. I didn’t really have a good answer for that. I did like the wagon next to the Olds as well, but that one wasn’t working very well when it came to isolations, and it was another one that didn’t work well as an overall shot.
As I stood there pondering what I liked about the scene, I was left with the idea that I just liked the scene as a whole. From where I was standing, I could see the Oldsmobile and the Chevy wagon clearly. There were several Pontiacs further up the hill that added to the background and helped to tell the story of the location. Once again, the sky made this composition possible because there was going to be a good bit of the frame which was going to be nothing but sky. I did have a lot of trees to add some texture and fill the negative space which I really liked. In fact, the way I was seeing the composition the bright sky would actually pull the viewer’s eyes from the two cars in the foreground through the line of Pontiacs and then up into the sky to hit the curve of the trees and come back to the cars again. It was a very effective composition the way I was speculating it which prompted me to look for a place to plant the tripod.
Since I had a lot of cars here, I wanted to keep the emphasis on the ones at the front which meant that I need to go with a wide-angle approach. I went with 24mm and got in nice and close to the Olds. I used the dominant tree to the left as the framing element for the shot, but had to keep it close to the trunk because there was a house just on the other side that I didn’t want creeping into the frame. Since that side of the frame had an element that was very closely cropped, I had to do a close crop on the right side as well. This worked out fine because at that point in the composition, only the fronts of the cars were visible, and it was more like patterns rather than full subjects. The cropping on that side made the frame very balanced. The rest of the composition worked like I had envisioned as far as how the eyes went through the frame.
With that, I had been on the property for thee and a half hours. This was a lot longer than I had anticipated, but I had missed any appreciable rain other than the mist that I had when I had first arrived. I had shot a total of 103 frames and ended up with 25….so scratch that, 26 keepers. Essentially a quarter of what I had shot were photos that I ended up processing and editing. That doesn’t usually happen, especially when I am moving as quickly as I was to start with. I’m still really impressed with how this trek went and honestly very surprised at how this location unfolded. I had really thought that it would be good for a handful of isolations, but it has turned into yet another epic experience with rust.
Thank you all for joining me for the third three-part blog experience dealing with old rusty cars. I wouldn’t blame you if you decided to go and get your tetanus booster updated. It probably is a good idea after all this rust that I have exposed you to. Hopefully it was worth it, and you have really enjoyed the photos and the stories that have gone along with each adventure. I do think I will be taking a little bit of a break for a while and trying to avoid doing these intensive treks. If I can get a photo or two from a location, that is all I really want to do at this point. I’m tired of sitting down here for days on end typing out blog, after blog, after blog. While it is a great indicator of how active I’ve been during the course of a year, I do need to slow down so I don’t wide up in a state of creative exhaustion. I do have to keep in mind that I have workshops coming up that I need to be fresh for.
With that being said, I’m going to wrap this up and go upstairs to spend some time with the Photo Wench who had been patiently waiting for me to finish this entry which has now taken about six hours worth of typing.
So, until next time……