Tuesday, March 4, 2025
OK, for a bit of context. We are now in the third part of what was supposed to be a relatively simple trek so that Toni could do things around the house without me being in her way. The weather didn’t cooperate, and my intended location didn’t pan out. Where I ended up was almost a Hail Mary and I really didn’t think that I was going to get anything great from there. If you’ve missed the previous parts, you can catch up and see how it all started, and were we last ended up.
When I last left you yesterday, I was talking about the fact that I had walked through the one property but hadn’t bothered getting the camera out to do any photos because nothing was really jumping out at me. So far, I had spent all of my time with the camera in the neighboring lot where all the cars were packed together like sardines. It was not the easiest of locations to compose images, but it was a good place to work on some isolations as that was all I really had room to do. Once I made that determination, things really started to come together for me in terms of getting photographs. I was starting to see the end of the possibilities in the current lot and was wanting to get back to the first group of cars to see if my new direction would serve any better up there. Before I left, I figured I owed it to myself to make one more walk around to see if there was anything I had missed or if the light was looking better on anything that I had already shot.

One of the first stops that I made was back to the green ’72 Road Runner that I had spent so much time on earlier. I was still really happy with the shots that I had made of the scallops on the hood but felt that I might want some extra interest to the photos when I got home. While there wasn’t much I could do with the driver’s side that I had worked before, the passenger side had a much better fender available for some contrasting colors. The light was looking better on that side now that the sun was higher in the sky, so I decided to work out a shot from this side.
I went through the same type of ideas that I had done before with the other side but opened the frame up a bit so as to include the fender. Of course, this made it to where I was going to have to include the entire scallop to have the scene make sense. I thought that took away from some of the minimalist nature of the original composition, but with the addition of the fender, I thought that the overall effect was going to be just as effective. I was also planning for this one to be done in color with the addition of the blue hues from the fender. Had I done this in black and white, that fender would have just been more of the same from the hood essentially and would have been negative space that really didn’t serve a purpose. With the addition of color to the scene, there was enough contrast between the body panels to establish the fender as a separate element.
I still wanted to make use of diagonals with the scallop to keep things a little more dynamic in the scene. This also set me up for the fender being a triangle with everything supporting the “340” decal in the scallop. it was a more complex composition, but it actually worked quite well, even when compared to the one that I had shot previously. When I got them all home, both of these hood shots made it through the rounds of culling and were up for processing. I went with my gut and did the simpler one in black and white while the second attempt was done in full color. They both worked well for what I intended them to do which prompted me to keep them both. While they are of the same car and essentially the same element, as a bit of wall art, they will serve two different purposes and two different clients.

One other car that I stopped to visit again was the Oldsmobile with the futuristic design. I really did like how this car looked and even though the paint wasn’t a great color and there was limited rust to add texture, there were a lot of aspects in the design that captured my attention. One of the areas that I had admired from afar was the curve of the A pillar at the windshield. By today’s standards that pillar was very slim and there was just so much glass curving around to it. The mirror seemed a bit plain compared to the rest of the car, but that made it more interesting to me. I decided that I would try to frame up something that might just show these features off.
I quickly noticed that there were fewer lines between the body panels than what I normally saw in cars of this era. In order to make enough lines to really sell the composition, I had to include the vented cowl and even a slight triangle of the hood. This balanced out the mirror as it occupied a complex area of converging lines and shapes. For a simple image, this one took on a complexity that I wasn’t really expecting. However, I thought that it worked well overall.
Because of the paint color and the lack of rust around the scene, I went with a black and white presentation for this one. The color really served no real purpose and actually created an image that was just too cool in tone for what I wanted to showcase. By stripping the color, I was left with the essence of the composition showing just what had captured my eye without any distraction from the color.
After I was done with the Oldsmobile, I grabbed my bag and made my way back to the other property to give it a second look. Most of the vehicles over here were parked in shelters or in garages. There were a few that were outside, but they were parked close together as the others had been. There were also several newer cars that I didn’t want to risk bumping into which limited what I was going to be able to shoot. This portion of the property was much more difficult to work with, but I ended up being able to get a bit more creative with some overall compositions that established place within the image. That took me a little while to build up to, and it was more about isolations once again.

In one shelter, there were three cars parked. A mustang with a Fairlane parked behind it and both were blocked in by materials and an ATV. On the other side, was an empty spot with a tarp laid down and a really nice-looking blue Barracuda with California plates. I was very interested in this car, but it was not in a position to really make for a good photograph. I didn’t have room to work around it enough to really look for isolations either. The only thing that I had access to was the front of the car which I liked, but it didn’t really lend itself to a composition where it was.
I had to start to narrow my thinking in order to figure out what part of the car made the most sense to me as a composition. The paint was in good condition, but there were areas where it was chipped off and the exposed metal had rusted. There wasn’t really anything there that I found photogenic though. The only part that I really liked was the deeply recessed grill. As I looked at that aspect, I found that there was a Plymouth badge on the grill close to the driver’s side headlight and under a covered turn signal. The design was interesting and there was a good bit of depth shown in the scene. The car was so far back in the shelter that the sunlight wasn’t able to hit it which reduced the shadows quite a bit.
It was worth a try, so I got the camera down really low and started to frame up a composition that I thought might work out. It wasn’t really feeling right, so I kept moving the camera around until I found the right angle to make it all come together. By cropping in really tightly, I was able to focus on the aspects that I wanted to capture without including anything at all extra. There was a slight bit of color to this scene as there was a blue stripe going behind the Plymouth badge, but mostly this was devoid of color which made it a natural to do in black and white. I didn’t even need to change up the color profile in the camera to show the scene in black and white because even in color that was pretty much all I was getting.
Sadly, this was the only shot that I got of the Barracuda. I would have loved to have been able to work further with it, but it was jammed into the shelter just too tightly to really be able to get any other angles on it. I did check out the Mustang which I would have been able to get a few compositions from, but it was largely rust free and in decent shape. The compositions I would have been able to get were ones that I had shot before of cars with a more interesting patina so there was really no reason to get any more to add to the collection. The other car in the back corner was a total waste because there was not a single clear view of any portion of the car that I could use for a photograph. In short, this side of the property was proving to be very difficult to work with.

Since I was not having any luck with the cars that were out in the open, I decided to look more at the cars that were in shelters. I’ve found that cars inside of barns and garages can be interesting photos if the light is right. The first time I really successfully photographed one was a Buick inside a garage near our house in Winston back in 2019. One of the photos that I captured of the Buick still hangs on the wall in my studio and is still an all-time favorite of mine. I’ve taken the opportunity to repeat that success several times now, and here I was looking at a Fairlane sitting mostly in a shelter with some nice beams on the inside for some added visual interest.
There were some notable issues with the scene that kept it from being one of the first compositions that I tried to work. First and foremost was the fact that the car was positioned right at the edge which meant that I was going to have to get the sky into the composition. This would create a very wide dynamic range for the camera to capture or force me to do an HDR image. Second, the car was in really good shape and had very little in terms of age or patina. Another aspect that I didn’t like was a tarp that was piled up on the floor next to the car which just seemed like a distraction. What I visualized for this car was a low shot composition that included the beams on the inside of the shelter. I needed to be able to include the background landscape for a couple of reasons. First and foremost, there was no way around it in order to get a good establishing shot of the car. Second, I needed the blue of the sky and green of the grass to help balance out the red. In order to get the shot, I was going to have to include the tarp which was fortunately black. This allowed me to kind of let it blend in with the shadows of the background within the shelter. It was going to be a difficult shot to get, but I remember thinking the same thing with the Buick six years ago.
Looking at the scene and how I wanted to capture it, I knew that I had to use a wide-angle lens so that I could get the front of the car to appear very dominant while including a lot of the surroundings. I swapped out my telephoto lens for my 16-35mm zoom which might have been overkill, but I knew I would be in that range for sure. The next step was to drop the tripod down to the ground and get a horizontal image framed up. My first few frames were a little closer in where I liked the perspective, but realized that the car was poking out of the shelter too much and that was becoming a distraction. I backed up slightly and recomposed again.
The exposures that I had taken from the first position confirmed that the sky was going to be too bright for me if I was going to capture the detail inside the shelter. I didn’t like the idea of an HDR image because it was windy, and the clouds were moving quickly. I could have done two different exposures and blended them in post as a composite where the entire outside was a single frame and the car within the shelter was a single frame with no exposure blending going on. Sure, I could have done this, but that would have added steps to the post processing which I didn’t really want to do. Remember, I was planning on this being a single day trek and it was already looking like it was going to bleed over into a second day of work. Adding steps to the computer didn’t seem like my idea of fun.
Since I will usually choose to spend my time in the field rather than in front of the computer, I decided to use the tools and techniques that I had available to me. As you all well know, I really love my filters, and you will see that I pretty much always have my Singh-Ray Color Combo Polarizer mounted to whatever lens that I am using. I also get a lot of use out of their Galen Rowell series of ND Grads which can help control the brightness of the sky and lower the contrast of a scene. Usually, this filter is used horizontally with the division right at the horizon. With the filter mount that I use I am not restricted to that orientation at all. Looking at the scene, I had a nice hard line between shadow and sky, it was just vertical in orientation rather than horizontal. Looking at how much exposure help I needed, I decided to fit the 2-stop hard edge filter on the front of the lens and rotate it 90 degrees. This put the dark part of the filter to the left of the shelter while the shelter and car received no light blocking. Because it was only a 2-stop, the edge on the concrete wasn’t really noticeable at all. It just blended in with the accumulated dirt, so I was really happy with this approach.

The next part of the problem came from the sunlight that was shining on the scene. Now that I had the landscape knocked down by two stops, the car was incredibly bright when the sun was hitting it. Essentially, I had the landscape balanced with the shadowed portion of the shelter, but the exposed part of the car was much closer to the background landscape in terms of exposure. What I knew was that the sky wasn’t going to change exposure with the sun, but the car sure would. Now that I had a composition that I liked, and I had the exposure balanced for the extremes, I just needed to wait for the sun to dip behind a cloud allowing for the car to get dark enough to match the rest of the photograph and make the use of filters invisible.
That took a little bit of time, and once again, I was staring up at the sky blocking the sun with my hand trying to figure out when a cloud might pass by. I spent a total of 10 minutes once I had the composition figured out and the filters all squared away waiting on the sun. As the clouds would move, I would fire off a shot here and there when the lighting looked right. Sometimes I would get something that I would think might work, but there would be highlight warnings going off on the concrete on the lower right of the frame. I would adjust the exposure down a 1/3 of a stop and try again, only to find that the shadows were too dark. I would boost the exposure back and try again when the light was a bit more diffused. This went on so long because I knew that it was going to be the right combination of light and diffusion that would work, and I wanted to stack the odds in my favor that one of the frames would hit. It was actually one about halfway through the series that worked out the best and allowed the most complete information in the highlights and shadows to be processed. I am glad that I committed to this because I had a couple that could have worked, and it was very nice to be able to choose from several good ones rather than just take the only one that worked at all.
After that ten minutes had passed, I decided to move on and see about photographing something else. I moved around to the area where the owner had been working on the truck when I had originally arrived because there were some cars there as well. He was no longer out there so I wouldn’t be in the way. Most of the cars were under covers, but there was a red Plymouth Satellite that was on jack stands that caught my eye. I honestly can’t tell you why it did because it was right next to the shop and parked next to other cars. The background was not good, and it was too high up to allow me to really shoot isolations on much of it. I think what I really liked about it was the sky above. There was still a good deal of blue up there, and the clouds were looking really interesting with loads of texture. I just didn’t know how to capture this just yet, so I started looking for other aspects that appealed to me.
I got between the car and the building and found one of those great stickers that defined an era of car nuts. There it was, pleading with me to love my Hooker. I had to get a shot of this as I did with the Corvette years ago. The lens that I had on was way too wide for this to work, and I didn’t have room for the telephoto that I had been using so successfully up to this point. Instead, I fitted the standard zoom and started to work out a composition. There was a nice little emblem on the pillar that I felt would work to balance out the scene, so I started framing up a composition that featured both the sticker and the emblem.
What I ended up with was a nice triangle formed by the window that repeated a few times through the layers of chrome above the glass. I also took note of the reflection in the glass that was a white grid from the shop window. I played with the camera elevation until the grid made sense around the sticker. Again, I will remind you that paying attention to those little details makes all the difference that you don’t even realize is helping the image.
The hardest part that I had to deal with was the color in the scene. It lacked something in black and white, but when the color was retained, it was too dramatic with all that red. The solution that I came up with was one which I have done many times in similar situations. I used a color profile in Lightroom that desaturates the image quite a bit. This changed the intensity of the red and muted it quite a bit. This allowed me a bit more control as I built the saturation back up as I envisioned it. The end result works quite well I think and it showed me that I could get a shot of this car in the tight confines that I was being forced to work in.

That photo gave me the inspiration to attempt a sky photo with the car once again. I had a different lens in place and found that the standard zoom was a good choice for what I was about to do. I remembered what had worked with the Road Runner that I spoke about in the previous entry, and decided that I would try something like that where I just kind of skimmed the car using it as a foreground of sorts. I knew that the colors would work because it was a very similar setup to how I photographed a Ford Fairlane 500 a while back. I started to look at the angles and found that from the front quarter, I could get some nice trees in the background which I would use as a midground. It would also let me get a view of the fender emblem that identified the car. I liked how it was all coming together but there was a problem. The Plymouth logo on the leading edge of the hood was spelled out across the whole thing. As I have talked about during this adventure, I don’t like randomly cutting through names like this. I had to figure out how best to deal with it.
Of course, I could capture the entire nameplate, but that would end up including the car next to the Plymouth as well as the house beyond that. That would complicate the scene greatly and was not what I wanted to do. My other option was to not include any of it which would mean cropping between the two lights which would lose the dimension of the scene that I was after. After some careful thought I decided that I could cut the name after the “Y” because that would leave three letters which compositionally would work due to the rule of odds, and we are used to seeing proper company names reduced to three letters like this. We would easily recognize what was trying to be said, while the displayed letters were still artistically relevant.
I found another issue that popped up when I started to look at the exposure values of the scene. In order to get the emblem on the fender to expose well enough since it was in the shadows, I was going to have to overexpose the sky which was not something I was willing to do. There was a good deal of exposure latitude represented here and the best option to deal with it was to add an ND grad once again. This time, I was able to use it in the standard way with it being horizontal. I opted for a 3-stop soft edge filter so that I could seamlessly blend the two areas of exposure while getting the most bang for my buck in the sky.
The filter did a perfect job, and the exposure was looking really close to right in the image review on the back of the camera. As I was looking at things, I realized that I didn’t like the trees in the midground as much as I thought I would. They were just a distraction, and the car was not looking as dramatic as I would have liked since it was a nice red color. I decided to lower the camera much closer to the ground so that the car would mask the trees. I also moved in a bit closer to make the car bigger. I kept the same cropping points as I had determined before so that you really couldn’t tell that the car was levitating on jack stands.
Once I simplified the composition, I went back to the waiting game that allowed me to get a lot of variation in how the clouds were looking. The wind was moving them quickly and I could have easily done a long exposure to streak the clouds, but they were a bit thick for that and I would have lost the blue in the sky. Also, they were going from left to right and for a long exposure to really work well, they should be going towards or away from the camera position. That is what makes them look dramatic. It just made more sense to use a regular exposure for this shot and how I wanted the elements to all be present, especially the blue in the sky.
This turned into another ten minutes of waiting on the clouds to do what I wanted. During that time, I shot 18 frames in total, and it was the 16th out of those that turned into the keeper. This trek actually turned into a really good example of why my hit rate can be so great at times and then so lousy at other times. When it is a matter of waiting for the clouds to be perfect, or the light to land just right, there are a lot of exposures that are made because you think that might be the best combination of conditions possible. With photographing detail shots, it is easier to get the right conditions since you are just looking at lighting, and if the day is cloudy, the lighting is constant as well. The two photos that I had the longest investment with were the ones where I was needing the lighting to work while sky was also working for the overall composition. There are a lot of variables when working like that, and it is worth taking that bit of extra time to try and get it right so that you have the best options available to you when you get home.

When I was relatively happy with what I had gotten from the Plymouth Satellite, I went back around to the other side of the parked cars and looked in the shelter that was built onto the side of the house. There was another nice Fairlane parked in there, but the structure didn’t have nearly the character that that the other had. I still thought it would be worth shooting thought because the only real color in the scene was the red of the car. Everything else was a tone of gray with the exception of the grill emblem which was a really nice warm tone. While this car was situated further back in the shelter, the front end was still getting lots of light from the sun when it was not being blocked by the clouds. It wasn’t something that a grad filter could help though. It was going to be another sit and wait for the light to be right. At least this time, I didn’t have to also time it with the clouds being in the right position as well.
While I was waiting on the clouds, I kept second guessing my composition, or more specifically, the perspective that I was using. I had started out down low to give the car a more imposing look, but that put more emphasis on the structure inside of the shelter. I decided that I didn’t like that and after waiting on the sun to do the right thing, I had to raise the camera and start over. That became another series of exposures before I thought that I might have gone too high. I lowered the camera and repeated the routine at a middle height from what I had already shot. It was the third out of seven frames which turned into the one that passed the stages of culling.
When it came time to process the photos, I decided that there wasn’t enough going on with it to justify doing an edit and I decided to go with the isolation that I shot after that series. It was a bit more direct, and I thought had a stronger composition with more focus on the warm tones of the grill emblem.
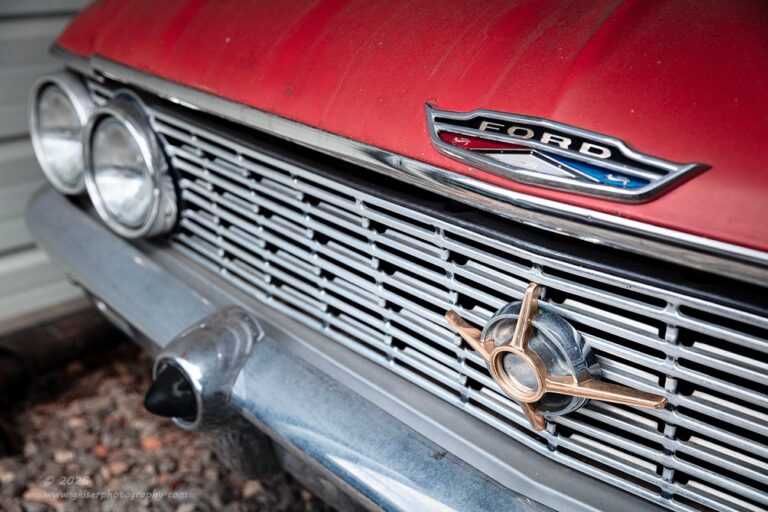
It was this photo that won over the establishing shot of the Fairlane. I really liked the directness and the ability to harness the sunlight that was coming in just on the front of the car. The composition reduced the scene down to the bare essentials that I really liked about it. There was just enough red to set the tone, while I was able to pull some blue into the bumper to balance out the color palette when matched up with the blue in the hood emblem.
It was this composition that turned into my last set of photos from the day. In fact, it was this very photo that was frame 141 out of a total of 142 for the day. I would have never thought that I would have shot that many frames at this location to begin with. I figured it would be good for about six keepers at best and I would have expected to shoot about 60 frames to get that. The fact that my hit rate was actually as high as it was, also surprised me. I was looking at 22 keepers out of the whole bunch, but as I was going back through the ones that I had ultimately dismissed, I gave that overall shot of the Fairlane in the metal shelter a second look.
I decided to put it through the process just to see how it looked. I went with that desaturated color profile that I love so much and that toned down the reds and brought in a subtle blue undertone to the scene. It was no longer punchy at all and kind of felt sterile which matched the environment. I went with one of the earlier frames after I had elevated the camera because with the lower saturation, I needed more of the red to show up in the scene, and this one also had the most even light which seemed to work better here. It was a low energy photo that mixed the modern-day metal shelter with the classic car that had been restored at some point. All of these clues give us an idea of the time frame that the photo was shot and help to tell the story a bit better. It isn’t among the stronger images of the day, but I still think that it has some merit.
With that, I had 23 keepers from the day after 142 frames. I was astounded by this and by the time I was finished with the edits, I knew that there was just no way I was going to be able to get all of this into blog format before the night was up. My initial plan was to go out early enough to get some good photos and be able to have them edited and shared in the blog in time to sit with Toni and relax before it was time to go to bed. Here I am still typing the following day at 5pm. Granted, I am just about finished with the trek from yesterday, but it is safe to say that I’ve gone almost 24 hours beyond what I intended when I left the house.
I do hope that you have enjoyed this trek and the photos that resulted. I would love to match you up with your very own print if one speaks to you. If you would like to join me and learn some of my tricks, I do have some workshops coming up very soon that I still have room in. I also offer mentorship programs to fit every budget and need. If I can help you out, I would love to talk with you about what you would like to improve on. The consultation is free and there is no commitment at all. Let’s see what doors we can unlock for you.
Until next time….