Sunday, March 9, 2025
Welcome back, long time no see. I know you are anxious to see all of the photos from the trek I went on yesterday. Hopefully, you have read through the first part of the blog, so you know how this one came to be as well as having seen the first six photos that have been added to the collection. I’ll be honest here; I had no intention of having so many photos from this trek. Looking from the road, I was thinking I would have six photos in total from a session out there because of how packed in the cars were and with how many of them were in various states of deconstruction. Even when I started to walk around, I was seeing this as a very difficult location to work, but one that was worth a bit of extra time with all the very cool examples of old cars.
I never would have seen this place had it not been for Don Kimmer who pointed me in the direction of a couple of Chevys down this side road. That was the first time that I laid eyes on the property, and it was the start of a year-long attempt to gain permission to access it in order to get some photos. As you have read, I finally lucked out and got the needed permission from the property owner by way of the phone which works great for me. I was now fully involved in getting photos from the property and when we last spoke, I had been shooting for just under an hour. It was kind of slow going because I was having to really think through the compositions and put a lot of effort into getting things right so that I would have solid photographs to work with in post. I never mind taking that time because I like being outside working with the subjects, and there are too many things that can’t be changed once the photograph has been created. If I can avoid the boo-boos at the time of capture, I have a much higher chance of getting a great image once the postproduction is completed.
The photo that we left off with yesterday was a shot of an Impala that was photographed from way down low to get the clouds above it. This was one of those shots that I started a long time ago with a Ford Fairlane where I was struggling to find a workable composition. What I ended up with was a crazy idea that included just a section of the car with a lot of sky in the background. I’ve used that concept several times with varying degrees of success, but most recently it helped to achieve a photo that I am most proud of, that was shot just days before. It really pays to think outside of the box because you end up with new ideas that can lead to photos where there just isn’t anything else to work with.

Now, when it comes to taillights, I always have tricks up my sleeves to capture them. had the down low shot not worked out, I still had my tried-and-true approach to capturing them from a top-down position. This approach gives me great diagonals while showing depth through the inclusion of the rear quarter panel. The trunk often provides a triangle while the taillights end up front and center for the viewer. That is just the composition that I ended up doing next with this Impala.
What I liked about this subject, and why the composition worked so well here was that the Impala logo was present on the quarter panel for a bit of added interest on a panel that would otherwise just be used for depth. I now had the logo and the iconic triple taillights in the shape of a V which was nice. However, that was a bit static in a way, but by adding one more element, I had a triangle in the frame. That element just happened to be the large rust patch on the trunk lid. Not only was the rust a great addition due to the color, which complimented the taillights, it also had that stained streaking on the black paint that I absolutely love to see.
It was these three elements that helped to form the composition, but I ran into an issue with the Chevrolet nameplate on the rear garnish trim. As I have recently talked about, I don’t like cutting through names unless there is a creative reason that makes sense. There was no way to cut this one because the only option was to crop at “CHEV,” but that would cut the trunk emblem in an odd place. My only option was to include the entire nameplate and emblem, but then we start to get into the taillight, so I had to figure out where to cut that part of the frame. The best choice I could come up with was to crop in just as the chrome started to lift up which would hopefully slow the eyes down as they went from left to right.
Now that I had the composition figured out, I made sure that the angle was right and then I did my waving like a funky chicken. Yes, I looked like a total idiot, but the maneuver serves a purpose here. you can see that the chrome bumper is front and center in the frame. My camera is reasonably close to the bumper as well. That means that so am I. By waving, I was able to tell where I was in the bumper and also where the camera was. I was able to move the camera over slightly so that it was in the trees and largely masked by other things in the reflections. I just had to do something about me, which meant dipping to the left and to the right to get out of the frame. Neither of these worked because I was still able to see myself in the bumper on the image reviews. The only option that I had was to get down close to the ground which allowed me to disappear in the grass with my dark coat on. These little things take a bit of extra time in the field, but it saved me time in post as there was nothing that had to be removed in the reflection of the bumper. I would say that it was time well spent.
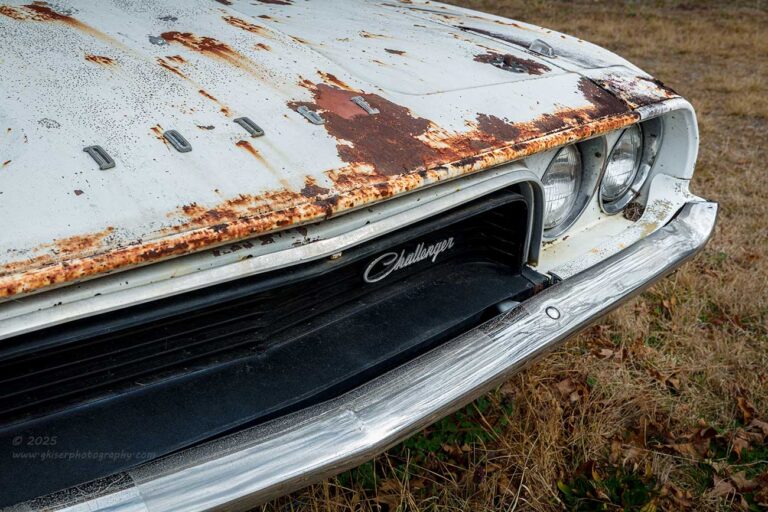
When I was satisfied with the Impala, I moved over to a Dodge Challenger that I had been eyeing for a while. It was a good complete car but parked in a way that eliminated any chance for an overall composition. I was left shooting isolations which isn’t the easiest thing on a white car. My first attempt at a composition was to work on the hood for a bit. There was a nice hood scoop with the motor size designation a bit further down on the bulge. I really thought that I could get something there, but nothing that I tried looked good. There was just too much negative space and not enough proximal connection between the two elements to really make it work.
Not wanting to give up on this car, I moved to the front of it since that was the iconic view of this car. I found that the Challenger emblem was still in place in the grill and started to work out a composition that included that bit as well as the headlights. In short order, I realized that the hood had DODGE spelled out which I had missed originally. Of course, that went well with the Challenger emblem, so I moved over to the passenger side to get the two badges a bit closer together so that they flowed better. This gave me a great opportunity to include the driver’s side headlights which completed the composition. It was a simple one and the grass framed the car quite well. The bit of rust on the white contrasted nicely and complemented the warmer tones of the grass making the white really pop in the frame.
I didn’t have much hope for the composition when I shot it, but after a quick bit of post processing, I actually quite like it. It is simple, yet effective. Thanks to the badges, there is a complete story here and anyone that is familiar with the car can likely fill in the blanks on how the rest of the car might look. I think that is a key element of these kinds of isolations. I’m not just picking a part of the car to photograph, I am picking a part of the car that represents the entire car so that you can kind of complete the image in your head while I get to avoid all of the distractions that would likely confuse the composition if I were to have photographed the entire car.
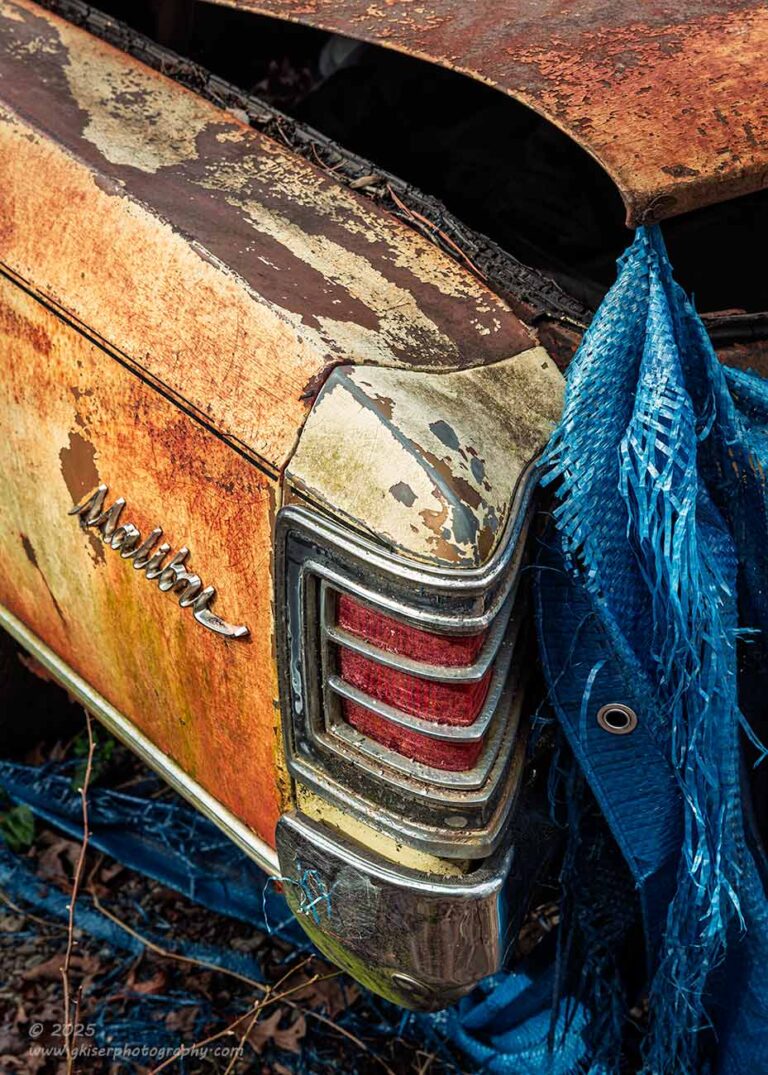
By this point, I was starting to get into the flow of things and was starting to understand how this location wanted to be photographed. I was starting to move through a bit faster at this point because I knew what kind of photos I was looking for. One of the things that I had noticed was that many of the cars has tarps which had been thrown over them some time ago. In many cases, the tarps had become shredded from the wind but still hadn’t faded. The blue of the tarps contrasted nicely with several of the cars which were primarily warmer tones.
One such car was a Malibu that I had never seen from the road. It was a yellow car with some nice orange, rusty patina. Of course, it was not in a location where I could get an overall shot of it, but I was able to do some isolations of it well enough. I looked around the car and determined that I liked the driver’s side rear quarter because it still had the Malibu emblem, a full taillight, and that blue tarp hanging from the open trunk lid. Years ago, I would have dismissed this scene because of the tarp, thinking it was an unrelated distraction. Even asking me an hour before, I might have taken a pass on this subject for the same reason. However, after taking the time to listen to these cars, I realized that the tarps were a big part of the story here and therefore worth photographing.
The color balance that the tarp provided was awesome and I knew I had something interesting with the different textures from the metal, chrome, and shredded tarp. I didn’t like the composition as a horizontal one though. It wasn’t until I flipped the camera on its end for a vertical shot that I found the composition workable. I liked how the trunk corner grabbed that thread of the tarp and let it drape down and frame the taillight while the attention went to the left and spotted the Malibu script. It all just seemed so perfect in the camera. When I got home, I was able to confirm that it was, in fact, perfect. I even liked the draping of the tarp on the ground which added to the overall color balance in the scene. It just simply worked.

Taking that creative lesson and moving forward, I found another yellow Chevy sitting just around the corner from the Malibu. This Chevy was also draped in a blue tarp which had been blown and twisted for quite some time it would appear. There was a pallet sitting on the hood to keep the tarp in place. Obviously, that didn’t really work out all that well. This was another one of those scenes that I typically would never have messed with. However, based on the totality of the location, this scene with all of the clutter was making sense. The tarp and the pallet worked together because of the color of the car. I saw an opportunity to get an overall composition of the car where I actually embraced the surrounding vehicles. This was one of the few times when all the vehicles in close proximity were of similar era designs. There is just nothing worse than photographing a classic American muscle car next to a late model Hyundai with a Lexus sedan in the background. At least there was a cohesiveness to the scene here.
I started to get my framing put together and chose to use a cluster of trees as my frame for the left side, while an off white Chevelle served as the framework on the right side. As long as I omitted the house just over the ridge, I was happy, but I also wanted to capture the blue tarp in the foreground. I really wanted that color balance in the scene, and in order for it to be successful, I was going to need more than what was on the car.
This is one of those situations where I broke the compositional rules to a point. I really should have cropped in closer at the bottom to get the front of the car a bit further off the centerline, but to have done that would have meant eliminating a good portion of the tarp that I needed in the shot. To lower the camera to achieve the proper positioning of the car in the frame with the blue tarp included, I would have lost a lot of the shape of the car and added the houses over the ridge. This would have greatly complicated the scene and made it less flattering for the car. By breaking the rules, I was able to achieve balance in the frame while only including the aspects that I wanted to be in the frame. The only reason that I mention it is to illustrate how sometimes the compositional rules can really get in the way of creativity. This would have been one of those times for sure. I really like how this one turned out.
Now that I was fully on the back side of the property, I realized that I had left my camera bag on the other side of the building where I had been working. Not wanting to be without it for too long, I left the camera set up where it was and worked my way through the brush back to my bag. I grabbed it and worked my way back to where the camera was. Now, normally, I would have just kept it on my back, but it would have certainly bumped into car after car as I was moving around between them. Even though I wouldn’t hurt these cars by bumping into them, I still pride myself on not disturbing other people’s property. I just put the bag down near the building, so it was close and went back to the camera.
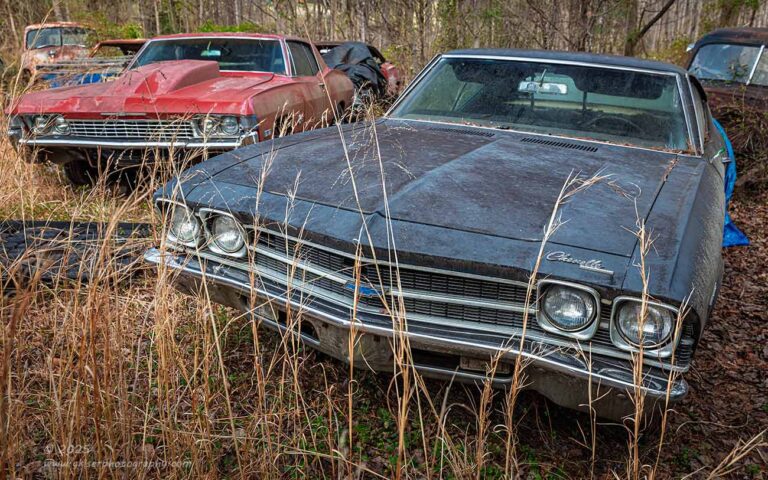
I started looking around for other compositions that might interest me. One that I found was centered on a ’69 Chevelle that was kind of off by itself. It wasn’t quite separated enough to make for an easy overall composition, but I was seeing a similar recipe from what I had just shot in that the surrounding cars were similar in appearance and timeframe. There was one Impala in particular that caught my eye. It was in too good a shape to be its own photo, not to mention it was a show stealing red which would have been too much to fill the frame with. It was a great secondary element for a cooler toned Chevelle.
I picked out the angle that would allow me to capture both cars with the Chevelle in a dominant position. I worked with my aperture so that I had just enough depth of field for the tall grasses at the front of the Chevelle to be in focus with the Chevelle itself. The Impala was just slightly soft, and the background was softer yet. The end result was that I had managed to put more emphasis on the Chevelle despite the fact that the Impala paint color called out for more attention. It was another successful composition in a very complex scene.
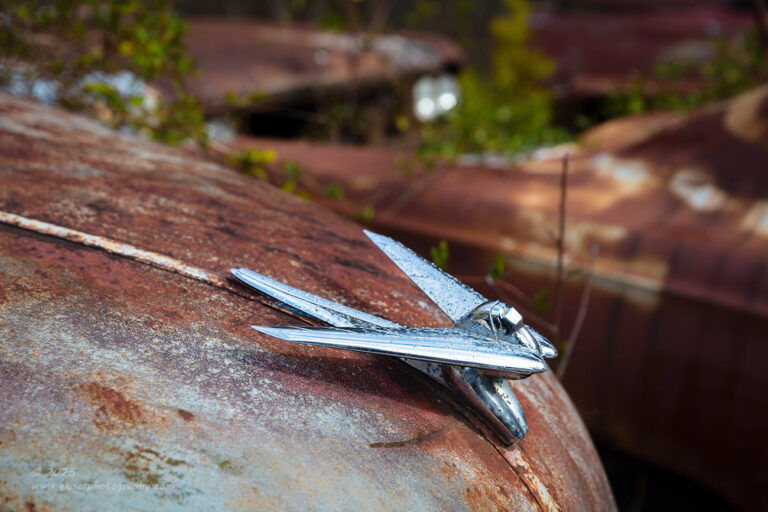
Just behind the Impala, you might see a rusty cab of a pickup truck. This was the next subject that caught my eye. There was no way to do an overall of the truck, and I don’t think I would have if it had been possible. I did like the hood ornament though and decided to give that a try. I started looking at my typical compositions, but it was hard to get in position to capture those because of where all the cars were parked around the truck. It occurred to me that I could actually bring in some of the clutter to help tell the story of this hood ornament where I wasn’t including much of the vehicle that it was perched on.
I moved over to the side and started to get a good angle on the ornament to show the shape of it. I then moved the camera around the changed the focal length until the cars in the background started to separate and fill the frame in a meaningful way. Then it was just a matter of getting the depth of field set to really make the image work. The last thing I wanted was for the background to overpower the subject and if the background was in focus, that would be exactly what would have happened.
The end result was a photo that I was actually kind of surprised that I liked as much as I do. The bits of green and the blue on the chrome balance out the overall warm rusty tones of the image. The blur in the background gives just enough information to tell you what you are looking at but doesn’t require much attention because there is very little detail to examine. The headlights are the only thing that actively pulls the attention, but that gives balance to the hood ornament which I was looking for. At first look, it would appear that there are only two bright elements in the scene and that they are lined up vertically from each other. That is a simplistic reaction from it, but what I choose to see is a triangle that has been developed. The hood ornament and even the trailing hump on the hood make for the bottom edge of the triangle, while the headlights in the background make for that opposite corner, thus forming a triangle within the frame. Now that I have explained it, I bet you can’t unsee it.
At this point, I have spent an additional 35 minutes photographing with 32 more frames captured for the day. You can see that my tempo has increased quite a bit. This is because I was in the groove at this point. While the compositions weren’t flowing freely, they were coming much quicker than they had to begin with. Considering the sun was coming out at this point, that is pretty amazing actually. I was spending more time waiting for the light, and I was taking multiple exposures for each composition waiting for the light to be the best that it could be. Even with that, the 32 frames turned into six more keepers for the day.
Now, the question is, am I finished yet? Well…no. There are still more photos to talk about, and I will get to them tomorrow. So, be looking for the final installment for this one coming up soon.
Until then….