Sunday, March 9, 2025
As you can see reading through the first and second parts of this trek that I was rather busy on Sunday. In no way had I planned on making this a multiple part entry as I figured I would shoot there for about an hour or so and get a half dozen photos from the experience. Obviously, things went much better than expected and we have already seen twelve keepers from this trek. When I was figuring out how I wanted to divide this up to make the parts manageable, not only to read through, but also to type out, I went with the obvious solution of dividing the total number of keepers by three which would keep each entry at six photos to talk about. That is a good number and doesn’t require a lot of time to read through for those that are actually reading my little dear diary entry. The other reason turned out to be a happy accident of sorts that I just keyed in on as I was putting this entry together. It would appear that I had a good mix of images to represent the changing weather conditions through the time I was there.
When I first arrived, it was cloudy, and the light was very even. Those photos were largely represented in the first part of the blog. After that first hour, the clouds started to break up and I spent time waiting on the light to be right for the exposures. Those were mostly represented in the last part. Now that I have the photos put together for this entry, I can tell that the sunlight was much more a factor than it had been in the past. You can see more shadows and I remembered having to be aware of the light direction in order to get the photos. It does strike me as rather funny that the blogs divided up that way by mathematical decision.
Before I get rolling on this last part, I want to mention that these blogs are all brought to you by the same sponsor…ME! These blogs are a labor of love and a way for me to take notes about how each and every photograph that I shoot came to be. I get no financial benefit from them unless I make a print sale off of the entries, or if I sell a service like a mentorship or a workshop to one of the readers. Of course, by getting my name out there, I might also get a booking for portrait services which I offer in the studio or on location. I understand that you might not have a need for any of these services, and your walls might be filled with other wall art (but how could you not have one of my prints hanging on your wall?). There is still a way that you can support these treks and the photos that result. At the bottom of each blog entry and at the bottom of my website, you will see a donate button. This is there to allow you to buy me a virtual coffee. It is a great way to show your support of what I do and will go a long way to helping to fund the time and expense of getting these photos. Obviously, I would much prefer the old-fashioned way of earning a living and be able to match you up with that perfect print on paper, metal, or canvas. This has always been my ultimate goal with my photography, and nothing makes me happier than giving these images a place to live that isn’t digital. While I capture the scenes that excite me, I don’t do it just for me. I want to share my work with others and have others enjoy it, preferably in physical form. I also truly love sharing my passion of photography with others through teaching and feel that I am very good at doing that. These are the reasons that I became a photographer, not to post on social media daily and get likes and comments, though I do appreciate all the feedback that I receive. All I ask is that when you are reading these blogs, there is no paying client on the other end that has tasked me with a job. For going on something like 15 hours, I’ve been working through capturing these images, editing them, and now writing about them. Of course, the year of back and forth that it took to get the permission to access the property is a whole different consideration, not to mention the miles that I have traveled back and forth in the attempts.
OK, OK, I get it, you didn’t sign up to hear a commercial for Greg Kiser Photography, you came here to see the new photos and find out how the rest of the trek went. I’ll get right to it. When we last spoke, I had started working on the far end of the property on the other side of the main building. I was using the standard zoom and for a change of pace, I was embracing the gaggle of cars that I found in front of me. Since they were all of a similar generation, it seemed to make sense. I had also found a great use for the blue tarps that were strown about covering portions of the cars. I had found my rhythm and routine, but kept losing my camera bag which I would lay down in various places so that I wasn’t knocking into the cars with it on my back. The spaces that I was working in were rather tight and the last thing I wanted to do was to damage any of the vehicles.

When I had gotten done photographing the hood ornament on the Chevy pickup, I had turned my attention to the side of the hood near the cowl. This has long been one of my favorite spots to compose an image around with these old trucks. Of course, I wasn’t able to get in close on the side because of the car parked next to it which made my typical approach very difficult to do. The fact that the truck was missing the fender also complicated that idea because the fender was an instrumental part of how this composition was formed. Since I do have a bunch of these photos in my collection, I would have likely left it alone and searched out something else, but there was something about this truck that pulled me in. There was a bit of gray primer that was showing through the flaking paint above the emblem that provided a very needed color contrast to the rich reds of the rust. There was also a vine that was growing along the side of the truck that had some vibrant greens on the leaves which also worked well with the reds. It was the color palette that was present here that really pushed my want for a photo.
I tried to get a composition put together, but I was unable to get close enough to use the standard zoom lens that was attached. Even zoomed in at 70mm, I was nowhere near able to get the composition I was after. I noticed that my battery was about dead anyway, so I needed to get another one, so I might as well swap out the lens for the telephoto once again.
Now where did I leave that camera bag?
I pulled the camera off the tripod to make it easier to go back and retrieve the bag but wasn’t really sure exactly where I had left it. I knew it was propped up on a frame which was over by the woods, but I had apparently strayed further than I thought. It took me a minute or two of looking before I found it, so I grabbed it and did the lens swap and added the new battery. I carried it all back over to where I was so that I had access to any gear that I might need while working more photos. The sun was coming out now and that might cause me some issues that I wanted to have the ability to deal with.
Now that I had the proper lens on the camera, I snaked my way back through the gaggle of cars and mounted the camera on the tripod. Now, I was too close to really make it work right, so I backed the camera up and started working on a composition that I liked. There were several elements that I wanted in the frame which was how I figured out the framing. I liked the emblem, which was the main focal point for the photo. I liked the gray primer because that gave me the cool color tone that I needed. The vent along the cowl was something that I felt was needed in the composition as well for the filling of the negative space behind the hood. The vines were the last touch of color for the image, and I wanted to have them kind of frame the hood emblem. All of these considerations brought me to the resulting composition that you see here. The rest of the process was waiting for the breeze to die down so that I didn’t have any movement in the vine.
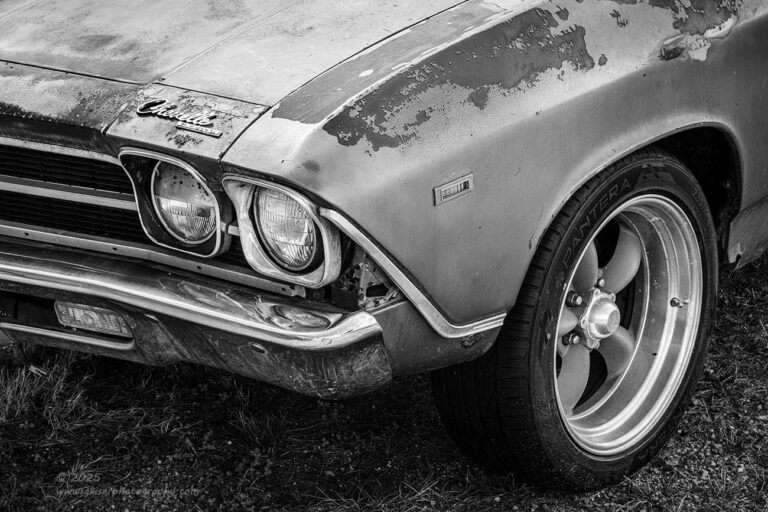
When I got done with the side shot of the truck, I started to look around to see if there were any other compositions that I wanted to try. There were a few more interesting isolations that I thought about, but the sunlight was not being kind to these areas. The clouds were getting more infrequent in covering the sun which prompted me to look for compositions that I could do in the sunlight. I made my way back through the cars and before long realized that I was back in the main area again. Of course, I had left my bag on the other side, so I decided to go get it while I was thinking about it so that it would be closer to me. Once I had that, I started to pay attention to a Chevelle that was parked kind of by itself in the parking area. It was surrounded by buildings, and other cars, but significantly set apart from all of them. To get an overall shot of the car, I would have to include other elements of the surrounding area. I didn’t really like how it was looking, so I started to look for isolations.
Since this was a ’69, I knew that the front quarters were unique and a design that I have started to really love as I have gotten older. When I was younger, I preferred the ’70 version of the dual headlights, but now I like the angled trim better, which flows down the fender. This car also had the American Racing version of the Riddler wheels which I have enjoyed photographing on ratrods for some time now. As I was taking it all in, I decided that I liked the driver’s side corner the best because it had the Chevelle emblem above the headlights which really helped tell the story of this car.
With that, I had the basic idea for the composition and started to set it up in the camera. I was still using the long lens which worked out well to keep me out of the bumper reflection. There wasn’t anything hard about this composition as I had shot it many times over with different cars, but the sunlight was creating a challenge with the exposure. The front of the car was in total shadow and the sun was glinting off of the badge in front of the hood. The polarizer helped cut through a lot of the glare on the hood, but the chrome was another story.
I really did like the composition and remember making the choice to stick with this one and wait for the light to hit right. Looking up and blocking the sun with my hand, I could see that there was a thin cloud moving towards the sun which promised to diffuse the light just enough to make the image work. It would probably cover the sun in the next few minutes, so I sat and waited. I also tried to estimate what the exposure was going to look like with the sun diffused. I moved the histogram slightly to allow for more information in the shadows to where I thought that I would have good image data in those areas and waited for the highlights to come down with the cloud.
After those few minutes the cloud covered the sun, and I could see the histogram drop rapidly. When it got to that spot that I had prepared for, I made the exposure. It looked good with just a little highlight clipping. I repeated and got another one that was better. The light continued to drop, and I ended up having to boost the exposure slightly which brought in more shadow detail than before. I was able to get a few more exposures with the sun looking more and more diffused.
It was the last of six frames that made the cut with the best light across the car. Since the car was a brownish tone and the surrounding grass shared a similar quality, I opted to do this one in black and white which gave me the chance to harness the contrast of the chrome and wheel against the paint. This gave the image the pop that the lack of sunlight couldn’t really provide. By stripping the color, I was able to concentrate on the design of the car which was what I loved the most here.
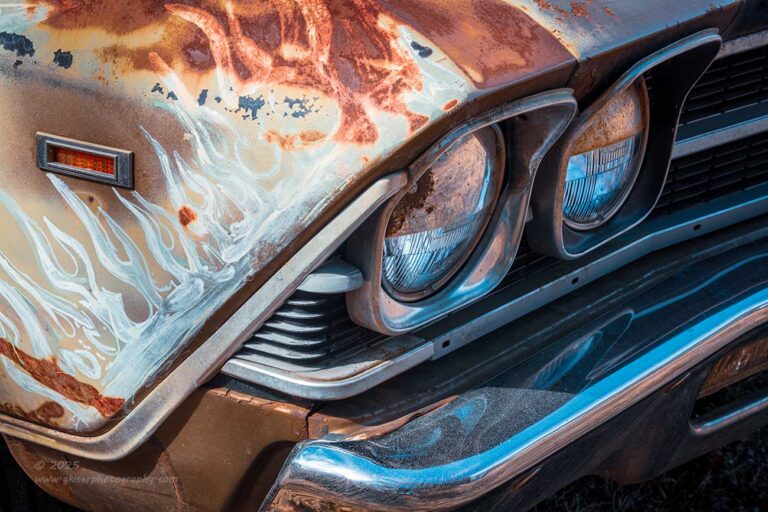
Speaking of the design of the car, I wanted to see what the other side looked like since it was getting the sun more. Of course, the basic design was still there, but the emblem was not on the passenger side. There was an interesting difference here though. It appeared as though someone had started to play with doing a flame job on the front of this car with a brush and some white paint. It was a unique part of the story, and I decided that it was worth capturing. I didn’t need the scope of the previous composition that included the wheel and even the part of the hood. I didn’t even want to get the ground included. All I needed was the headlights because I really liked the design as I have mentioned. To balance that out, I wanted to cut the frame just past the marker light on the fender which would give me plenty of room dedicated to the flame job. I just needed enough of the bumper and the leading edge of the fender to frame the lights and the front fender trim.
This was another one of those moments of doing the funky chicken to see where I showed up in the bumper as a reflection. I made some slight adjustments to my position and managed to get a clean photo without the need to clone me out. There were only three attempts to get this photo with the right lighting and exposure with this being the last one. It had the best balance of highlight and shadow which I Felt was important for this view.
I knew that when I was going to be processing it, I was going to go with a color image because the shadows on the front would be nice and blue which would balance out the warmer tones of the browns and oranges. I embraced that difference by selecting a color profile that really accentuated the differences in tones. There wasn’t much to the processing after that as the image just fell into place very quickly. While it was an experimental shot to see if I would like it, I ended up really loving how it turned out. The flames seemed to transition beautifully into the rust at the top of the fender so that the main design element of the photo flowed all around the headlights which was what I wanted to see happen.

The more I worked with this Chevelle, the more I started to appreciate the color of the car. While I am not a fan of brown muscle cars, this one seemed to work quite nicely. I really liked the overall look of the car and decided that I wanted to get a shot of the entire car before I called it a day. From the front, the lighting was terrible, and I didn’t like the background at all because it was too disjointed. I just spent a minute or two walking in circles around the car trying to let it tell me how it wanted to be photographed. At first, nothing was jumping out at me, but I eventually started to get an idea based on what I had done behind the main structure with the cars. If I were to shoot the Chevelle from the rear quarter, I could frame it between the rows of cars on either side and let the arch of the building provided a secondary framework. The bare trees to the rear would balance out the colors of the ground and the car. The sun was also on the right side of the car to make this work as it provided some nice and even side lighting for the scene.
I thought about my lens choice but decided that the compression of the telephoto was going to be key here. While I would have liked the distortion of going a bit wider, the extra background that would have been included would have overly complicated the photo. The telephoto lens also allowed the body shape to flow more naturally as seen from the rear. With the sunlight being pretty much even from this angle, there was no need for any grad filters to darken a brighter background. All I needed was my polarizer which was already affixed.
It was now just a matter of getting the right camera placement and height to get the composition to fall into place. I didn’t have to spend very long with this because most of the elements were lining up quite nicely at a moderate 85mm with the camera slightly elevated above eye level. To help reduce the distractions of the background, I shot this at f/2.8 which from using that in portraiture, I knew from this distance would get the car mostly in focus, but would throw the background into soft focus with enough detail to recognize what you were looking at.
This is one thing that I can really thank my portraiture work for. After having learned the ropes as a landscape photographer, I have become so accustomed to seeing everything very sharp from front to back. However, in portraiture, it is usually advantageous to limit the depth of field to draw more attention on the subject. Understanding those differences and when to make use of the techniques has made me better at both types of photography. In this situation, the soft background still provided a sense of place, but the detail wasn’t there so there was not a lot of want to explore the mid and background. With the focus being squarely on the Chevelle, that was where the viewer’s eyes would land and remain. Everything else was just a framework for the main subject.
This photo turned out to be one of my favorites from the day, and oddly enough, I started to think about how many overall shots I had gotten of the cars here considering how tightly packed they were. When I started out, I had resigned myself to looking for isolations more than anything, but the longer I was out here, the more these cars were telling me that they were up for some more inclusive compositions. I treat these kinds of images as personal victories in this type of setting. They were not easy to come by, and I had to lean on a lot of compositional history as well as make compromises that I normally wouldn’t have to make them happen. Now that I look back on them, I really see how doing things a bit different has paid off big dividends with the photos that resulted.
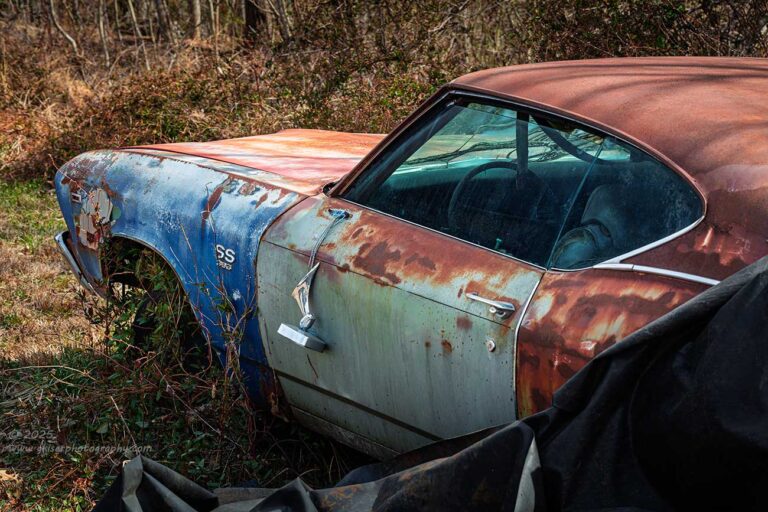
There was another Chevelle that I had started out working with early in the day that I wanted to come back to. Up until now, I had been shooting that car from the front, but I was now inspired to capture it from the rear like I had just done with the brown car. The difference was that this Chevelle was partially covered in a tarp. I know that there are a ton of photographers out there that would have thrown caution to the wind and pulled the tarp off. I don’t operate in this way. I would not advise doing that for several reasons. First of all, this isn’t my property, and I want to be respectful of what I am photographing. I always shoot it as I find it, because I don’t know if there is a reason for things to be the way they are or not. It is not my call to determine what needs to be changed. By not messing with the subjects, I have received a reputation of sorts with these owners that has allowed me more opportunities than I can count to access properties. Many of the places that I shoot have been recommended by property owners where I have shot previously. If I had messed with their property, I doubt they would have sent me over to friends’ and family’s places or allowed me to come back to theirs time and time again.
In addition to having respect for these properties, I also know that if I start moving things around, the whole subject could change. Imagine if I had removed the tarp from this Chevelle. There is every chance that the weathering would be different, and there might be moisture trapped beneath the tarp which would cause awkward tonal variations on the car. Once I remove the tarp, I can never put it back the exact way that it was placed there before. I would be looking at a lost opportunity for a photo in that case. By choosing to embrace the story as it is being told to me, I don’t move anything and take it all at face value.
In the situation of the tarp on the Chevelle, I decided to use the similar angle of the tarp to the rear quarter window to provide a framing aspect for the car. This allowed me to avoid shooting the tail of the car which was positioned next to a trailer and another car. By using the tarp to my advantage, I was able to really concentrate on the more dramatic portion of the car and give more visual weight to the blue fender which I needed for color balance. The hanging mirror on the door was another point of interest that I liked because of how new it looked compared to the rest of the car. It also helped to draw attention to the SS badge on the fender which I appreciated.
The photo came out pretty solid and I liked how the different colors worked together. The black tarp made for a great framing element as I had hoped. Even the sunlight worked to my advantage here by giving a little punch to the hood while letting the brighter door fall into shadows for a bit more balance to the overall tonal aspect of the image. I was really happy that I had returned to this car for another shot at a composition. It just goes to show what the difference in light will reveal as far as compositional options in these kinds of settings.
While I wasn’t really minding the sun too much, this is not my preferred lighting to work with. It makes things much harder to come by and deal with which takes some of the joy out of the process for me. I was figuring that my day was going to be ending here pretty soon since it was pretty much noon at this point. I had been working for about two and a half hours up to this point and I had nearly 100 frames on the camera. While not nearly as many as my last trek generated in similar lighting, it was way more than I had been expecting from this trek. I was also thinking back on the different ways that I had shot, and I was thinking that most of what I had captured had only needed a few frames to get right which meant that I was probably looking at a pretty high hit rate overall. Chances were, I was going to be editing for a while when I got home and would likely have more than one blog to write. While the edits went surprisingly quick, there were a bunch of photos that resulted from the 98 frames that I shot which is why we are coming to the close of the third part of this blog entry.
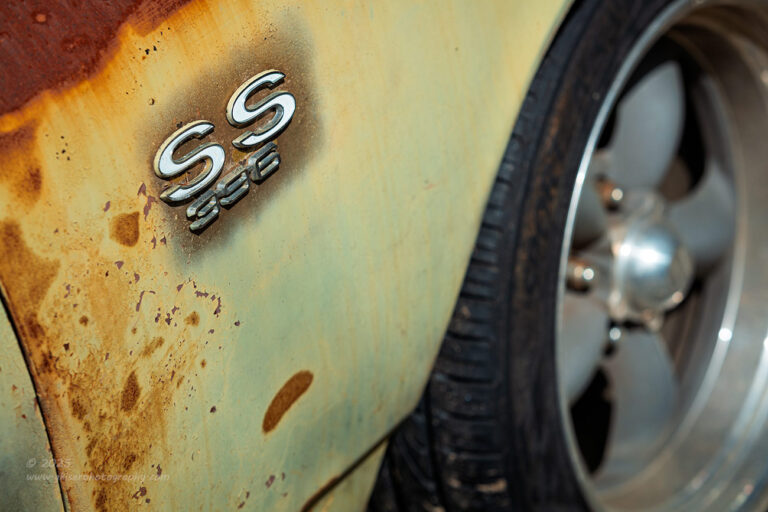
This last photo of the day was back at the Chevelle that I had managed to get the overall establishing shot of just a few minutes ago. I really liked this car and wanted to give it one more try before I called it a day. Something that I had noticed was the fact that the passenger side fender emblem was in a section that was darker than the rest of the fender. This seemed to frame the emblem quite well and I liked that. There was also some great rust starting to show through on the faded fender. I liked all of these aspects enough to start forming a composition to capture these elements. It only seemed logical to include the wheel as well since I do like that design.
I didn’t want to do my typical straight on shot for this because I wanted to add a little visual tension to the frame by picking an angle to work with it. By working up high and shooting down, from close to the door, I was able to get just that angle that I wanted. I picked the crop points very carefully so as to keep the visual balance intact. It was the inner part of the wheel that interested me mor than the barrel or tire, so I pulled in close to the spokes to keep the relative size of the wheel in better scale to the emblem. The darker framing of the emblem really helped to pull the attention to it, and the sea of faded green worked quite nicely with the edging of rust at the top left.
This was another one of those photos that was a breeze to process. In fact, it was the first one of the bunch that I put through Lightroom. I think it took me three minutes to get the base edit finished. It was just that quick, and I moved onto the next one. I would eventually come back to it and finalize everything, but I probably have less than seven minutes in this edit from start to finish. As I’ve said a few times through this blog, all of the edits went very quickly and really showed how good the conditions were, and how well I had picked my compositions. There wasn’t any need to overly manipulate the lighting in any of the shots and I had next to no cloning or object removals to deal with. There was one bungee cord that I removed from the ground, and a couple of sensor spots from images with sky visible, but that was it. Everything else was determined by composition and exposure choices. I’m really happy with how it all worked out.
For this third part of the blog, it represents a total of 40 more minutes of shooting and a total of 26 frames shot that turned into these six keepers. There were a couple of compositions that I tried which failed that you don’t see here, but for the most part, everything that I shot through the day is represented here in some form. There were 98 total frames that I worked through to get a total of 18 keepers which you have now seen all of. To say that this was a successful day would be an understatement. After a year of trying to get permission, I had finally gotten it and spent about two and a half hours getting photos under clouds and sun. There were many times that I had tried to convince myself that it was going to be too hard to get good photos because of how things were all packed in together, but had proven once again, that I can work wonders in these kinds of locations. I can’t help but think about all the times that Dean has offered to move cars around at Outlawed Restorations when I am shooting there or running a workshop. Each time I’ll let him know that I prefer to work with everything in the positions that they sit. There is a certain skill to being able to work in this type of environment and that skill takes lots of practice to be able to stay proficient with. Thanks to never taking the easy way out, I was able to come out here and get the shots…one after another.
Thank you all for joining me and I do hope that you have enjoyed the photos as well as the story behind them. Even though the blogging does take a very long time and can get a little tedious, I really think that it has value beyond just introducing the photos. I love being able to return to these little narratives to remember how a shoot went and what issues I had to deal with. It is too easy to forget those details and just see the photos as easy captures. I also enjoy being able to link previous blog entries and Behind the Camera entries so you see how it all works together in my mind. I try to teach with every chance that I get and treks like this offer plenty of learning points that I like to share for those of you who want to learn photography. I also like to share how many pictures I am actually capturing in order to come up with the keepers that you see in these pages. Far too often, photographers get credited with nailing the shot every time. That just isn’t the case, and I want you to know just how many attempts I have to make in order to get to the end result that you see here.
Anyway, I hope this has been a fun one. I’m hoping that the next few treks are much smaller in scope than these last few have been. I do think that I am about finished with this stint of time in the Northeaster section of the county. It is also about to be landscape time as Spring colors start popping up. Hopefully, I will be getting out to the Blue Ridge Parkway soon for some nice landscape compositions. We will see soon enough I suppose.
Until next time….