Friday, July 10, 2026
Welcome back once again! If you’ve been following my blog entries, you will already know what this one is all about. If you happened to miss the last chapter, I’ll give you a minute to catch up by clicking here. I went into detail about how I ended up in Taylorsville and what I was looking for there. Spoiler alert, I didn’t find those Fords, but I’ll still be looking for them as time goes on. What I did find was a couple of barns that were worth photographing as well as an old Chevy pickup cab that was tucked into the woods just off of the road. All of these scenes were new to me as this was the first time I had been through these particular areas. I teased the next subject that I found which I had photographed a couple of times before in 2024 and 2023. Both of these times happened to be in North Wilkesboro at the same property and under the same tree each time. The last couple of times that I had been there, the car has been missing. I remember thinking to myself that I would probably never get another chance to photograph the car which was a shame. It was a ’30’s Chevy sedan that I really enjoyed working with, but found that since it was under a tarp, I had a very difficult time with getting compositions with it. The location also made it very difficult to get an overall view of the car without the scene looking very cluttered. As with all of my decay subjects, I was content to say goodbye to that car and just hoped that it had found a new life somewhere else.
Of course, that goodbye was going to be short lived as I drove through the main stretch of town on my way to the other side where the Fords might be waiting. The sun was out, but the clouds were thickening up, and it was looking like rain was going to be in the near future. This was expected and I decided that I would take advantage of the variable light as I looked for the next subject to photograph. I wasn’t really looking as I went through town because I’ve been through here many times and the few things that I really wanted to photograph have made their way in front of the camera already. Most of the area was a little to “current” for me in terms of photographic subjects.
As I turned down a short street that brought me to the other section of the highway through town, I happened to catch the unmistakable shape of a pre-war sedan sitting beside of a building. I only had a second to look that way, but I could see rust and it was something that I had never seen there before. I looped around the block and pulled in on the other side of the property to see what this was all about. When I could see it in complete detail, it somehow seemed very familiar to me, but I wasn’t able to place it immediately. It wasn’t until I was looking at some of the details and the copper wheels that were mounted that I knew what car I was looking at. It was the first time I had seen it out from under a tarp, and it was beautiful. The setting was a total letdown though because there was really no way of getting an overall photo of the car yet again. However, I had more options for detail shots and the lighting was very much improved over the dappled light from the tree that it had been parked under.
The way it was parked, there was no doubt that I was going to have to get permission to work the car. Looking at where it was in the parking lot, I figured that it belonged to the building that it was closest too and that was where I started to look for an owner. When I got to the storefront, I could tell that the building was empty and no longer in use as a business, so I went next door to a body shop to see if they were connected with the car. Of course, this made the most sense, but I always go with the closest avenue to find the owner initially.
I found one of the technicians by the main entrance and asked about the car. He said that it did belong to the owner of the building, but that he wasn’t there currently. After some conversation, he had me talk with another technician who knew more about the car and the owner. After that discussion, I was given permission to get some photos of the car. I figured that I would be here for just a short while because after two other times of photographing the car, I didn’t see needing to spend a long time just getting more detail photos of the same car. I would probably be leaving here with a handful of images and would be back on my way South to see about finding those Fords and I had another idea for a stop that I wanted to make once I got into the next town. This was worth a few minutes of my time though, and I was happy to pull the camera out.
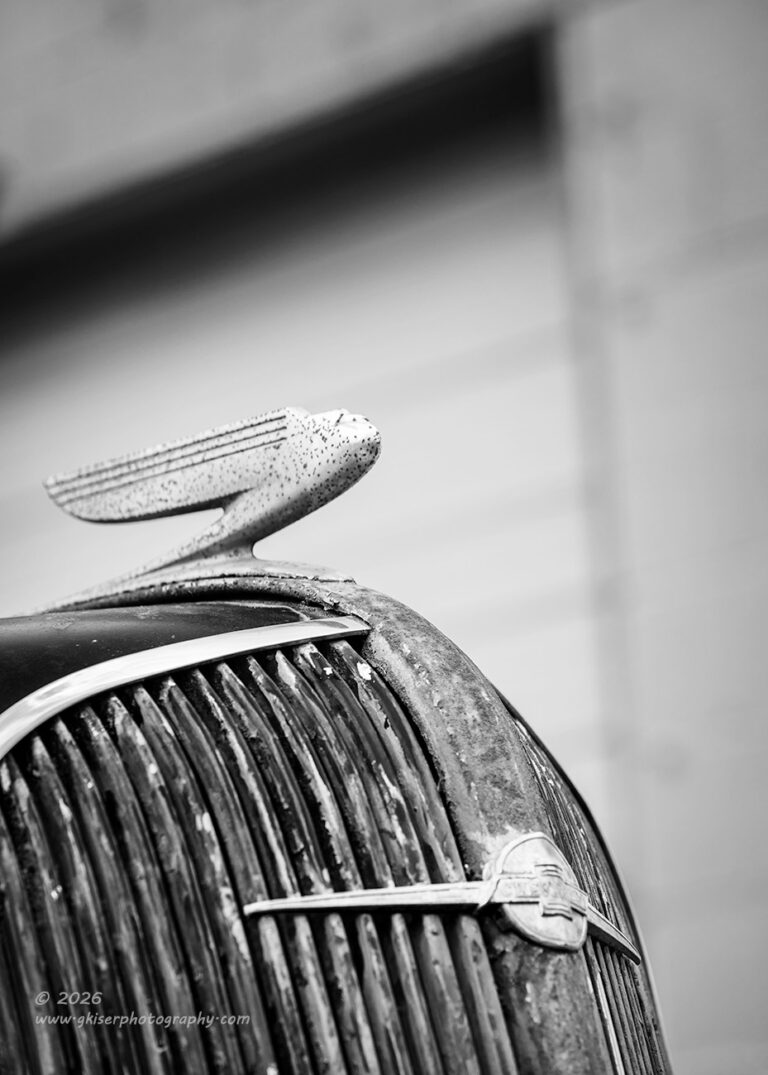
Because of the location of the car and the surroundings, I chose to go with my telephoto lens which I’ve found to be increasingly useful in restricted locations like this. It is a great lens for picking out the details and avoiding the visual clutter around the car. I added a polarizer for glare and started to work my way around the car to look for some new ideas on compositions that I could shoot. Of course, the first thing that grabbed my attention was the hood ornament and the emblem on the grill. I’ve shot these a few times with this car but felt that the surroundings might offer a slightly different look to the photos. I decided to get down low and work the corner of the garage door into the composition for a bit of framing and for the diagonal element. The idea was similar to what I had done recently with both the Dodge under the shelter and once again with the Ford truck a couple of days later.
I liked this as a black and white composition to focus on the shapes, and I wanted the background to be pretty heavily blurred as the only detail I wanted was the main shape of the bat door. This left me with the task of getting both the emblem and the ornament in focus which I thought I had done well enough in the field. It wasn’t until I got back home that I found that I had missed the focus by just a hair because of the angle I was shooting at. It wasn’t off by much, but it wasn’t quite what I had in mind. Because of that, this will never be a portfolio piece for me and I’m not sure it will make a good print, but I liked the concept enough that I felt that it was worth hanging onto for online posting and for completing the story of the day.
While I am always looking to make print quality images whenever I press the button on the camera, the fact of the matter is, I’ll never be able to achieve that 100% of the time. There are some photos that are still very good and help me tell the story of how the other photos came to be. This was one of those that helped to further the story. It shows how I started off very simply and even a little clumsily before I got into the groove of this car. It always takes a little bit of time to listen to the landscape, or in this case, the old car to really know how it wants to be photographed. Had I spent just a minute more with this composition, I would have more than likely gotten it right.
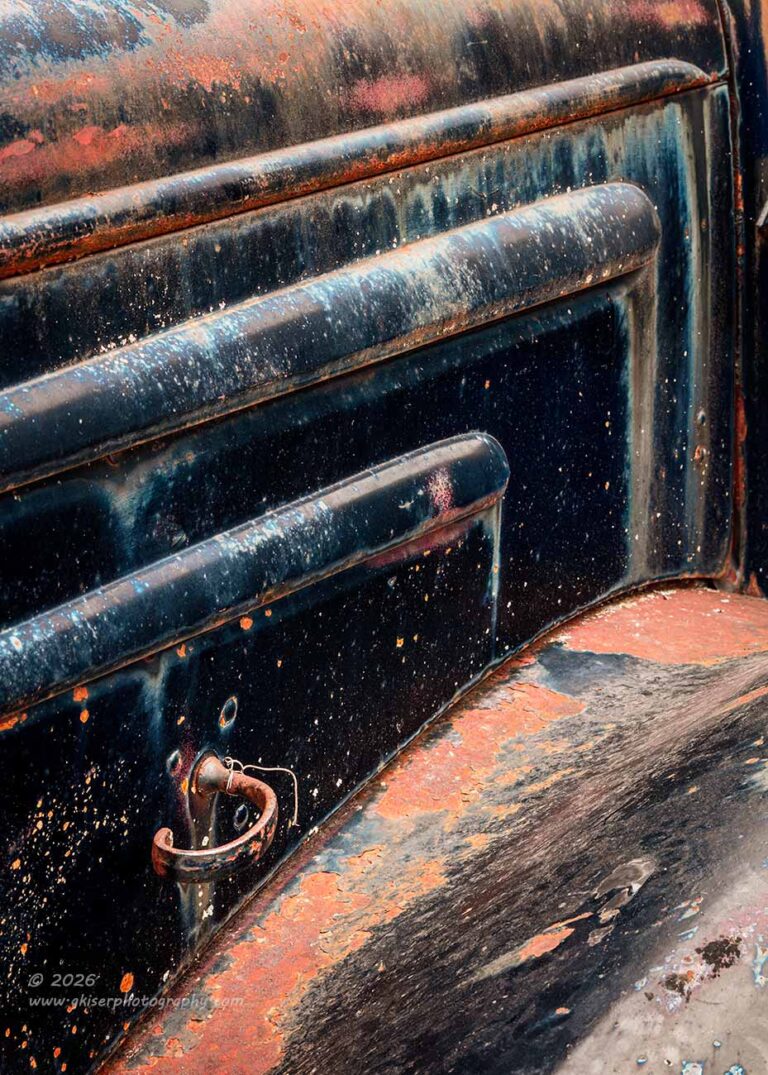
It was a great starting point to get me on the same wavelength as the car though. For that, I am very grateful. One area that I knew that I liked on this car was the side covers for the engine. They had some very strong horizontal body lines that had vertical runoff staining on the front edge. This created a nice repeating pattern of framing on the panel. The handle which was on the lower edge fit into that framing very nicely with the rounded fender giving that final touch. I had worked composition around this feature a few times and had made some compositional mistakes which I wanted to correct this time.
I looked at the view from the front as well as from the rear to see which was going to work the best with the light. It turned out that the better view was from the rear on the passenger side. By elevating the camera, the horizontal aspects of the photo turned into some very diagonal lines which added to the visual excitement. The vertical lines could easily remain vertical to add to that drama with the rounded fender and handle contrasting to the strong lines. I really liked how this was coming along as I was framing it up. I spent only two frames to get it right.
It started to hit me at this point how my hit rate had been going through the day. It was not uncommon for me to have shot ten frames for a single composition while working with the barns earlier. The process was much slower, and I had to wait for light and wind to all come together to make the final image work. Now that the light was more constant and I didn’t have to worry about the wind, I was back to doing two to three exposures to get the right image for a composition before moving on. Things were going much quicker at this point, and I was liking the tempo. It is almost like my version of ADD and it happens when I start shooting details and abstracts on these rusted cars. I can move all around the car quickly and will get inspired with a new detail while shooting the current one. I become a photographic gnat in a way. this is wildly different from finding that establishing composition of a large scene and committing to it for a longer period as the light changes across the scene. Those are the times that Toni gets bored watching me creating photos because each composition can take 15 minutes or more to work out. These detail shots can be done in a matter of a couple of minutes usually.
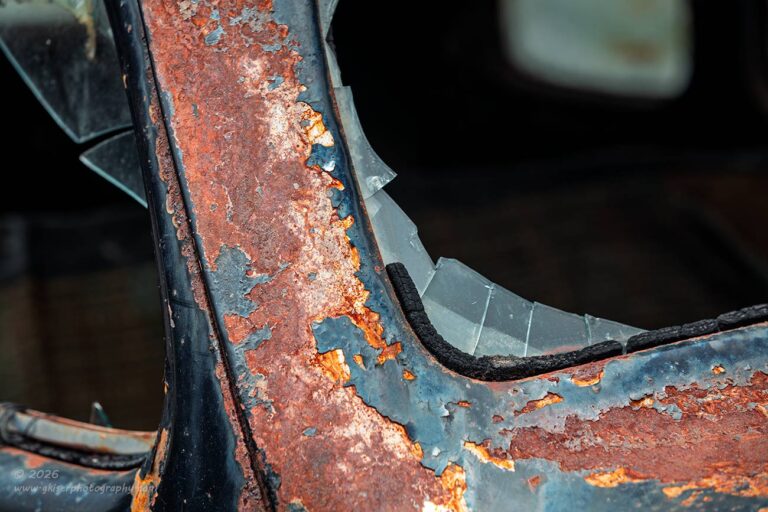
Since I had worked this car so many times over the years, I really wanted to find different ways of seeing it which also fit into my yearly goal of learning to see differently in general. I’ll be honest with you for this next photo. I actually pulled from one of my decay workshops to get the idea for this composition. I remembered that one of the participants had focused on the broken glass that was remaining around the window frame of an old truck. He was having a hard time converting that into a composition, so I started to help him out with that. This is not to say that I’m a better photographer, it was just that he was having a hard time turning his vision into a composition. That vision is one that I had a hard time seeing, but I had a better understanding of composition, so together we were able to create something pretty cool with that subject.
As I’ve said many times before, I learn as much from teaching workshops as the participants learn from attending them. In this case, I saw a different way of seeing a subject that I particularly enjoy photographing which is broken glass. The way that they interpreted the glass was quite interesting to me and I took mental notes of what worked in their concept. Having worked through the compositional end of it with them allowed me to better understand the visual language that was needed here. Those lessons served me well for this composition of the Chevy sedan.
I wanted to have an abstract view of the glass with the shapes being the main part of the composition. I found that the shards of glass in the vent window seemed to flow into the remaining windshield at the lower corner. This gave a nice curve that went through the diagonal of the pillar. Yes, I was using the properties of continuance and closure to get to this conclusion, but it was working. That was the basis of the composition, but I needed to have more involved with it to keep it from being static. This was going to be a great time for some negative space which would allow me to add visual tension by placing the main subject for the image along the left side and bottom of the frame. This left me with roughly half of the image in darkness from the interior of the car. I needed that negative space, but at the same time, I didn’t want it to become empty space with no reason for being there.
The solution came from the quarter window on the other side of the car. By including just a bit of that in the larger dark area of the frame, I was able to create another shape within the frame that gave the negative space a reason for being. By blurring that far window, I was also able to bring in an illustration of depth which added even more to the image. This was all just an experiment based on several different concepts and I wasn’t sure if it would work or not while I was actually capturing it.
It wasn’t until I got the images home and started to look through them that I found that the different textures of the rust and the broken glass fragments worked very well together. In fact, the entire piece worked in relation to showing the shape and flow that I was after. The intersection of the pillar and the curve of the segments of glass were executed perfectly while the visual weight of the image as a whole was very balanced across the frame. In short, it worked out better than I would have expected and I had a feeling that I might be onto something.
By this point, I was really starting to get into the groove of working this car. There had only been seven frames shot and I now had three keepers from those seven. The concepts were getting more complex and reaching further into the realm of art and fine art. At least that was my impression. These small successes fueled my desire to reach further into the creative bank to see what else I could come up with for this car. Not having a tarp to deal with or that dappled light, gave me so many more options with how to photograph the car and I was really starting to feel energized.
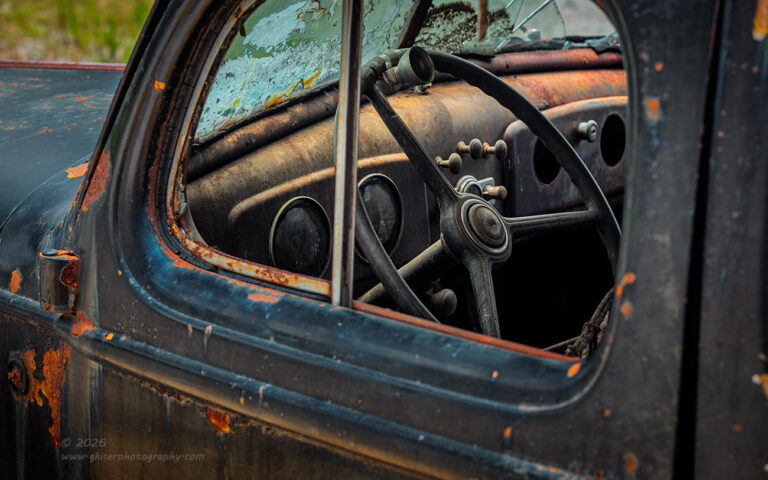
Since I had already kind of started photographing the interior of the car, I decided to go over to the driver’s side and check out the potential for an interior shot. This was something that I don’t think I had the ability to do earlier because of the tarp covering the missing glass. The dash was very simple on this car with some gauges and switchgear mounted into a simple metal dash. In the age of touchscreens and tech, this view was one of pure beauty and artistry in my eyes. Working out a composition on this was something else entirely. Interior shots have always been hard for me. Organizing the elements is a huge hurdle to get over, but then you have the added problem of exposure with the interior being so much darker than the exterior due to the shadows. Glass usually causes issues as well for detail and sharpness, while just giving the viewer something to focus on as an anchor can be tough to accomplish at times.
With the current lighting I had some nice diffusion from the clouds and the white wall of the building was bouncing the light back into the car quite nicely. This alleviated much of the concern on exposure. The glass was missing from the driver’s door which eliminated the concern for having a clear view of the interior. The only thing left was for me to figure out a working composition that showcased what I wanted the viewer to see. Using the concept of frames within frames, I was able to utilize the door, hood, and window openings to frame the interior. I placed the camera in a way that organized the elements within the window centered around the steering wheel which was also a frame within the larger frame. I made sure that everything had its place in the photo and then started to look at the exposure issues. Even with the bounced light, there were still some deep shadows to deal with and some highlights on the car.
Many photographers would likely look at this as an HDR photo and take a series of images to blend in post later. I considered this, and it would not have been an issue since nothing was moving in the frame. However, I didn’t need much detail at all in the deep shadows, only with the dash and the steering wheel which were both getting light from the building and the sky. I know the capabilities of my camera in terms of what range of tones it can capture in a single frame and felt that what I was seeing fell well within the scope of what it could capture. I just exposed to the right, making sure not to clip any highlight and looked to see where the shadows fell. Based on the histogram, there was no crunching of the blacks and that meant that I had room to work recovering the shadows. Since I was working at ISO100, noise wasn’t going to be an issue at all. This is all about getting it right in the field and making the work in post much easier. It is always much easier to work a single frame than blending multiple ones. If it takes me an additional minute or two in the field to get that one right image, I’ll take that over the extra time sitting at the computer processing the image afterwards. In the case of this frame, it was the only one that I shot of this composition because once I actually pressed the button, I knew that I had it nailed right out of the gate.
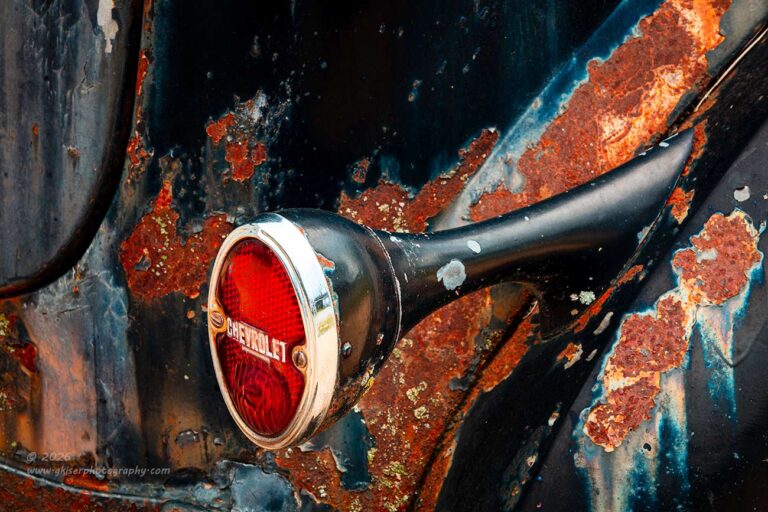
After pushing the envelope of what I was capturing, I stepped back and looked for something a bit easier to capture for the next composition. As I was looking around the car, I noticed the taillight which I had forgotten about at first. These lenses had the “Chevrolet” logo emblazoned right in the middle of the lens. I had shot this before but used it as a framing element for a composition focusing on the copper wheel. I was less interested in the wheels this time and found that I wanted to give more attention to the light. I started to work around the angles to see what worked the best. It was going to have to be centered on the passenger side lens because the driver’s side was broken and while I typically would prefer the broken light, I needed to see the entire logo to make it work.
For this one, composition was the end all and be all of the photo. I couldn’t just snap a photo of the taillight and call it a day. I needed to make the composition pleasing to the eye while giving a visual path through the image. I knew that I needed to include the stem of the light which was just as unique in design as the logo on the lens. With the car being black, I needed a way to separate the stem from the body which came in the form of placing it against the rust running down the adjacent panel. Depending on the height of the camera, I was looking at needing to include the bumper which I ultimately determined to be a distraction. I did find that there were three patches of rust that had some nice staining from runoff that I could use as a framing element on the right side of the frame. To balance that out, I wanted to use the curve of the trunk lid. With all the elements decided, I moved the camera to a position that would allow the light to be in the lower left third of the frame kind of close to the area of interest for the golden spiral.
Now, I wasn’t looking at the compositional rules in a very specific way, it was more of a method to keep me from centering the light. What it resulted in was an angle that stretched the stem of the light through a large portion of the frame. With it against the rust, it stood out and created the shape that I was wanting in the frame. Everything was elegant and flowed well. The composition was balanced and based loosely on two different compositional guidelines but done in a way that felt right to my eyes.
Looking at this composition compared to the one that I had shot before in 2023, I can see where I missed the opportunity that first time. The composition had worked but was too heavily focused on the wheel which was the intent. I had completely missed out on what I think is a far more interesting composition by just including this area as a detail within the photo used as a framing element. It all comes down to the mindset while I’m working a scene. I’m more open to different compositional possibilities depending on where my mind is currently at. I was feeling the artistic end of the photos more than the descriptive side of the craft. All that is to say that I was here for the art, not the subject this time.
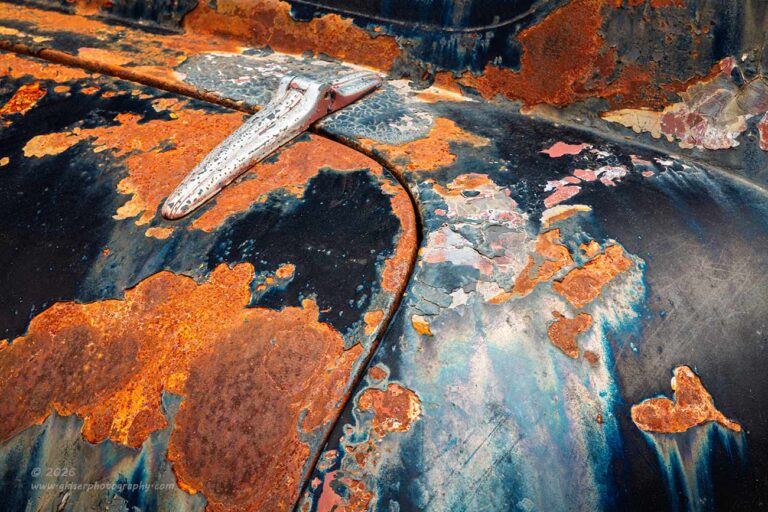
It was the overall patina of the car that really caught my eye on this back corner of the car. I really liked how the staining from the rust had affected the black paint. This is something that I love to photograph when I see it and is one of the only redeeming qualities that I find about photographing black cars. The fact that all of this was happening on a curved surface just made it even better because of how the light was falling off on the panel depending on the angle.
I took a moment to examine the area of the car and found that the hinge was my favorite part as far as being a visual anchor for the scene. I started to frame up a composition that included that as well as a bit of the body line below the rear window and the panel gap around the trunk lid for a bit of structure to the scene. The rest of the frame was filled with rust and patina for a bit of texture and come color contrast.
Part of that color contrast came from the fact that there was still a good bit of blue in the sky above. One characteristic of black paint, especially faded and worn black paint, is that it will reflect the color of the light that hits it. In this case, it was a blue hue that was showing up on the painted surface. Knowing that the rust was a reddish orange, I knew that I had a good color harmony going on and planned to shift the colors slightly to orange and a more teal tone in post. This would bring out the staining quite a bit more than leaving the more magenta tone of blue. I just had to nail the composition so that the photo made sense and didn’t look like it was carelessly snapped in passing.
This is the danger with doing abstract shots centered around rust and panel lines. It is far too easy to come up with a composition that looks haphazard because the abstract compositions can almost look random. The trick is to work out the different elements like the lines and shapes to make the entire composition cohesive and captivating for the viewer. This can be more difficult than capturing a grand scene with leading lines and all that other good stuff that goes along with a larger view.
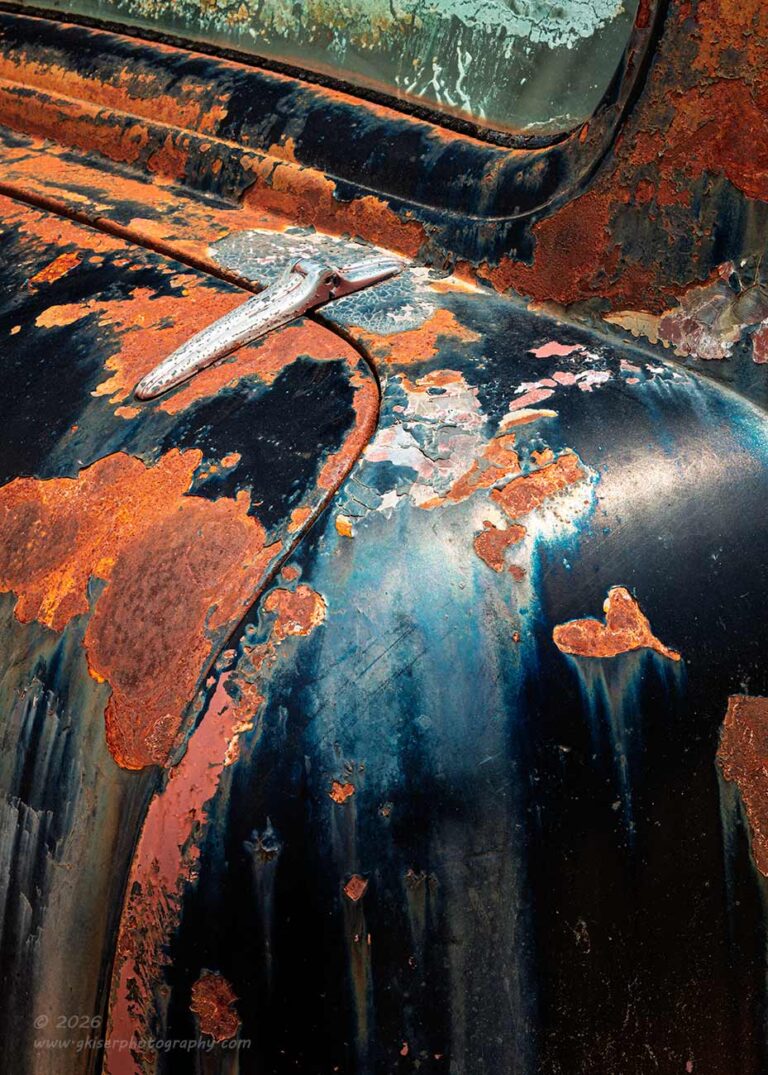
After my single horizontal shot of the trunk area, I realized that I was missing out on the curve of the body that was part of what had drawn me here in the first place. That was a simple fix, and I just needed to rotate the camera to a portrait orientation to get that curve while still capturing the area that I had started with. This brought about a few new considerations in terms of visual balance though. I was still using the hinge as a visual anchor, but keeping the framing similar at the top of the frame was pushing too much weight to the bottom of the photo where there wasn’t as much visually interesting going on. I needed to give that hinge some more breathing room to make the whole image work better.
The solution was to include the lower portion of the glass as a framing element for the entire scene. This brought the attention back to the hinge and allowed the bottom of the image to serve as a natural vignette with the darker tones and the shadows falling. The trunk lid panel line was now creating a much more elegant line and curve through the image, and I felt that this one was going to be the better option for a composition.
With the light starting to change up, I waited here for a few minutes and captured the different characters of light over three frames. It was the third that had the best mix of shadow and highlight. I felt that it was the strongest out of the four that I had shot of this back corner, but there was still something about that initial horizontal composition that I still liked. They turned into another two keepers out of only four frames shot.
If you have been keeping track here, I ended up with only four keepers out of the first 36 frames that I shot over three different scenes. That was roughly 10% which is still a really good hit rate, but things were really amping up at this stage of the day with another fourteen frames captured with exactly 50% of them being keepers. It all depends on the subject and lighting as to how successful you will be with each press of the shutter. There was no doubt that I was truly in the zone with this car in these conditions.
I’m going to take a quick break here before we finish up the photos from this location. There are still more to come and trust me, I’m still surprised at how many new photos I have gotten from this car considering I have shot it before and the location it was in was really not all that great. I’m really proud of what I have captured with this car though and I can’t wait to see you back here again soon for the conclusion to this trek.
I’ll be back soon….