Thursday, April 13, 2023
I set out on this trek with the hopes of capturing a very colorful sky as I was seeing some dramatic conditions starting to develop with the cloud cover late in the afternoon. With multiple layers of clouds present adding up to less than 100% coverage of the sky, I was hoping to luck out and get the sun to poke through a hole to light up the entire sky. I had so much hope for this to happen, I dragged Toni along with me despite us both being a little worse for the wear from going to the gym early in the day. The destination was pretty simple to figure out. There is a section of the parkway near the Lump Overlook that I have stopped at many times and have taken a workshop or two to this location as well. There is a fantastic fence there which overlooks a wonderfully layered mountain range that adds so much depth to the scene. My time with this spot goes back to probably 2006, when I shot a simple composition with my Sony F828 that went on to become one of my first limited edition prints. Since that time, I’ve been out here at any given time of the day, during all the seasons, and have shot with every lens that I own. So, why in the world would I want to come back to this same place once again? Well, my hopes were for better conditions, and a better understanding of my role as a photographer since I’m always improving (hopefully).
The plan was simple, we were going to start that way about 6:30 which would have us at the location about an hour before sunset. This would give me time to figure out the compositions that I wanted to shoot before the light started to kick off. I had in my mind that I wasn’t going to get a lot of photos from here because the light was going to be the biggest factor and the one thing that would dictate what I composed. That being said, I needed to have several options in mind so that I could react swiftly to the conditions. Unlike my decay photography that takes place under very flat light for the most part, the lighting for the evening was going to be ever changing with no real guarantee of the correct conditions developing. You could say that this is the most difficult part of landscape photography, and it really is. You can have a great composition, but if the light isn’t right, the image will be lackluster unless you have a stellar subject. I knew that the subject here wasn’t going to be overly strong, but I knew of several compositions which would work well if the light was good.
When we arrived, I left the camera in the truck and started to look at the scene to see what I had to work with. The more exciting grand landscape composition was looking good with the sun setting within the frame which was hopefully going to provide some very good colors. There were plenty of holes in the clouds for the sun to poke through and I was very hopeful. In addition to that shot, I also considered a panorama from across the road which would incorporate a lot more of the scene along with more of the sky. I found a rough idea for that and decided that I would be able to shoot it with my standard lens. This was a good thing since I was planning on using the 24-70mm for the basic shot of the evening. I have gone with my wide-angle many times before but have realized that the perspective shrinks the distant mountains too much and I wanted to make sure that I included them in the composition to provide that much needed texture in the midground. By setting up a panorama with the same lens, I would be able to keep the camera setup the same and just move from one side of the street to the other.
The other compositions that I looked at were an isolation on the gate which I have shot more times than I can count and a tree just a bit further up the road. The tree composition wasn’t going to work because the sky was looking rather bland in that direction. The gate isolation was looking potentially good if the sky got some definition to it. I was particularly interested in shooting this composition because I had done it for the first time back in 2018 as a test of a concept. It had turned out really well and since that time, I have continued to look at this composition favorably. I knew it would be a shot for after sunset because the light would be much softer overall at that point.
The plan for the evening was simple, as I would start out with the basic composition that I have come to like from this location and then move to the panorama location when the light stabilized right at sunset. From there, I would run back to the gate and switch my lens to the 14mm and get the vertical composition that I wanted taking into account the things that the original one had taught me. If all went to plan, we would be done by 8:15 or so.
Things didn’t quite go to plan though, which I’ll talk about a little more in detail as we go, but because the sky never really did materialize, I wanted to take this opportunity to talk about two ways of dealing with higher contrast scenes. There are two main schools of thought out there about this type of landscape image. The first is the filter crowd which chooses to use ND Grads to control the sky’s exposure. The other side of the coin are those that choose to take multiple exposures and blend them in post. There really is no right or wrong way of dealing with this common issue, and both methods can be done in a way that you just can’t tell anything has been done. As luck would have it, I did a little of both during the hour as I tried to get the sky to expose correctly in relation to the ground. Since I ended up with two different images that I liked that represented both techniques, it seemed appropriate to talk about that process a bit here.

As I mentioned, I set the initial composition up as the simple one-shot framing. This was going to allow me to get the exposure figured out and to apply any filters that I felt were needed. I saw that there was an opening in the sky to the upper right of the frame, so I chose to include the worn grass as an integral part of the composition to the lower left. This provided a visual balance from that corner to the opposite corner with the break in the sky. The fence and gate formed a nice diagonal line that linked up with the mountains in the distance. The gentle curves of the field were shown to great effect with this composition as well. Once I had it all set up, I put the lens cap on because the sun was really bright, and I didn’t want it to cause any damage to the camera while it just sat there. While I was waiting for the sun to drop in the sky and the light to dim a little, I was looking around for other compositional ideas including isolations on the distant mountains. This probably went on for about 20 minutes until the light on the scene started to appear workable to me.
That was the time that I pulled the lens cap off (very important step to remember) and started to look at the exposure. The composition was long since figured out, but it was time to turn the camera on and look at the histogram. As expected, the sky was way overexposed when I tried to get the ground exposed correctly. Looking at the horizon, I saw that it was largely flat and since I was wanting to keep the definition in the mountains, I chose to go with a 3-stop hard edge ND Grad. I slid that in the holder and matched the division line up with the flat horizon so that there was no visible transition. Looking at the histogram, I was still a bit off from having a good exposure thanks to the break in the sky which was still causing too much of a highlight. I added a 2-stop soft edge filter on top of the existing one which gave a smoother transition and a bit more subtle effect in the sky which I aimed at the brighter area. That seemed to do the trick and brought the histogram in line.
I made a test shot and decided that the ground was still too dark, so I purposely exposed to the right, and even pushed the exposure to the clipping point within the brightest part of the sky by 2/3 of a stop. I knew I could recover this in post, and it allowed just enough brightening of the ground to where I had plenty of shadow detail to work with. Once I had the exposure right, I started to press the shutter button every minute or so as the light changed. The clouds weren’t really moving much at all. In fact, I couldn’t determine any movement until I started to move through the image review which showed a slight progression to the right.
At one point, I saw a very good composition developing with the light and the position of the bright part of the sky. I snapped one exposure which showed the 2/3 of a stop overexposure which I didn’t mind, but I wondered if I would be better off dropping the exposure. Since the clouds weren’t moving, and there was no breeze, I decided to take the filters off and shoot a bracketed series. I did a four-shot spread with 1 1/3 stops between each frame to give me a very wide dynamic range to the scene. Of course, none of them looked good in the image review because there was no balance to the light. However, I knew that the end result of this would be as good as the filtered image, but with more working room within the tones. After I got that series done, I put the filters back on which was very easy with my filter holder since the positioning of the two filters remained exactly the same as what I had one initially.
I continued to shoot exposures and saw a couple of cars pull onto the shoulder. The second of them threatened to enter into my frame, but fortunately, the driver was aware of what I was trying to do and backed up enough to be out of the frame. The two cars did put a damper on my panorama composition because that section of the shoulder was going to be included in the shot and there was no way to avoid that. As long as the cars were there, I wasn’t going to get a pano shot. It didn’t bother me as much as it should have because it was looking like the sun was going to dip down behind clouds anyway which would severely hamper the colors that would be reflected from the bottoms of the clouds. What I had been shooting would probably be the highlight of the evening as far as colors went.
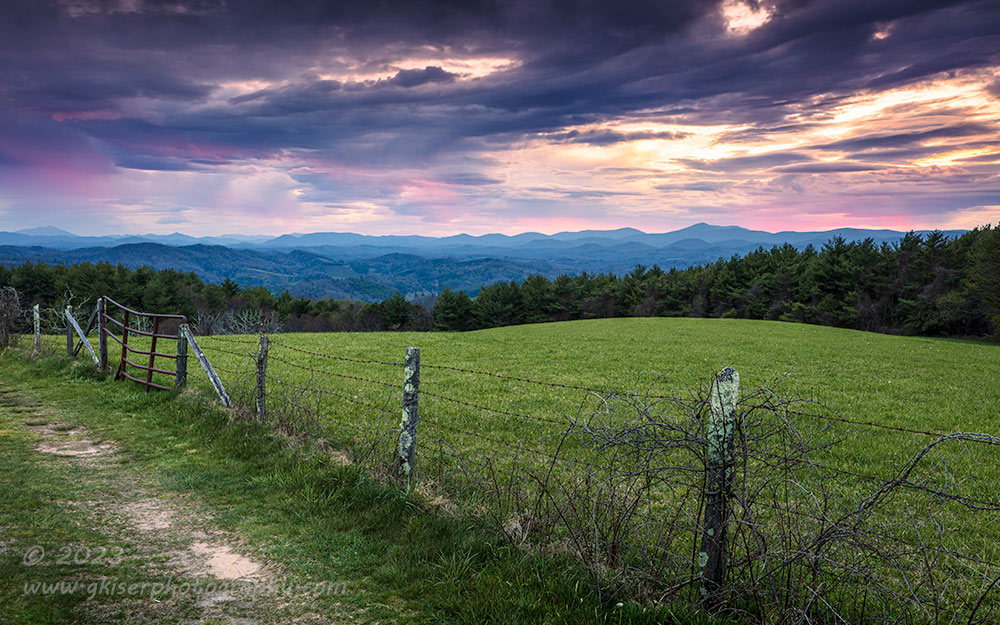
As the sky changed, the colors all faded and the bright part of the sky seemed to just get brighter. I had a conversation with one of the driver’s that had joined me about how the sunset was probably going to be a wash, but there was a good chance that the second blush might provide a bit of color if we were lucky. He wasn’t able to stick around to find out unfortunately, since the second blush did add a bunch more color than we had seen before. When I first started to see the rose colors popping up at the horizon, I called for Toni to look since she was sitting in the truck nursing her sore hip. It started over to the right, and eventually spread the entire width of the scene. It was going so fast that I didn’t have time to even consider the pano shot now that the cars were moved. The likelihood of me being able to get four exposures shot quick enough to capture similar conditions were slim. I also didn’t think I would have time to get the shot set up before the light was over. I just moved my camera position to the left slightly in order to get more of the sky to the right and adjusted the filters accordingly. In order to get more of the sky, I lowered the camera position a tad which changed the bulk of the midground. It was essentially the same composition but change in position made it possible to include the right section of the sky since it had been moving slowly to the right.
The major difference here in comparison to the previous series of photos was the intensity of the sky. With the sun now below the horizon, the highlights weren’t nearly as bad which allowed for a more even exposure. I still had to have my filters attached as I had earlier since the ground was largely in shadows at this point. There was no clipping now which was wonderful. I saw no reason to try for an HDR blend with this scene because the areas where the magenta hues appeared were changing almost quicker than I could make an exposure.
This is kind of what I wanted to talk about with the difference between filters and multiple exposures. I think that they both have their place, and I’ve used them both together a number of times. In my opinion, any photographer that discounts one technique in favor of another is shortchanging themselves. In this situation, I was able to use both techniques to arrive at a very similar outcome. As you look between the two images, I think you will be hard pressed to see the division lines of the filters in the second image. Keep in mind that there are a total of five stops of light reduction going on at the top of the image. Many photographers I’ve seen on YouTube will say that when you add an ND grad, you are using destructive editing and darkening things without care of consideration. I don’t see where this is a problem in this image. It all came down to proper placement of the filters and the proper types of filters. By using the hard edge as the main darkening agent, I was able to line it up with the horizon and place it to where it couldn’t be seen. To add to what I was achieving with that filter, I used a soft edge filter slightly higher so that I had a gradual transition in the sky leading up to the brighter areas. The edit was quick here and most of the tonality was already in place.
Conversely, I chose to do an HDR blend in the first photo. I was able to successfully do this because there was no motion in the scene, and the clouds were not moving fast enough to cause a problem. Had I done the four exposures over a period of 30 minutes, that would have been a problem, but I was around a minute total for the four exposures which allowed nothing to move in the scene. The benefit here was that I had extreme dynamic range across the entire photo allowing me to play with shadows and highlights as much as I wanted to. I could do more local adjustments without fear of noise, or image degradation. The biggest tradeoff was that by doing an HDR blend, I was adding processing time to the mix. This one actually took about twice as long to process as the one shot with the ND Grad filters. Because of the extreme contrast in the scene, the HDR series was the right choice in that first photo which made the editing time worth it. However, in the second image, with the fleeting light and colors, it was easier to get the shot in a single exposure.
Comparing the two together as final images, I think you would be hard pressed to decide which had filters and which was the blended image. Of course, a lot of that comes down to the post processing choices made along the way, but the point is this. Don’t think about ND Grad filters as a bad thing. Used the right way, in the right conditions, they are just as effective as multiple exposures, but will take much less processing time to arrive at the final image. Also consider that combining the two techniques will provide you with images that you might never have though possible before. Always look at tools for their potential, not as something that you have to use in every situation.
That brings me to the conclusion of this little photography lesson. If you would like to go more in depth with this concept or any other, do consider signing up for a mentorship session with me. The use of filters and different post processing techniques are some of my favorite subjects to teach. Not only can these techniques improve you photos, but they will allow you to create photos that you might not have ever considered in the past.

You might remember that when Toni and I had arrived, I had gone around looking at the different compositions that I wanted to shoot. One of them happened to be the gate which I had shot an isolation of quite a few years ago. I felt that this night was going to have the potential for another try at the composition. As the sun continued down past the horizon, I was pleased to see that the sky was looking good for another try at this scene.
Since the colors were all but gone over the scene that I had been working for the past hour, I moved the camera down the fence line to the gate. I switched over to my Rokinon lens which I had not used here before. My though process was originally, I had shot this scene at 16mm which provided a nice dramatic perspective but opening that up to a full 14mm would make a bit of a difference since I would be able to get even closer. The sky above the gate had a similar curve to the clouds which I liked, but this time it was a bit more pronounced. With the sun well below the horizon at this point, I had to work fast. My exposures were going to be around 15-20 seconds at f/11 which didn’t leave a lot of margin for error. Since this is a manual aperture and manual focus lens, fast was not something it was good at. I got the camera positioned very low to the ground so that the gate would enter into the sky more than the original composition had allowed for. The position was shifted until I was happy with it, and I dialed in the aperture and a focus point. Because of how this lens communicates with the body, I wasn’t able to use live view or the histogram which meant that I had to use the internal light meter and the optical viewfinder.
I made my first test shot which was a little dark, although I had it set at +2/3 on the light meter. I ended up giving the exposure a boost of +1 1/3 total which nailed the exposure that I was after. I only made a handful of exposures as the clouds and the colors changed up. I noticed that the light levels were falling fast at this point, and I knew that the evening was over. I packed up the camera and went back to the truck with Toni. It was a little more than an hour and a half since we had arrived. I had shot 85 frames which included two different HDR series that totaled 15 of those frames. The rest of them were just watching the sky change. I knew when I set out on this one that I wasn’t going to have a high hit rate as that is usually what happens when you are looking for subtle differences in the sky.
If you enjoyed this trek, let me know that you want to see more landscapes as the season progresses. I’m really enjoying them for the time being and it is giving me a chance to put to work a lot of things that I have learned over the last six months or so. If nothing else, it is a nice change of pace for me in the field. As always, if you are interested in bringing a print home with you, I would be happy to assist you in that purchase. You can order directly from the gallery store, or you are welcome to discuss other options as far as sizing and media with me directly. No matter what you choose, rest assured that you will be getting a top quality image that you will be proud to display for years to come.
Thank you for joining Toni and me on this evening trek. There is certainly something to be said for how a landscape appears at the ends of the day. The last couple of outings has cemented that in my head after concentrating on a very different kind of light for my decay photography. It is nice to work with the more dramatic lighting once again, and with Spring here, I’m thrilled to be able to revisit some of my old Parkway haunts.
Until next time…

Remember to use the code KISER10 to get 10% off your purchase