Saturday, May 30, 2026
Welcome back! You are probably getting tired of hearing from me, but after nearly three weeks of quiet, what do you expect? Just to get everyone up to speed, this trek started slowly enough with working on photos of an old Honda N600 in Clemmons. From there, I searched around to see if I could find anything around Yadkin or Iredell Counties with no success. I ended up at this shop near home that I have photographed several times before, but this time there was a pretty cool Plymouth Fury sitting outside. That was enough to convince me to stop and give that car some attention which we read about in the last entry. If you have been paying attention, and are subscribed to my blogs, you will also know that the latest Behind the Camera has also been published. This month we talked about how you shoot something rather than just what you are shooting. That is a fitting topic for sure, because both locations that I’m going through in this blog series have been about great subjects in less than idea settings.
What that means is that I could have just grabbed a quick photograph of the particular car in the scene that I was seeing and moved on to the next shot. That would be a documenting photograph which would show what I was seeing, but not how I saw it. For me, the entire point of photography is to show the viewer how a scene was observed and how it made the photographer feel. That takes a bit more time and consideration and I’ve talked through much of the struggles that I have gone through to get the photos that I have up to this point. It becomes more about what the backgrounds look like rather than what the main subject looks like. My goal is to isolate the subjects and what I am wanting to capture to make sure that the viewer has no doubt as to why I have captured the photo. Hopefully, I have succeeded in that goal and will continue to do so in the coming years.
As of the end of the last blog entry, I had gone through most of my ideas for the Plymouth and was ready to move onto some of the other subjects in the parking area. I had worked these vehicles before and had a decent understanding of how they worked in photographs. The one that caught my eye at this point was an old Ford that was parked under a tree. This truck has been here since the very first time I visited, and I think I have probably captured at least one frame of it each time. The problem that I kept running into was that it was situated under a tree, and the sun always seemed to be on the other side of that tree which made for some seriously terrible light falling on the truck. It was either bathed in dappled light, or in deep shadows. This is not ideal for a vehicle with patina on it as it becomes too complex to make out the actual shape of the truck with the dappled light, and when it is in shadows, the exposure latitude of the scene is just too great to really get a solid image. The lighting was always the same each time that I was here though and those were always my options. While I was usually able to get something that worked with the truck, it was always an uphill battle to get the photo processed.
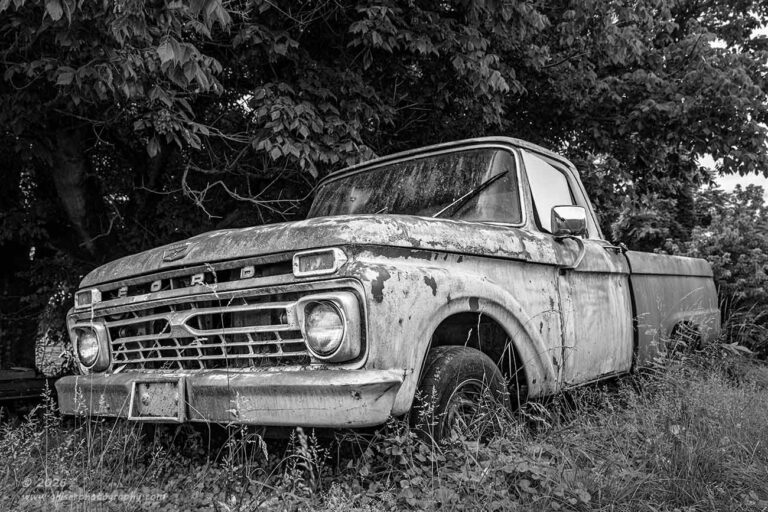
The clouds that were overhead on this day provided a very nice and diffused look to the scene though. That made me really want to work with the truck again. When I went over to it, I started to look at it with the building in the background but decided that the light wasn’t as good for that as it had been the last time. After thinking about it for a minute or two, I moved to the driver’s side to see how it was looking from that angle. The light was nice and even across the entire truck from that side and the green in the tree was bright enough that I was going to be able to get detail in the leaves as well as the grass. The only thing that I had to worry about was the other vehicles to the left of the tree and the background that could be seen beyond the tree. The lighting was good enough that I really wanted to make this work out, so I set out to find the right composition to capture the truck the way that I saw it, not in how it looked in the scene.
This was where my focus on wide-angle shots started to really help me out. I was much more able to see in my mind how this would look if I got in very close and used a wider focal length. I wasn’t using anything too crazy because I was having to get down really low to the ground to mask out the distractions. A really wide look would have just made the bumper massive in the frame and I wanted to keep the balance of the truck right for the image. The standard zoom was plenty for this, and I played with the angles and distances for a bit until I landed on the one that I liked.
Once I had the composition set, I turned my attention to the exposure and tried to balance the movement in the branches and leaves with the shutter speed. I wanted to keep everything still in the frame rather than have so much of the scene blurred. This meant really working the shutter speed and waiting for a lull in the breeze. The composition was good enough that I committed to it and stuck with it through eight different exposures as I tried to get the entire scene to be still. It was the fifth frame that worked out the best and that was the one that I used for this final image.
I could have easily done this in color, but the overall color tone of the truck was in the green and yellow spectrum which seemed to wash out too much with the tree and grass. I wanted the truck to stand out more in the frame and the best way to do that was to convert the scene to black and white. That gave me much more control over the tones of the different elements in the scene. It also allowed for a bit more grit to be added into the scene which furthered the story that I was trying to tell with the photo. I’m really happy with the end result of the photo and think that it is one of the better images of this truck. I know it was the easiest to process due to the lighting and it all just fell together quite naturally which I always enjoy.
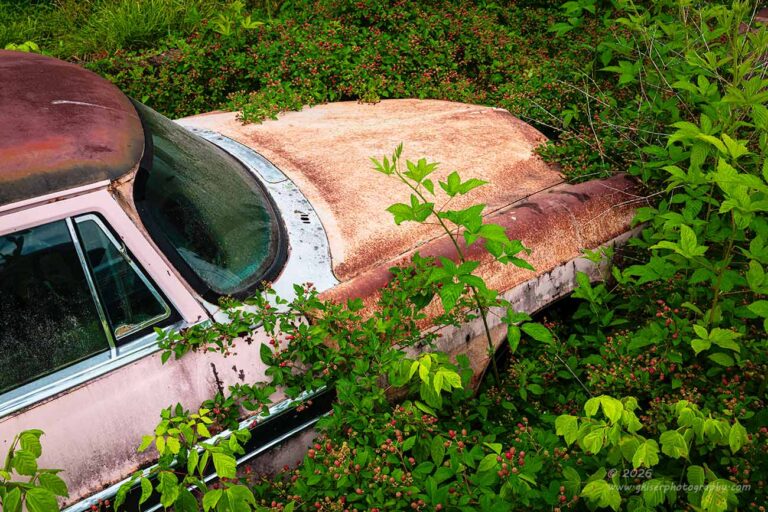
The next subject that caught my attention was a pair of DeSotos that were parked in a recessed portion of the parking lot. They have always been very hard to photograph because of the location. I have always been completely unable to get on their level except for the rear of the one car that is at the entrance of the ravine. Both cars are parked nose to nose and there are vines, weeds, and other vegetation growing all around them. During the Winter, the fronts of both cars can be seen, and I’ve shot both of them during these times. During the warmer months, the vegetation seems to take over the cars and most of the bits and bobs are obscured from view.
The one DeSoto which has an odd pink tone to much of the body is one that I have had a very hard time photographing over the years because of that color. It just isn’t a pretty color and honestly looks like I have manipulated the color in post which I don’t want assumed. The color has been a really big blockade for me, but for some reason it just looked right with the lush greens and the reds of the berries. The odd color actually fit the scene according to color theory, and that prompted me to figure out a composition to make the image work.
Once again, I could have just snapped a picture and moved on, but that wouldn’t be fair to the scene. Instead, I found the right angle and got the camera positioned partially on a wall, partially on a trash can, and partially on the pavement under my feet to get the right angle. I then worked the lens to get the right crop to avoid seeing the wall or the other DeSoto in the front. The photo that I was putting together was a study in color more than anything else because most of the details of the car were obscured. In fact, the real detail came in the form of the vegetation surrounding it. The car was almost a supporting player in terms of compositional elements within the frame.
Normally, this would be a problem as I need to be able to tell the viewer what was most important to me in the scene based on visual weight. If I had been wanting to photograph the car specifically, this composition would not work. However, it was the relationship between the colors that really drove me into the scene and that was where the visual weight of the scene actually was. For me, this is a very successful photo of the scene and captures exactly what I was after when I first saw the scene. It is probably one of my favorite photos that include this car and it is the first time that I have actually liked the color that appears on most of the body.
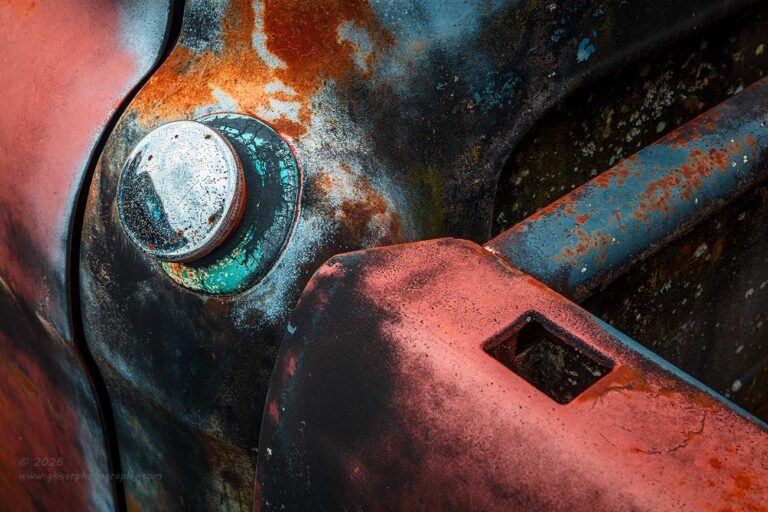
Now that I was back on the side of the parking area that I started on, I started to look at the Apache once again. The quality of light on it was quite a bit different than the last time I had worked with it. The diffused light made it possible to work from a number of angles and still get great colors. The biggest problem was the one that had always plagued me with this truck. That was the room to work around it. It was surrounded by other vehicles and there were no angles where I could really include a background. This meant that I needed to focus on isolations and details within the truck.
Leaning on my want to explore more abstract shots, I started to look for areas that I liked in particular to work with. Naturally, I gravitated to the driver’s side which was far too bright the last time I worked with the truck. This time, it was all evenly lit, and I found the area around the fuel filler to look particularly interesting. I started to explore my compositional options thinking about where I would spend the time drawing if I was creating something on a piece of paper.
This exercise brought me to a broader view of the scene than I would normally have captured in the past. I found a collection of shapes between the bed and the cab with the patina clearly linking all of the pieces with the visual anchor being the chrome filler cap. That was the element that really caused me the most problems because the chrome was highly reflective. It wasn’t my reflection that was causing me issues though. It was the exposure needed to keep detail in that reflection. It served no purpose to have a visual anchor that was blown out with no details present. This meant that I had to really finesse the exposure on the camera to keep from clipping that detail too much. This was why I ended up shooting five different frames with the exact composition as I walked the shutter speed quicker and quicker trying to keep the shadow details, as well as the highlights.
It was that last frame where I had just a touch of clipping in the highlights which I knew to be a product of the jpeg rendition of the RAW file. The histogram was showing sufficient detail in the darker areas, and I felt that I had something that would work. On the off chance that I wouldn’t be able to pull out the shadow details, I had a built in HDR blend with the five captures. I would just need to pick the first and last to merge and I would have plenty of shadow detail. That wasn’t needed though, and I was perfectly happy with the outcome of the last exposure which had plenty of shadow detail visible. In fact, this was one of the easier photos to process because of how much care and attention I had given the exposure in the field.
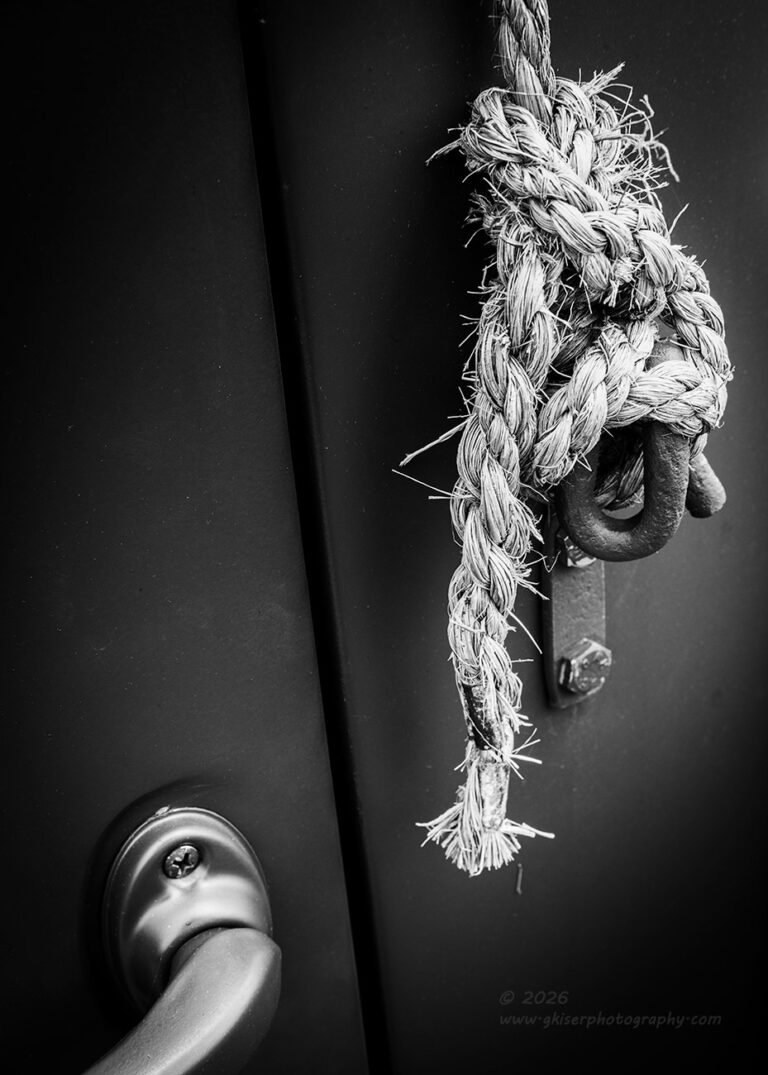
While I was looking at the Apache, the military truck also caught my eye. This was a restoration from the looks of it and the paint was all in great shape. Even the underpinnings were shiny, so this really didn’t fall into my decay subjects, but there was something that made me interested in it. There were different shapes present that I don’t usually get to work with and I wanted to see if there was anything that might make a good photograph while I was here.
After looking around it for a while, I realized that the large areas of green without any texture or patina didn’t really fit into what I wanted to photograph. The only thing that really held any interest for me was the rope tiedowns that held the canvas top for the cab. I liked the textures and the contrast between the beige of the rope and the green of the truck. It was just enough to prompt me to try a frame or two to see if I could get anything to work.
The first frame that I tried had a bit of a Dutch tilt to it and included the handle and the tied end of the rope. I kind of liked it, but the panel line of the door was just too dramatic. I relaxed the tilt a bit and reframed the image for what you see here. It looked pretty decent on the back of the camera, and it made it through the first two rounds of culling. However, when it came time to process the image, I chose not to go forward with it, even after looking at it in color and black and white. There just wasn’t enough visual interest in the “background” to make it work for me.
As I was writing this blog and going back through the string of exposures that I shot, I saw this image once again in the line and saw the same qualities that I liked when I photographed it originally. The RAW photo was just boring, but this time I was seeing more potential. I pulled it back into the develop module and started to work out a final version of the photo. Again, I looked at color and black and white, but the color photo locked the scene into a military feeling more than I wanted. By stripping the color, I was able to remove that olive drab color and the link to the military. Now, I was able to concentrate on the rope and the handle which I liked much better.
Even after getting the basic edit done to the image, I still wasn’t sold on how it was looking. I decided to pull from an experience that I had earlier in the year with a Studebaker where I really pushed the post processing dodging and burning. This had resulted in a much more exciting version of the image while still being very true to the scene. When I started doing this process, things began to take shape, and the photo became much closer to how I had seen it at the time. After a few finishing touches, the photo was moved into the keeper category and added to this blog. I’m very happy with that decision and hope that you like the photo as well.
I spent a short time looking around the old Dodge to see if there were any more potential photos but wasn’t able to find anything that sparked my interest. It was coming to the end of the trek for me, and I was getting ready to call it a day. The clouds were still out and looked good, but I was starting to get hot and sweaty and needed to get home to see what I had captured during the day.
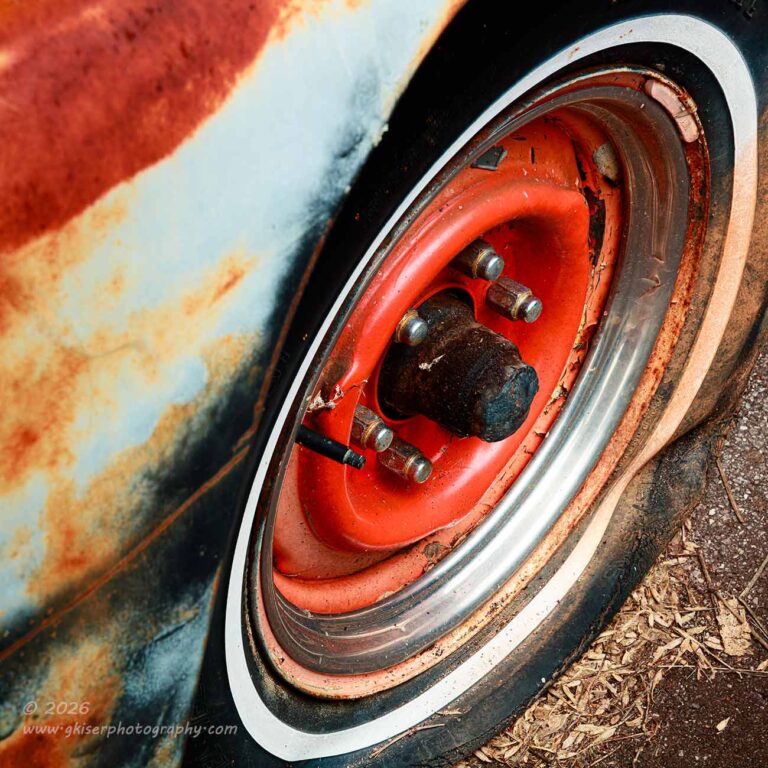
Before I packed it all in, I took one more look at the Apache and remembered the red wheel on the driver’s side that I had been interested in before. The lighting hadn’t worked to capture it the last time though. This time, the light was great and I decided to give it a try. The first composition that I started with was one that included the fender and the long emblem on the side of the fender. I pressed the button and looked at it. It looked like a snapshot more than anything and I much preferred the tighter image that I had shot of the emblem on the last visit here. Since it was the wheel that I was mostly interested in, I chose to recalibrate my expectations for the image and I looked for a tighter crop of the wheel.
By moving forward, I was able to tuck the wheel right up to the front edge of the fender which had some really nice patina going on. I had to play with the framing and the crop so as not to include too much else in the frame. I finally landed on a composition that I liked which cropped into the bottom of the tire but kept the whitewall portion intact all the way around the wheel. There was about half of the frame dedicated to the fender and the patina which I liked in the camera. That didn’t quite hold true when I got the image home though.
The fender started to compete for attention with the wheel, and it threw the purpose of the photo into question. This was the second of only two exposures that I shot of the wheel, and the first one was just too broad in scope. This one was better, but not quite right. I started to look at different aspect ratios which might focus the attention better. It was the square crop that won out and created a scene that focused the attention on the wheel rather successfully. I was able to crop through the tire on the bottom and the right which balanced out the fact that the tire was obscured by the leading edge of the fender. I made sure that the white line around the tire was left fully visible as a frame for the wheel. The fender just became a bit of negative space in the frame to push the attention to the right. It all looked quite good from a compositional aspect.
The edit was done with high contrast in mind because I didn’t want that much attention on the tire except for the fact that it was flat. This allowed me to render the black parts as deep black with very little detail so that the attention remained on the wheel. It also helped to balance out with the hub which was a very dark tone. All of these little details went together to form the image that you see above and it is one that I am now pretty happy with.
That was the last photo that I shot of the Apache because I was starting to get interested in the Fury once again as I was working close to it. I knew that there were views of it that I hadn’t really thought about. Most of those were around the front of the car. With very little rust and highly polished chrome, I had kind of shied away from the front of the car, but wanted to see if I could make something work with it.
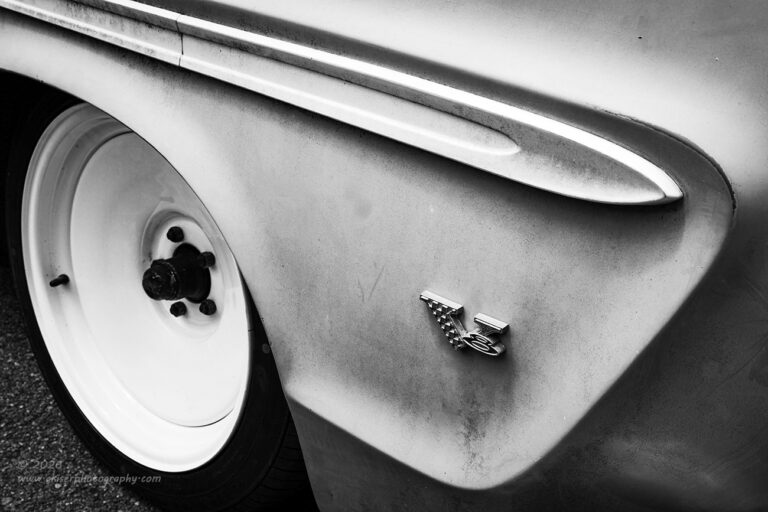
The aspect that had drawn my attention back to the car was actually the scallop of the front end of the fender. I had played with this to a point already but wanted to focus on that design for a composition. I really liked how the scallop framed the V8 emblem and how it all came together with those white dished wheels. The light, while diffused, was still directional and that was creating some subtle shadows on the outside of that scallop. The contrast on the fender was going to look really good when that white wheel was added in.
It was the contrasts that I was seeing that prompted me to select a black and white profile in the camera so that I could really push the contrasts to a new level. This composition was going to be all about light and shadow defining the shapes within the frame. I only needed a couple of frames to get things just right as I was working through the depth of field that I wanted. Since there was not that much detail on the wheel, I didn’t really need much sharpness there but wanted to make sure that the V8 emblem really stood out in the frame. By limiting the depth of field, the shapes could still be seen but the detail in the hub was no longer important. This was what I was after but didn’t want things to go too obviously soft which would look like I was trying for that “bokeh” look which I wasn’t.
The end result was pretty much spot on with what I had envisioned. I kept the crops close so that all sides and corners looked considered and not accidental. Even the editing went along to support that desire. You can see that there is really no detail in the tire. It had some tire dressing on it which made it darker than normal, and for this, I didn’t want to see any of the detail on the tire. This made it much easier to justify the cropping though the tire on the left and lower edges. It just became a black band around a white wheel which defined the range of tones in the image. The fender was left to include the full range of gray tones in the image.
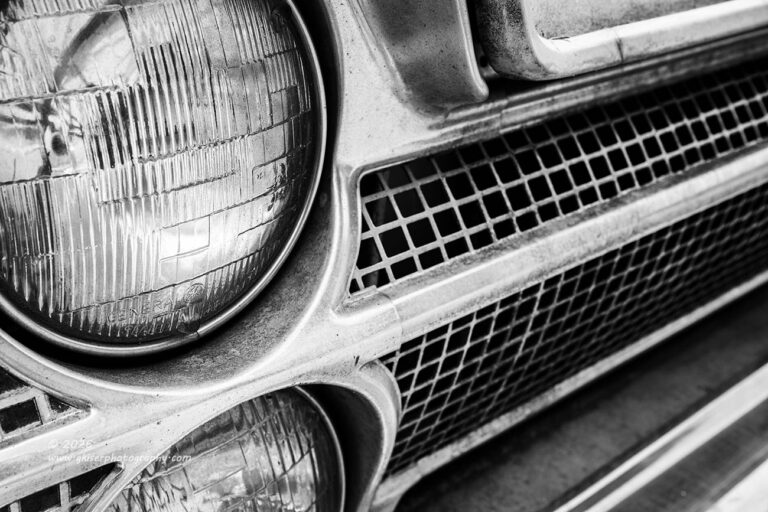
With my attention back at the front of the car, I started to look at the grill and headlights. There were a lot of expected compositions that I could make with this area, but I didn’t feel that those were the best choices. Instead, I wanted to avoid the hood because of the long Plymouth emblem that went the entire length of the leading edge of the hood. I needed to avoid the bumper as well because of the chrome. To get both headlights, I was going to need that bumper though.
The more I thought about it, the more I realized that it wasn’t the headlights that I was most interested in. I liked the style of the grill and how it worked with the headlights. I liked how the hood dipped into the grille from the raised bezel of the headlights. that was the aspect that I needed to focus my attention on with the photo that I was working out. I knew that this was going to need to be black and white so that I could really push the contrast of the scene, and since the camera was already in that mode, it was a simple matter of looking at the scene through live view to see how it was all laying out.
I went with a technique that I have started doing recently where I crop through the headlights so that I just get that hint of the round shape. I rely on the Gestalt principles which will help the viewer complete those shapes in their minds. This keeps me from having to include them all which would then force many other elements into the composition that I didn’t want. The angle that I shot the image from dictated the amount of diagonal that the grill was going to showcase. This was the important part as it set the overall tone for the image and established the level of excitement that it would have.
I shot three different versions of this composition before I landed on the one that I really liked and the one that would go on to be the keeper image from the series. The processing was actually quite simple and just involved some work with the dodging and burning. Once again, using the Gestalt principles worked to create an image that I didn’t quite see automatically. This is part of my goal in learning to see things differently this year, especially considering abstract and detail work. The ultimate goal is to continue moving away from simple documenting photographs and get closer to artistic representations of what I am seeing. That was the goal that I felt was going to be the easiest to work with, but it turns out that I’m really having to think through those steps while looking at things from a wide-angle perspective is feeling much more natural to me.
This brings us to the end of the trek. I had been out for most of the day and shot two different locations. My total frame count was only 60 which for the number of compositions I worked on seemed quite low. I was really expecting something in excess of 100 frames, but I was happy with 60 knowing that with my current hit rate, I should be somewhere near a dozen or so keepers from the day even though I could only think about maybe seven or eight that stuck out in my mind.
After a few hours of processing, I had 17 keepers from the day, which was amazing, and after writing this blog and revisiting the one image from the military Dodge, I ended up with a total of 18 keepers. After being tied up and not doing much photography through the month, I wasn’t expecting such a successful trek. Usually, those first ones after a break of any length turn into just a few images that are average at best. Looking back over these images, knowing the surroundings that I was dealing with, I can say that these are all very strong images and they look like I haven’t missed a beat since earlier in May when I last went out for photos.
Thank you for joining me on this trek. I do hope that you have enjoyed the photos and the story that goes along with the photos. As always, if any of these photos speak to you and you would like a print, I am more than happy to talk with you about creating that perfect print for your space. There really is no better way to enjoy photography than in a physical form that takes all the variables out of the equation based on what kind of monitor you are viewing the images through. Also, if you would like to up your own photography game and think that I might be able to help, I do offer mentorships that cover a wide range of budgets and needs. It all starts with a free, no risk consultation where we get a chance to see if I’m a good fit for you and can provide the instruction that you are looking for. Just contact me and we can get things rolling to see what can happen.
Until next time…