Tuesday, January 16, 2024
It feels like forever since I’ve written in the blog, but I also have to remember that the last time I went out, I was typing for four days to talk about 25 new photos from what should have been a quick trip. I’m still not quite sure how that happened, but I was ecstatic to have such a successful trek for my first outing of 2024. Since that time, Toni and I went to Williamsburg, VA, for our 13th anniversary. The plan had been to take the camera, but at the last minute I decided to leave it at home since we were only going to be there for a short time. In hindsight, I am very glad that I made that decision because there would have been no time to really go out and look for photos. We had a very enjoyable time there just being together. The traffic and navigation around the area was a different story, but I’m a simple southern boy that likes my rural roads.
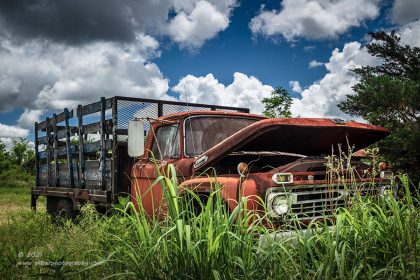
Anyway, now that we are back, I’ve been wanting to get out again to get some photos and unlike how things normally have been, I had a destination in mind for when the weather looked good. This was a spot that I have been looking to shoot since the Fall when I met with a client about a Spring photo shoot with his two classic cars. I’ve been by there a couple of times since seeing it, but had no luck in locating the property owner. This was going to be a mandatory ask as I wasn’t able to get the angle that was needed from the road. However, I had been in the driveway enough to know exactly how I was wanting to shoot the one Dodge pickup that was parked at the edge of the property. If I were ever able to get permission, I was going to need an interesting sky as I planned on including at least some sky in the composition. Other than that, the sun would likely fall on the front of the truck throughout the day, but I was more interested in the afternoon light as the sun would be on the passenger side as well.
On that initial trek of the year, I spoke with my friend who owned the shop I was shooting at and was telling him about the location that I had wanted to shoot that morning while the clouds were still looking good. As I was describing it, he let me know that he knew the owner and had her phone number. Within a few moments after we finished talking, I had a text with her contact information. There was no time to go and work the property at this point because the sun was getting a bit too bright for the other location and as you can read, I was having a great time where I was.
Between the time that I finished up with the photos and the blog from that trek and the time when we left for Virginia, there weren’t any good days for me to go back out to Yadkin County to photograph the truck. When we returned, however, I started to look at the weather again. Between snow and ice events, it took a few days to get a weather pattern that would work for the location. On Monday night, I saw that there were some interesting looking clouds forecasted over East Bend through the afternoon. Since there was no rush to get out there, I was able to take my time in the morning and not get up at any particular time. I love photo days like this when I’m not rushing to get out for first light. It was also going to give the roads a chance to dry so that hopefully I wouldn’t get salt spray on the truck which would mandate a wash sooner than later. with temperatures well below 40 for the foreseeable future, I wasn’t looking forward to spending three hours with my hands in water to wash the 4Runner.
As I mentioned, I already had a pretty good idea of how I wanted to shoot the old Dodge which is always half the battle. It was a simple overall shot because I wasn’t convinced that there would be enough contrasting elements like chrome to allow for interesting isolations. I wanted to keep my mind open though, but I was really feeling like this was going to be a one composition location. The other truck, which was a Dodge panel truck had a wonderful patina but was not in a position to be photographed in its entirety. Oddly enough, I had been contacted on Facebook by a friend of mine who had spotted this particular truck from the road. He suggested that I go and check it out. It was the first time I had been able to reply to one of his suggestions with “I’m one step ahead of you and have the contact information for the owner already.”
You might get the idea that I have been putting a lot of energy into getting access to this spot for just one photo. I would agree with you, and originally when I spotted this location years ago, I had dismissed it entirely. These last few times seeing it made me hopeful for a strong overall composition though, and I felt that this was the time to shoot it with the bare trees in the background. I also liked the color of the dormant grass as I thought it was very well suited to the rusty look of the old pickup. It was just one of those photos that I really wanted to get, or at least try for. It was occupying my mind to the point where I wasn’t sure I could effectively plan a different shoot.
Before I continue with the trek, I’m going to go off on a quick tangent. As a photographer, it is very helpful to know your strengths and weaknesses. At the risk of bragging, one of my strengths is being able to figure out compelling photos from locations and subjects that might normally go unnoticed or be dismissed due to one reason or another. It is something that I have been improving on quite a bit over the last few years and I really think that is one of the signs of being a professional photographer. On the other hand, I have a pretty serious weakness which has come into play yet again. You see, I will go out with the full intention of getting just a photograph or two. I choose these locations where I feel confident that I can get a really good photo which I can return home with and take my time processing. The short blog that follows is also a nice treat. The reality of these treks is that I try to ensure that I have something really good to call a keeper and I shoot a lot of different aspects of the location in the hopes that one of them will work out. I’ll keep going until I feel that I have something worthwhile. This is where my weakness comes into play. I have a hard time calling it quits. I like to really work a scene to my own detriment. Usually, the longer I work a scene, the more photos I end up with, and as my hit rate has been increasing lately, that translates into even more keepers.
It seems like more and more, I am going out for a couple of hours here and there, and end up editing double digits worth of photos. This is not really a bad thing as it is more experience for me, and I love the new images that I get to add to the collection. The issue is, I have a huge portfolio at this point and the photos that I am adding are increasing the size beyond measure. These treks are also very time intensive. For instance, I was out of the house for four hours this afternoon with about two of them spent traveling to and from Yadkin County. In the two hours that I actually had the camera out, I shot a total of 70 frames which isn’t that many at all. It was 5pm when I returned home. After a quick break and some dinner, I was down editing through the day’s photos. Once they were edited, they were prepared for upload to the website and the blog was started. It is now 11pm, and this is where I currently am with the blog which won’t be finished until tomorrow morning. It is very easy for a trek to fill 15 or more hours from start to finish. Those treks that only yield a photo or two can be knocked out in three hours or so. When I set out on a photo shoot like I did today, I get it in my mind that it will be quick so when I end up processing through a load of photos, I am just not mentally prepared for it. But…I carry on and make it happen because I love photography and I will never complain when the creative light shines on me and the camera.
This brings me to something new that you might be seeing here on the website and blog. Over the years, I have looked for print sales to help fund these adventures with the camera. This has always been a losing arrangement because it would be asking far too much to sell enough prints from a trek to justify the time spent on it. I’ve been doing a lot of soul searching over the last year or so about this fact and after really looking at the business finances from last year, I have come to the conclusion that I had to do something else. The end result after looking at the options available to me was to go through PayPal and use a “Donate” button which you see above. This same button appears at the bottom of the website as well, so it is always accessible. For those that don’t want to spend the money on a print but feel that I offer something worthwhile through the website and blog, I have created the option to buy me a cup of coffee or a sandwich. This is figurative, of course, but it is set up to where you can donate, or tip whatever you feel comfortable with. I guess it is like crowdfunding in a way, and it is something that I have not wanted to do because my whole purpose as a photographer is to create a product that will support me. Ideally, this type of funding would be unnecessary. The reality of it is though, I’ve become the starving artist and it is time to break that trend. So, if you are of a mind to do so, consider pressing the button above and show your support for the time and effort that has been put forth for treks like this one. I really appreciate it, and now back to the program already in process.
I left the house shortly after lunch so that the sun would be slightly over to the left as I was expecting partly cloudy skies with a mix of high and low level clouds. It was going to be nearly perfect as I would be getting some cool blue tones in the sky to compliment the warmer tones of the scene while there would still be plenty of visual interest in the sky. The trip took about an hour and during that time, I was seeing mostly clear skies over Wilkes County, but there were lots of clouds to the East where I was heading. If I was lucky, I would be right at the dividing point and get the sky that I was after. I had already spoken to the property owner by phone and knew I was clear to photograph till my heart’s content which took the biggest variable out of this equation.

When I arrived, everything looked as I remembered it and I was hopeful. The sky wasn’t quite what I had in mind, but there was some detail in it despite being totally overcast. It was the lower level clouds that gave me the visual interest. There was no direct light just yet, but I could see that it looked like clear skies were close by, especially to the Northwest. I wasn’t going to have long because it looked as though the texture in the clouds was going to be flattening out very soon. Fortunately, I had an idea how I wanted to shoot the Dodge pickup which allowed me to work very quickly. I grabbed the camera with the 24-70mm lens and a polarizer. I wanted this combination because I wanted to have the truck dominate the frame while still including a larger portion of the background to get the sky.
Once I had the camera, I started to walk around in the area that I thought that the angle would be, and eventually found the right place to put the camera where the background houses weren’t a problem and the trees made sense to the composition. I also had to be careful about the angle that I shot the truck at to keep things looking right. If you will look, I had the center post of the windshield placed in a way to where it didn’t cut through the rear window. This just made the shapes less complicated and simplified the photo. I also looked at things like where the trees were in relation to the roofline because I wanted the truck to touch the sky in at least one place to relate those two elements. All of this was figured out in a matter of minutes and I was starting to make exposures.
The breeze was a slight problem as there was a lot of tall weeds in the scene that I wanted to be frozen. A quick tweak of the ISO values allowed me a shutter speed to stop the action in the scene. I tweaked the composition slightly after I got started. In the first handful of frames, I had the image that I had been wanting to get for all this time. I really felt like I had nailed it from looking at the image review and saw nothing that needed to be changed. I was hoping that this would be a color image, but it would largely depend on how blue the clouds appeared as to whether or not this would even work as a color image. Since I have been wanting to do more with black and white photography this year, I wasn’t opposed to making this one monochrome and figured that it would look pretty good that way too.
Well, I had achieved the photo that I wanted and was confident that it was going to work well in my portfolio. I can leave now, right? Well, I suppose I could have and that would have made this a quick trek like I had imagined it would be. Remember that weakness of mine where I don’t know when to say when? Well, even though nothing else was really jumping out at me, I decided to look around and see if there were any isolations that I could do. This took a little while, and I started to get cold with a biting wind blowing around. I pulled out my rechargeable handwarmers that Toni got me for Christmas and they became lifesavers. It was also the first time this year that I had to use my Vallerret gloves which have the open fingertips for control of the camera. It really was that cold, I was having a hard time thinking because I was so cold which didn’t make sense with the temperature being just under 40. It was that wind which just went through my bones and as I get older, I like the cold less and less.
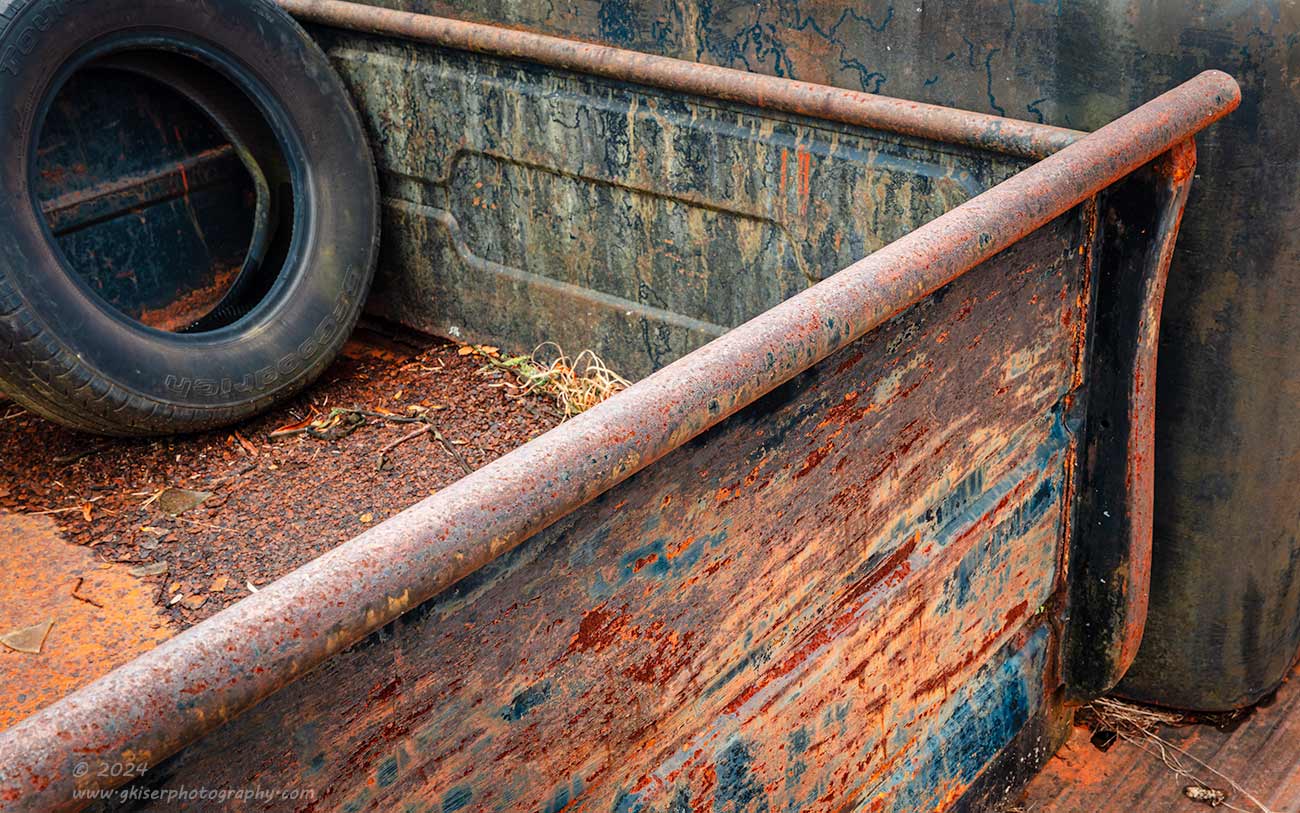
Despite the cold, I was still getting my creativity warmed up. I was looking for isolations because I knew that there was only the one angle that would work for the pickup as an overall. For the isolations, I was looking for things that stood out, something that would be a visual anchor of sorts. Usually, I like to use emblems and chrome trim but most of that was long gone by this point. Even the headlights were missing. The one thing that stood out to me was the lone tire in the bed. It offered a lot of contrast while belonging in the bed of the truck. How boring would it be to photograph a lone tire in a rusty bed though? I needed something to make it stand out. This is where the art of decay photography comes into play and a topic that I will be going into very much detail with in an upcoming workshop this Spring. The first step that I teach is to find something that stands out from the surroundings. That becomes your visual anchor. Now it is just a matter of finding a composition that supports that visual anchor. In the case of the tire, I chose to compose the frame around shapes and textures.
I love working with lines in my photography, and as I looked around the tire, there were lots of straight edges and hard lines. The tire was round with no hard lines. That was an additional contrast to the fact that the tire was black, and the surroundings were largely warm tones. From experience, I knew that the black tire would have a blue tone if I didn’t desaturate it. This blue tone would be beneficial as a color balance to the scene. I could see some blue paint on the wall of the bed as well which I could position opposite of the tire for a bit of balance. Things were coming together and I started working the angles and lines.
The decision was made to put the bed rail at the lower left of the frame as a direct entry point to the image. I allowed it to go slightly soft to keep the eyes moving into the scene. It was placed at an angle that almost bisected the frame, but I kept an opening at the top right that allowed the eyes to choose two different directions either down or to the left to explore. The cab was a bit darker than the bed which made for a natural vignette to keep the eyes in the scene. The tire, which was my visual anchor, was cropped by the composition to keep the eyes in the frame and not escaping outside of the truck. I kept the inner circle fully intact because I needed that shape but allowed the outer circle to be cut by the frame. The visual anchor was now a framing element that helped to tell the story of the lines and textures of the frame.
In all honesty, this was more an experiment than a surefire win of a composition. It was just something to try since I was there. It made it through the culling and into the editing process which kind of surprised me actually. It was one of the later ones that I edited and I kind of went into it halfhearted. After a few minutes of playing with the color profiles and a few global adjustments I was starting to get excited about this one. It had everything that I had been looking for with this concept and the colors worked very well to tell the full story. The actual edit went very quick as there was very little to do locally on this one. After about ten minutes, I was looking at a photo that I was really happy with and a composition that I had never tried before.

I was down the rabbit hole at this point and my creative juices were flowing, even if slowed due to the cold environment. I was at least glad that I had brought my heavier coat as well as a hoodie for the day. The routine of walking around the truck and looking for things that jumped out at me yielded the driver’s side headlight bucket. What really struck me was the fact that the trim ring was still there even though the headlight was missing. It was in a position that looked like it was in mid light replacement. I started to look at the surrounding elements to find a composition that would work. The overall scene was made up of very warm tones which I didn’t like because there was just no color balance to the photo. It was decided early on that this was going to be a black and white photo for that reason. I also knew that the bright chrome would contrast well with the darker tones around it in black and white.
I needed something to balance the headlight which turned into the front wheel. I was wishing that it was turned slightly to the right, but with this kind of photography, we have to accept what is there. At least the wheel arch gave me the shape that I needed for balance. The taller weeds to the right of the truck were used to frame the composition and keep the eyes from leaving the scene. By shooting from the corner, I was able to turn the bumper into a diagonal element for a bit of drama to the scene. The rest of it was made up of textures from the grass and the patina. In a way, the grill turned into leading lines directing your eyes to the headlight as well, since we read an image from left to right.
This turned out to be a very simple composition as it was one that I had shot many times over the years with different vehicles. It worked well here and made use of one of the few places on this truck where there was something chrome to focus on. The way that I was able to work out the micro-contrasts helped to really reveal the textures of the rust on a level that would have been missed in a color photo. If you compare this photo to the opening one, you can see how the driver’s fender looks pretty much a uniform color of rust which is largely was. By converting to black and white, the color makes no difference, and it becomes the layers that bring the visual interest. This is the part of black and white photography that I am wanting to really explore this year and become better at seeing in the field.

In my quest to find isolations, I eventually moved from the pickup to the panel truck parked in front of it. I knew that there was no way for an overall composition on that truck, but the patina of it was incredible with lots of textures. There was a bit more trim on the truck than had been on the pickup which gave more opportunities for isolations as well. It was not easy to find things to shoot on this truck though, and I had to put my frozen brain to the test to find something. One element that caught my eye was the apparatus on the side right behind the doors on both sides. It looked like a stainless steel outlet cover with a round screw on cover linked by a chain to the plate. I am not sure what this is as I have never seen one before. From the looks of it, there was nothing on the inside of the truck to help identify what I was looking at either. Whatever it was, it caught my attention, and that is the first step in creating a composition.
The one on the passenger side was bathed in the sunshine which was now coming down pretty nicely. The patina was also better on that side which made the decision to shoot the passenger side an easy one to make. The hard part came in the way of figuring out what else to include. I could have filled the frame with the outlet cover and just shot that, but what was the fun in that. I needed an environment to force the questions that would keep the viewer looking at the photo. It was positioned in such a way that I had patina to the left, which was nice, but with the door frame so close, I would have to create a very awkward composition to use the patina alone with the unknown object. On the other side was the door handle and lock. This was an easy addition to the composition because they were both similar in finish which would balance the two elements nicely. The problem here was that to include the handle, I was going to have to include the window and therefore the interior of the truck. I had to do it in a way that made sense to the overall composition.
My first thought was a straight on composition with the unknown object in the upper left third while the handle was in the lower right. The open window would be in the upper right third. Compositionally, this worked, but the window just showed the background of the truck and a little bit of the steering wheel. I didn’t want the attention going beyond the truck, so I altered my position allowing for some more diagonals to come into play. By moving back, and elevating the camera, I kept the basic idea for the composition intact, but replaced the through the window look with a view of the dash that offered more elements that matched the chrome and stainless appearances of the other two main elements. I didn’t need much exposure, or even focus on the dash as all I really was interested in was the lighter tones and the shapes that they defined.
It was the addition of the dash that completed this photo because you can tell exactly what you are looking at which makes you question the primary element even more. The composition is well balanced and shows off that wonderful patina. in fact, there is a large area of rust that I used to frame the left side of the image which helps to push the eyes into the frame. Of course, working in color was going to make this appear too warm and the interior portion was going to be too much of a visual shock. By converting it to black and white, the darkness of the interior blends well with the rest of the tones and what we are left with is the textures of the patina with the brighter areas directing our attention to the different areas of the frame. Oh yeah, and those brighter elements form a triangle within the frame which is another compositional trick I like to use.
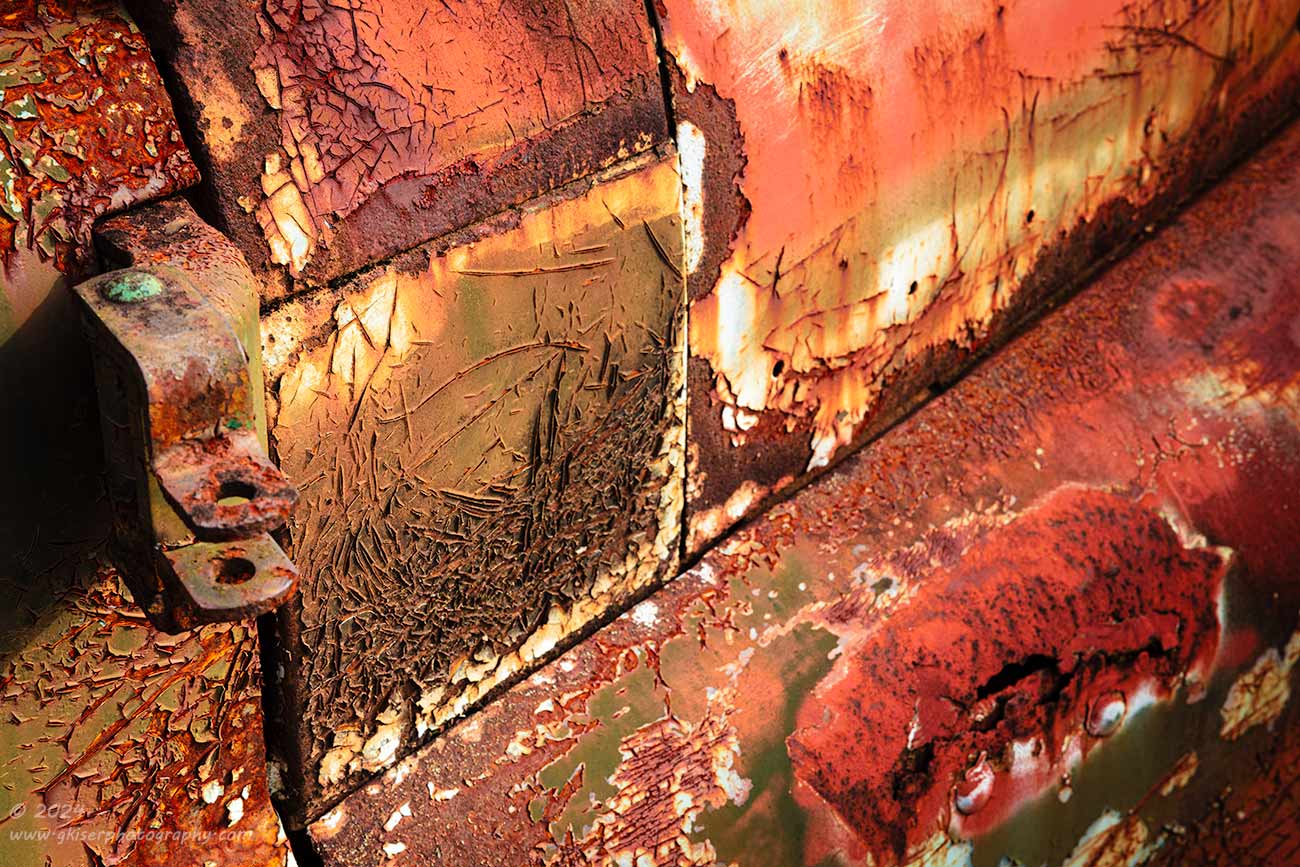
When dealing with patina like this, I hate to limit myself to black and white because the colors of age are so beautiful to me. The trick with a color image on this truck was going to be finding an area that offered some balance to the tones captured. Thanks to the sun, the colors were becoming more saturated, and I found a great blend of them on the passenger side front fender. This was an area that had a lot of body lines to help define the space. As with all of my other photos, I needed to find a visual anchor. This is usually the first step in a composition, but I found myself being drawn to the colors and textures of this area before I had found that anchor.
The only thing that I could find which would work here was the mount for the rearview mirror. It wasn’t chrome or stainless which meant that it blended in with the tones already present. The sun helped out here as well since there was a shadow behind the mount that showed depth. I was also able to place it over a body line to further that depth perception. This was going to be my basic concept for the composition. From here it was all about finding the right angle to shoot it. I knew that I didn’t want to do the straight on composition that I have done with this area of trucks before. It was going to be much more effective to shoot it at an angle, either from the front or the rear. I found that from the rear have a more readable composition as the eyes carried through from left to right. By elevating the camera, I was able to dictate the exact angle of the diagonal to exactly where I wanted it.
Even with all this effort on the composition, that was not the real focus of the image. You will remember that I talk a lot of about the three elements of a photograph. Those are: subject, composition, and light. If you have two of those, you will have a good photo, three of them will get you a great photo. I think that we can agree that the subject here is not all that strong. I mean it is an empty bracket on the side of a truck. However, we have a compelling composition that works to tell the story that I am attempting to. The fact that the sun is now shining on the area provides not only a shadow behind the mirror bracket, but it also brings out the texture of the cracked and peeling paint. It is that contrast provided by the sun which brings an entirely new element to the photo. I ended up having a solid composition, great light, and that great light created a strong subject. I’m really happy with how this photo turned out and it met all my expectations. The edit just intensified the colors and the contrasts to really bring it home.

As I have mentioned, both of the vehicles that I was photographing here were very warm in color tone with the amount of rust that was present. I had to be very careful with how I photographed them because the warm tones would get to be too much with the photos. I needed some cooler views of these vehicles to give some more variety to the day. Shooting interiors of these old vehicles has long been a challenge for me, but I am making great strides towards getting better at this subject. When I looked inside the panel truck, I saw my opportunity. The dash had a cooler tone to it with much less rust going on. I just had to figure out a composition.
My first attempt was from the driver’s side door through the window. It turned into an expected composition focusing on the steering wheel. I liked it, but in the end, it was really no different than what I had shot before of other vehicles. It was a later attempt that made it through the final culling. I had moved over to the passenger side where the window was either missing or rolled down. I switched my lens to my increasingly favorite 70-200mm telephoto and started to look for compositions. I struggled with including large areas of the dash to get the steering wheel, so I started to narrow my approach. As with all of my isolations, I tried to find what really struck a chord with me. It was the focal point of the dash with the speedometer, gauges, and speaker with the old school pull buttons. I started to work out a composition including those elements and realized that there were two wires below that offered some warm tones to the image.
I had actually been worried about having an image with too many cool tones and thought that I was going to have to do this one as a black and white. However, when I realized that I could include those wires in the composition, I had enough balance to some of the warmer tones splashed around the dash to make it work. I even knew the color profile that I would be using for it which would lean towards the cooler tones while keeping enough of the warm ones intact to really make it work.
The edit of this one turned out just as I had anticipated. It fit the need for a cooler toned image for the day, but still had a nice color balance to the entire thing. There was a lot of visual interest and the fact that this area of the dash is something that we just don’t see anymore, it holds a certain interest for those of us that have ridden in these vehicles. This became one of my early favorites during the editing process and was destined to be a keeper from early on. I love it when photos I shoot meet or exceed my expectations. This one did. It actually met my expectations in the capture, but when I did the edit, it exceeded what I had expected for this photo. If the RAW photo is the score, the edit is performance, and this one performed very well.

As I was working out ideas with the dash, I found that I really liked how the windows were clouded over with some pretty heave film appearing on the glass. There was also an old red oil filter sitting on the cowl in front of the windshield that offered a bit of color to the scene that I thought fit the overall look. That was the basis for the next composition, but I had to find something to anchor the shot and make the composition work. Directly below the windshield was the dash which was a stamped steel piece (all about safety I guess) with ribs pressed into the surface. There was a switch right in the center of the ribs that lined up with the center frame of the windshield. Just between those elements was a screw and a spacer of sorts which was positioned over the (assuming) other screw. Those three elements formed a triangle both with the switch and with the base of the windshield frame. The ribs on the dash became leading lines through the scene.
I framed this collection of elements up with a diagonal intent reading from left to right with the windows taking up roughly half the space, but in a visually interesting way thanks to the diagonals afforded by the camera position. When I shot this one, I wasn’t convinced that it was going to be color or black and white, but I had a feeling that I was going to have some amount of color since it was the reddish hue that the oil filter provided through the glass that originally caught my eye.
The final edit included a desaturated color profile with selected colors being saturated a bit more than the overall scene. It became a very subtle treatment, but it allowed the colors to tell more of the story that I wanted to share while keeping the attention on the design of the composition. I’m quite happy with this one and how it turned out. In fact, I am starting to see a lot more options with interior photos that don’t include the steering wheel as a main element. This will prove very helpful going forward because I think that it will be a great tool to have in my pocket for interior compositions.

Since I was seeing lots of potential in the photos that I was capturing from the interior of the panel truck, I went back to the pickup which had open windows on both sides of the cab. With them both being Dodges, the dash was very similar so many of the same tricks I had used with the panel truck would work here as well. The difference was that the interior of this tuck was very much rusty and had the same overall warm tones that I was trying to get away from.
My first attempt was the expected shot through the driver’s door showing the vines growing up along the pillar and including the steering wheel as a main element. It worked but seemed a bit static. It was no better than other compositions I had shot from a similar angle, so I ultimately decided not to edit it. As I had done with the panel truck, I moved over to the other side and started to look for compositions that didn’t include the steering wheel. Not wanting to repeat the same things that I had done with the other truck, I looked for a different way of representing this scene.
For a bit of variety, I rotated the camera on its side and started to frame up a vertical composition that kind of played off both of the previous compositions. There were elements that were different here that made those individual compositions less than appropriate, but by including all the elements in a vertical shot, things started to make sense once again. I had the split windshield represented that went into the dash in almost a triangle shape. The camera angle created a nice series of diagonals in the frame around this area. The stamped ribs were not as visible on the top of the dash because of the rust that had piled up there, but you can still make out the lines which help move the eyes around. It is that center focal point for the driver that seals the deal here with the speedometer in place as well as the gauges over most of the pull knobs. The speaker grill and speaker are missing which adds to the story in my opinion. It is the decay which is the main subject here and all the elements work together to support it.
I think that the success of this photo comes from the choice of doing it as a black and white. Since color wasn’t really all that important here, I removed it from the situation. This allowed the viewer to concentrate on what I thought was most important to see in this photo. It also made the holes in the floorboard make more sense. Instead of them just being splotches of soft focused ground, they are just patches of light which fill the negative space below the dash. It is still negative space, but without the splashes of light, it would have just been empty space which is not the same. Those splashes of light are also at a diagonal that mirror the direction of the window frame above and pull the eyes from the left to the right. This increases the readability of the composition greatly and it is those holes in the floor that make this image work the way that it does.
Of all the interior shots, this one might be my favorite, and it was the last of the three to get edited. I felt that there was too much going on in the scene at first, but as I was editing it and removing the color, the textures took over. I love photos that I think I can reach out and touch. This one has that look, and I could just imagine it as a print hanging on the wall. There wouldn’t be any fingerprints on the glass, but I would touch it in my mind every time I passed it by. I hope that eventually this one finds a home where it can be enjoyed on that level by someone. If that someone is you, I do offer prints of all my photos here on the website. If you want something other than the options provided for ease of checkout, I am able to make prints on a multitude of media as well as sizes much larger than what you see offered here. Just let me know what you want, and we will get the order started.
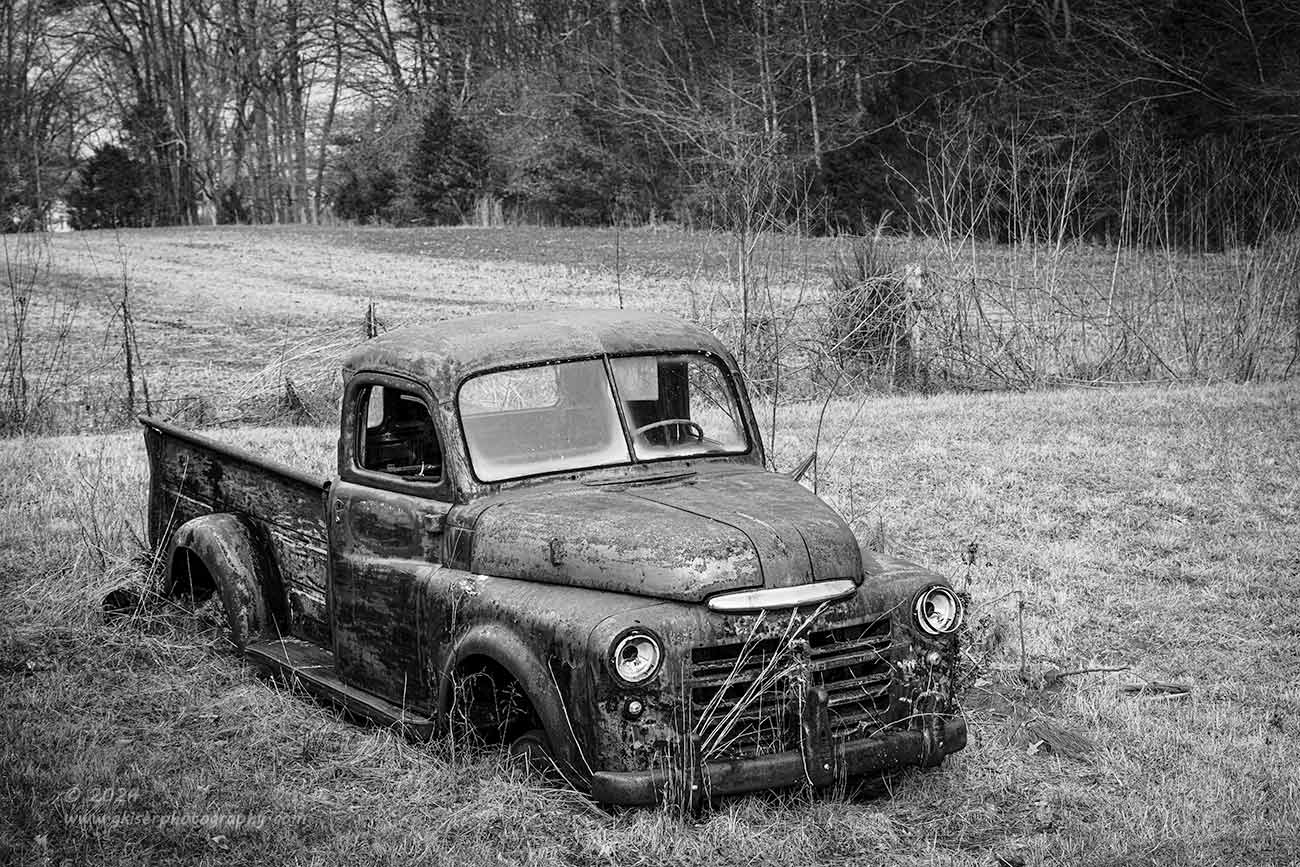
As I finished up doing the interior shot of the pickup that I liked so much, I felt that I wanted to try another overall of the pickup with the longer lens. The sky was now no longer full of interesting clouds. It was largely overcast without any texture. This prompted me to make a composition where the sky wasn’t an element. Of course, for the reasons that I had mentioned with the opening photo, I needed the sky for a proper color balance. Using the long lens was going to cut the sky out and force me to go black and white more than likely. This was fine as I am actively looking for good black and white compositions this year.
As with the earlier composition, I had to be mindful of the background. Thankfully, using the telephoto lens was allowing me to include a much smaller amount of the background than the wider angle. This gave me a little more flexibility in my camera placement, and I used that to my advantage. I went up on the hill to really elevate my position and then cranked the tripod all the way up to get a top-down perspective on the truck. This worked well and allowed me to separate the roof of the cab from the tonal variation in the field behind it. I wanted that separation because it would get too complicated with the turned dirt line cutting through the cab. I would much rather have it above and at the base of the trees. This view also gave me a nice view of the fence that was behind the truck. It is subtle, which was good as it didn’t block the eyes from moving through the scene. it did provide a nice midground to the composition though to help show depth.
Once again, the breeze was providing a bit of a challenge, not only from the fact that it was making my hands and face numb by this point, but it was blowing the weeds beside the truck. I had to change the exposure settings to compensate for that, and then I shot an alternate composition with a slightly different angle to change the placement of the windshield post against the rear of the car. That was the last composition that I shot here. I was cold and really felt that I had worked out all the angles on both of the trucks. Remember, I came out to get a single composition of the pickup which was actually successfully captured as the second of five frames to start the day.
I looked and had a total of 46 frames shot for the day. I felt very accomplished considering most of those were just playing around and looking for new ways of composing isolation shots. I was cold and tired and ready to go home at this point. It had been a successful day that ended up yielding a total of nine keepers. With everything loaded back up and the batteries changed in the camera, I headed back down the road. I did have one more stop to make though.
It was innocent enough, and just a few miles back across the highway. Well, that turned into a whole can of worms that I didn’t expect, and neither do you. We will get into that tomorrow with the next part of this blog. I told you; I have a weakness when it comes to knowing when to say when.
If you aren’t subscribed to the blog, you can subscribe on the website homepage at the bottom, or on the side margin of the blog if you are viewing on a computer. That way, you won’t miss a single blog entry.
See you back here soon!