Welcome back for another month of my Behind the Camera Series. If you have been paying attention to the previous entries, you will no doubt be expecting a tour of the studio this month. Well, I hate to say it, but I have had a change of heart on that topic. I’m hoping that we will be able to get to it next month, but during January, I decided to update one of the sets and to keep from rushing the tour around that set change, I just decided to put it off for another month. Fortunately, I have topics ready for all of 2023 at this point and I just substituted the next in line. This is going to be an interesting topic, and certainly one that will be much less involved than my last Behind the Camera, where I did a year-end review of 2022. I wanted to discuss this particular topic because I really feel that it will help new photographers, and ones that have been at it for a while. We are going to delve into the concept of tossing images and clearing your hard drives. This isn’t just a bit of spring cleaning; this is something that you should be doing with every import that you make.
I’ve alluded to the concept many times in this very blog. I’ll talk about shooting 139 frames during the day, but as you look back over the post, you will see that there are only about 13 photos shared. In some cases, there are quite a few less than that. Am I holding out on you? Are there thousands of photos on my computer that I’m saving for a gallery exhibit so that they will only be seen for the first time there? Nope, the ones that I post here are always the best from the trek (and hopefully good photos). The reason you are only seeing a small amount of the photos that I shoot is because of a single word….Editing. Each photographer has to become a great editor of their images and that doesn’t mean that they are proficient with Lightroom, Photoshop, Capture One, or any of the other software applications that are used to process an image. That is only a part of the editing process, but the most important part of it happens long before the sliders start to get tweaked. This is what we are going to talk about today.

“Your first 10,000 photographs are your worst” –Henri Cartier-Bresson
I’ve talked about the concept behind this quote before and how photographers need those bad images to get better. What I didn’t talk about was the need that we photographers have to keep everything that we shoot. Let’s have a show of hands here, how many of you have a hard drive filled with photographs that you have taken, or maybe you just collect memory cards and replace them when they get full?
[counting out loud as I see hands go up]Just as I thought, there are a number of you out there. When I got started, I would have raised my hand proudly because not only did I keep everything that I shot, I made backups of those files. I still have a box of CD’s with all my original photos in the closet. In the course of maybe three years, I had filled up a large boot box with CD’s crammed in there, all full of digital images. I had those same images saved on my computer. Honestly, it wasn’t a big deal then because I was shooting either a 2mp or 8mp camera and was going with a jpeg workflow. I just wasn’t taking up that much room, although looking back over those CD’s shows that I was wrong and simply lying to myself. As I got further into photography, I moved up in megapixels, and started to shoot in RAW with TIFF master files. The storage alone was going to cause me problems in the very near future and something had to be done.
Looking back over all of my originals, there was only a small amount that I deemed to be good enough to show, or otherwise use. To make matters worse, I had large numbers of the same composition with subtle changes made until I got to the one that I deemed the best which was edited further. The redundancy of the photos confused the issue greatly because it became very difficult to locate the original when the need would arise. I honestly didn’t know what to do because I had read that you need to keep your originals, and even ones that you don’t edit.
The answer came in the form of a magazine article from Outdoor Photographer about the time that I was switching into a DSLR kit and shooting RAW. I remember reading the article with my usual gusto because I was learning things at an alarming rate. I don’t recall what the article was about, but I distinctly remember reading that professionals will likely only keep about 10% of what they shoot. The horror of it….getting rid of 90% of what you shot??? That would be such a waste of time in the field knowing that nine out of ten images would never see the light of day. And these were professionals who were supposed to be very good at what they did. Surely, they would only shoot winners!
That isn’t the case, and don’t call me Shirley. Ba dum bump
The more I thought about it, and the more I started to pay attention to my treks, the more I realized what they meant. Much of the issue that I was having was dealing with several versions of the same composition. It seemed that for each composition that I shot, I was actually shooting between ten and twenty images in order to get things fine-tuned. Of those files, there was usually one that had all the ingredients that I wanted. Then it clicked for me. There was really no reason to keep photos that were so similar when there was one that was clearly better than the others. I would never do anything with the ones that had flaws, and they would just clog up my storage options. I saw a light at the end of the tunnel when it came to file storage after reading that article.
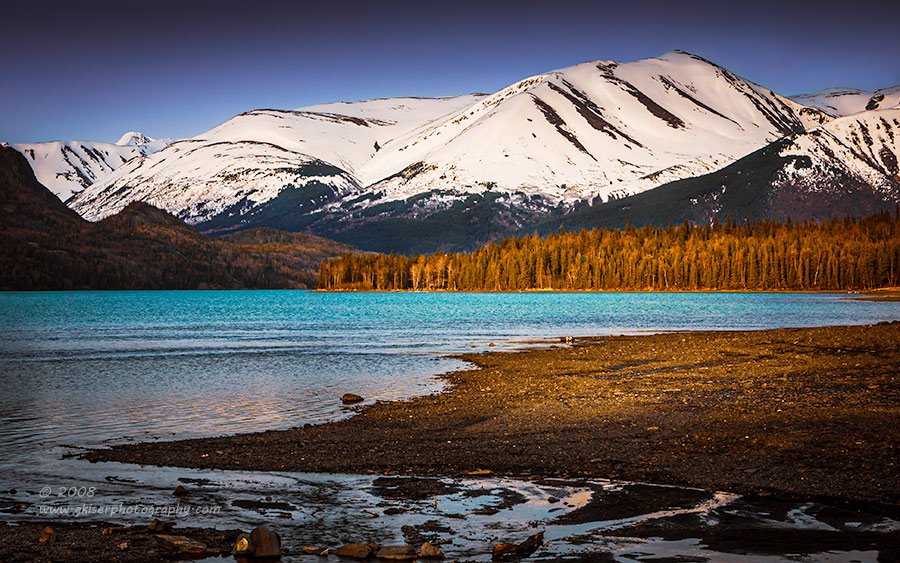
Of course, even with that new understanding, it was very hard to get rid of 90% of what I shot. For example, when I went to Alaska in 2008, I think I shot about 350 frames. Out of those, I realistically should have kept about 35, but in actuality, I kept 90 of them. That is nearly a third of the trip which isn’t all that bad for a once in a lifetime visit, but over the years, the photos that really stood out has dropped significantly to much less than that 90 from the original culling, and closer to that 30 mark. What this tells me is that I didn’t edit the originals as well as I should have. I forced images through that weren’t all that good in the first place which had the result of watering down the body of work from the trip. I was still learning back then, so I don’t regret the choices, but instead used them as a learning opportunity for the future.
When it comes to culling your images, you are actually talking about the first steps in the editing process. This is both the easiest and the hardest at the same time. It takes no skill or proficiency with programs like Lightroom or Capture One to cull your images. It only takes gut reaction when you see the photo, with a little understanding of how you would like to see it edited. The problem with harnessing that gut reaction is that you are emotionally invested in each and every frame that you have shot during the day. Each time you press the shutter, you are convinced that this is “the one,” but if it was, wouldn’t you have stopped right there? Nope, we keep shooting trying to make it better, or at least we should be. Lighting changes, the composition shifts slightly, and even exposure choices or filters might change. It is through all of these changes that we are attempting to make that “perfect photograph.” Before you start typing your comments out, there is no such thing as a perfect photo, but there are ones that get closer to it than others. Choosing the cream that rises to the top is not easy, especially for someone who’s eyes are not trained to see the issues with a photo. If you learn nothing else from this installment, I want you to learn that editing starts with choosing the strongest images before the first slider is ever moved. This skill will eventually follow you into the field and you will be able to make lots of adjustments to the photos you are capturing in the field which will hopefully make this process easier when you start your editing.

So, culling sounds like a great idea and getting the best of the best certainly appeals to you on several levels, but how in the world do we arrive at that goal? Well, you have to separate yourself from your photos and lose that emotional link you have which is strongly linked to the moment that the image was captured. This is something that is hard for everyone because when you look at the photos you shot, you are immediately taken back to the entirety of the scene, and you can remember what it felt like to be there. Your viewer doesn’t have the same experience to lean on and is relying completely on your photograph to paint an emotional setting for them. As part of the culling process, you have to reduce your photos down to just the elements in the frame in order to evaluate if it is a successful photo or not. A trick that I will sometimes use is to wait a day, or even more before I start to go through the images and cull. This can be helpful when I have a strong emotional attachment to the shoot because it will allow my own emotions and memories to fade so that I can just evaluate the photo. This is also a very effective method when I come back from a trek that didn’t go as planned. Those are the times that I just feel like everything that I shot was garbage. By giving myself emotional distance from the images, I’m allowing myself to react to the photos on their face, just as a viewer would. Most of the time, however, I can turn the memories off from the trek and read the photos for what they are. I guess a lot of that has come from the fact that I know that the more photos I select to edit, the longer I’ll be sitting at the computer. That makes it very beneficial for my time to only pick the best of the best which motivates me to make the hard choices.
I have a multistage process that I run through in order to cull my images. I do it all in Lightroom which reads the RAW files and creates a photograph to look at. These are not edited in any way other than the Adobe Color profile has been applied to them. I have learned not to pay much attention to the colors or contrast of the image at this point, but I will look at the composition first and foremost. Lightroom has a rating system where I can award an image 1-5 stars which I use during this process with great success. As stars are applied, I can filter the group of images that I’m looking at, so with each progression, I have less and less photos to look through. You will truly see the benefits of culling just during this process because each image that rises to the next level becomes a stronger image without a bunch of similar images around it to dilute the impact.
This is how the process looks and the qualifications of each stage the way I do it.
One Star
During this round, I am looking at each and every photograph that I have shot from the day, or location. As I scroll through the photos, I don’t look at details, but kind of look at a blurred version (forcing my eyes to blur and not really see details) to see how the overall composition feels for balance and impact. If the composition works, I will award the image with a single star. As you can imagine, this is where I lose most of my photos because as I change the compositions slightly with each exposure, I am getting a different visual balance. This causes me to usually have just a few favorites from the series which I will want to look at closer. In addition to basic composition, I am also evaluating overall exposure, so if I see a grossly overexposed, or underexposed image, they will be awarded no stars.
Two Stars
This is the round where I start to look at details. Most of the time, I am looking for separation of elements (overlapping, or too much distance between). This is a very important detail that affects how the story has been delivered through the photo. Other details that I might look for at this time are things like cloud position in the sky, or how the water appears in waterfall photos. These subtle changes between photos will have a huge bearing on how the photo is received by the viewer. They both still fall under the composition umbrella and makes for a natural follow-up to the previous culling. This stage is usually a more subtle culling than the previous but is starting to get us closer to a workable number of images.
Three Stars
This is the stage where things start to get cutthroat because all of the photos in our list at this point are very well composed and have good details in the image. At this stage I am looking for things like movement in the frame from wind, lighting changes, and all of the subtle changes. I will use the zoom feature in Lightroom at this stage to see small details and how sharp they are. If I have been working with limited depth of field, I will typically look at focus points as well. This process will get rid of another handful of images and leave me with a workable number of photos which have been awarded three stars.
Four Stars
At this point, I might have two or three of the same composition with each one working very well. If I run into that problem, this is the stage where I will put both images on the screen together and see which one has the most impact. I might also put them into the develop module and adjust the highlights and shadows to see what the dynamic range is on them. Ultimately, to make the move from a four star to a five star image, it will go through the full editing process and I will evaluate how the image makes me feel. If it misses the mark, I can copy settings from that edited image to one of the similar four star images and see if that one turns out better. If that is the case, I will do some more tweaks for that specific image and the best of the best will get awarded a five star rating. This is the stage where I will end up with between 5% and 20% keepers, or hit rate.

This sounds like a very long process, and it certainly can be, but I have found ways of speeding it up quite a bit. For one, I have done this so much, that I am able to spot some of the issues that I normally would reserve for later runs through the images and cull them much earlier in the process. It is not uncommon for me to go from two or three stars to my final edited five star image. In addition, at some point during the last two years I started to change the order that I go through the images which has greatly helped out with this. I now start with the last image and go in reverse awarding stars. You might not see the benefit of that right away, but it is actually a stroke of genius when you think about it. I can say that because it was not my idea, and I picked it up watching YouTube a while back. The logic is very strong because most of us will continually try to improve our images as we make additional exposures. Once we feel like we have it, we will go to something else. I’ve shot 20-30 frames of one subject like the pier above waiting for the light to change and then once it hits and looks great, I get a bunch of exposures until it starts to fade away. If I go through those images in order, I will have the same reaction that I did while shooting them. Each one will be good until I see the next one which will be better. I’ll end up with a bunch of one star images for the next round. If I go in reverse, I’ll see the peak of the conditions earlier in the process and it will keep me from giving a star to the earlier ones unless they say something completely different. Doing this one different thing from how I started has saved me about 50% of the time that I spend doing this process. When you come across the best one sooner, you automatically look past the ones that aren’t as good.
There are other times when those images that are in line to get edited might not get edited, or still might never make it to a point where they will get viewed. When I have culled my list down to the photos that I think will make good edits, I will start the editing process with the one that has the most visual impact for me and the one that I feel the strongest about at the moment. That will be how I go through the edits and by the end of that process there might be a couple of photos left that just don’t resonate with me anymore. These are the ones that are the weakest usually from the bunch. I will hold onto them for a few days to see if my opinion changes, which it will sometimes. There have been a few blog entries that I have done recently where I have gone back to look through the images to see how my filters changed, or to see timeframes. When I come across these highly ranked images that I didn’t edit, I will sometimes be motivated to try something different with them and then they end up making it into the five star rating after all. When this happens, it is usually a very successful trek with a lot of photos that I think rise to that level and I just get tired of editing so the last few look less appealing to me until the next day. Other times, I will remember similar images that I’ve shot before and remember those being better than the new ones. As I go and link back to the previous blog entry and see the photo again, I might change my mind and realize that the newer one is better in some way and worth being released. Regardless, at this stage, the ones that make the cut are the strongest of the bunch and I will usually put the hit rate at the end of the blog entries. My average is 10% give or take which I am totally happy with.
What do I do with those other 90% of the images shot? I delete them. Sure, there is an off chance that I might regret deleting a photo at some point, but after the culling process I put the images through, I am convinced that the ones that I choose are the best of the best. About the only time that I would want to go back to those deleted photos would be because I’ve learned a new editing technique, or a new version of the software has come out which would make the image a success. However, that is getting dangerously close to “fixing it in post” which I am not a fan of. If the image isn’t a strong one out of the gate, there is no amount of post processing that will change that base fact. It will just be makeup at that point.

Now that we know the process that I go through in order to get the images that I edit and keep, let’s look into the logic behind why this is a good thing. If we look at the barn image above, there is a certain impact to this image. It has been one of my most successful prints and I still have to pick my jaw up off the floor when it is printed on Baryta paper. I love everything about it. The composition works so well (one star), the clouds and framing of the tree adds visual impact to the image (two stars), The light falling on the barn and casting the shadows on the foreground draws you into the image and there is nothing that is blowing in the breeze (three stars). There was no need for a four star culling here because this was one of only a few frames and there was no comparison needed. However, this was not the composition that I had stopped to get. I had tried compositions from the left and the right before getting this when the sun started to play nicely with me. In all, I had about 20 images of this barn with three different views. Imagine for a minute if I had chosen to keep all of those photos and share them all here. Maybe, I just picked one from each of the views. As we looked through those three or more images, the visual impact of this one would fade. It would just become one of many photographs of the barn. What has been one of my favorite prints, would have just become a face in the crowd never to be appreciated as it has been.
When we think of editing, we think about things like contrast, color, exposure changes, and manipulations of the digital file, but those are all things designed to fine tune an image. The most important part of the editing process is where we decide what images are a success and which ones truly rise above the crowd. As the photographers, we have the best ability to do this because we know what our vision is, and the emotion that we are trying to convey through the photograph. If we can’t make that decision, it is unfair of us to have somebody that is not involved with the creation of the image decide which one has the clearest voice. The photographer has spent the time learning their craft, finding the subject, and working the composition, so why can’t we decide which frames are better than others? Well, the best answer I can come up with is nobody likes to see their work as a failure which makes it very hard to press delete and admit that the photo doesn’t work.
As photographers, we have to be ruthless in our quest for perfection knowing that we will never arrive at that level with a photo. This ruthlessness in the culling process is actually very good training for you in the field. Consider this, after spending hours going through your originals and picking them apart for why they don’t work as well as the next one, you start to be able to recognize many of your patterns and mistakes. You might realize that you are missing distractions coming in from the edges, or maybe you have a habit of cutting things off with your framing. You might see opportunities for improvement in the area of separation of elements within the frame. It could just be that you realize that photos that are shot with a 50mm focal length are more boring than the ones that are shot wider. Whatever the case, you will get very good at seeing what works and what doesn’t in your own photography. Even the five star images you will learn to see things that could be improved on that you wished you had done at the time of capture. All of this information is valuable, and it becomes part of your subconscious evaluation which you will start to do in the field.

As you get better with culling, you will find that you are slowing down in the field and considering each composition in much more detail than you have before. You will start shooting less variations and spending more time on a single composition that works. What I mean is, you will be able to recognize the elements of a great composition much quicker and you can then lock that in while you photograph the change in conditions and lighting to get the best image possible. On a related note, this is where a tripod comes in so well in this type of photography. Once we have committed to a composition, we can lock the camera in so that nothing changes except the lighting and possibly the exposure. In the scope of this topic, the tripod will be the difference between a three and a four star image because you will have two that are so close together that one single detail makes one stand out above the other.
It is the skill of culling that allows you to evaluate every image that you shoot in the field and decide what changes you would like to see. Many times, you can cull to the one, or even two star level by looking through the viewfinder or live view. Does the composition work? Are the edges clear of distractions? Is the exposure right? You learn to recognize the junk photos before they are even captured, and you can dial in the composition better before you even press the button. This is how photography used to be when photographers were using large format cameras where they only had five or six plates to expose before they had to go home. Culling images after the fact makes you better at crafting them beforehand. That means that the images that you are culling get stronger and stronger. In all reality, these days, I will start to edit from my two star images because I’ve already done the first two phases of the culling in the field before I even press the button. That leaves me with compositions that work, exposures that are right, and a visual impact. I just have to evaluate the details as part of the culling process which takes no time.
You would think that by being so selective in the field, that I would come home with less RAW images and have a very high hit rate. Well, the fact of the matter is I’m still shooting the same amount, but instead of capturing lots of failed photographs, I am capturing a lot of very strong images with very minor differences that usually come down to the shape of the clouds, or a spot of highlight on the main subject. It might be a blade of grass that is moving in one frame and not another. These small details account for most of my exposures, but they leave me a bunch of the same image. In many cases it is that one blade of grass that tells me which one is going to get edited over the rest of them. In all actuality, I could edit any of the photos that I shot in that series, and nobody would be the wiser, but I would know. This is what makes me the photographer that I am and helps me produce the quality that I do. I spend the time to shoot 90% of the files captured to be trashed, so that the remaining 10% fully express the story that I am wanting to tell.
I’m sure as I get better as a photographer, I’ll still keep on average 10% of my photographs because I will find new details to stress over and have to cull out. I have reached that stage in my photography career to where I can feel good about deleting 90% of my photos because I know that the ones that I am keeping are really the best of the best. It was a hard concept to really understand at first, but once I embraced it, it has made me a much better photographer, and the impression that the viewers have of my work has improved along the way.
Think about those photographers that will post 20 images on Facebook of the same subject captured in nearly the same composition or angle. You look at a few and then move on just remembering the subject, but not the photography behind it. Had that photographer culled the images down and made the choice of which image worked the best, you would be looking at a clear image of the concept left with a single impression of the subject in the terms of that particular composition and presentation. You would know what the photographer found most interesting about the scene, and you could spend time appreciating the story behind the photo. That right there is the power of culling your photos, and there is just no way of denying it.
I challenge the photographers out there to evaluate their catalog of images. When you go into your photos, do you see everything that you ever shot? Most of everything you shot? Half, or less? Did you just realize that your hard drive crashed, and you have no backups (a related topic for another day)? What value is your current catalog of images? Is it groups of 20 frames for a single subject where they all just blend together and you can’t be bothered with figuring out what is the best, so you just post them all? Do your photos have impact when you look through them and cause an emotional reaction with every frame? If you agreed with the last one, you are on the right track. If the other questions described your photo storage better, then you need to get better at culling your images. Look at it as an investment in your own growth as a photographer and look at it as a chance to breathe life back into your collection of photos so that when you look through them, you are impressed with each of them. Nobody wants to sit through a slideshow of your trip to Yellowstone that includes five carousels of slides showing the same views over and over. Add impact to your catalog of photos by removing the excess which doesn’t quite rise to the same level of quality as the others.
Thank you for joining me for this installment of Behind the Camera. I hope that the studio updates will be ready in time for next month’s installment. I am excited to show off my studio space and give you all an idea of what I can do with it. It just wasn’t quite ready for this month unfortunately. Hopefully the topic of culling has been beneficial for you and will give you yet another tool in your box to be able to grow as a photographer. If you see the need to do this, but just can’t bring yourself to cut images, I do offer portfolio reviews and image critiques as part of my mentorship programs. With those services, I would be able to put together a custom package for you to help you learn how to cull your portfolio which could easily be done virtually. It is a hard skill to learn, and even harder to master, but if you can get started with it, you will see improvements almost immediately and will quickly get to the point where you can automatically pick out the stronger images.
I’ve also found that embracing the 10% keeper theory has removed a lot of the stress I have about creating strong images. It is freeing to understand from the beginning of a shoot that 9 out of every 10 images will likely be thrown away. I don’t have to create magic with every press of the shutter, but I also know that the more I press, the higher the chance that I will get something with that one detail which makes the image better than I might have hoped. There are just so many moving parts to photography and so many things that are outside of our control that we have to understand that most of what we shoot will have problems. The better we are at recognizing the problems, the better we will become at avoiding the problems in the field so that we can focus on the details that elevate our images even higher.
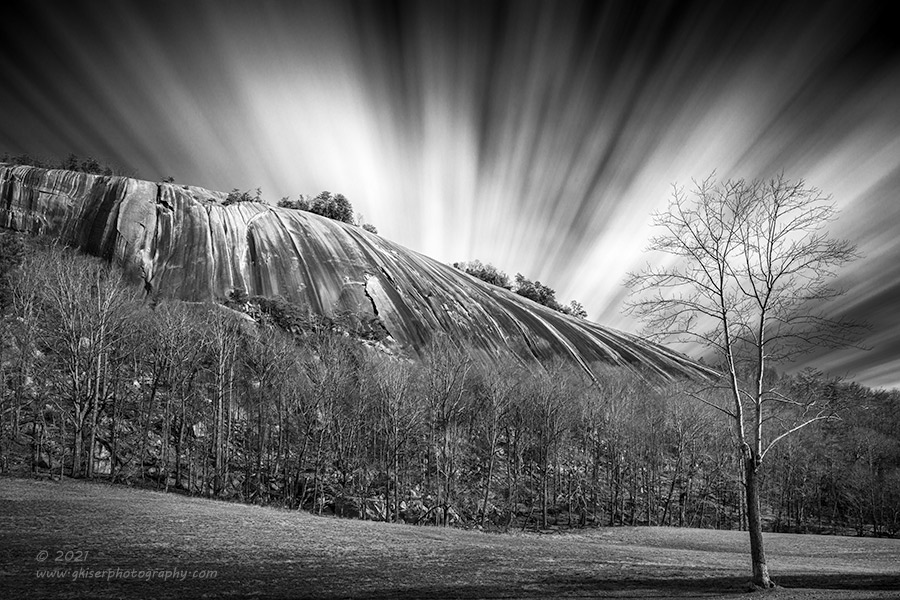
By the way, that first photo that I opened this entry up with was a throw away image. I only kept it to show part of the process that resulted in this final image from Stone Mountain. Would there be any legit reason to keep that first one when I had this version which was shot moments later of the same composition, but very different shutter speed? Nope, it would just dilute the impact of the image that was the strongest of the group. Just imagine if you were looking through another half dozen images with this same composition, but different presentations. None would be special…that is the purpose of culling your images.
You aren’t deleting photos; you are adding a great deal of visual impact to those photographs that remain.
Until next time….

Remember to use the code KISER10 to get 10% off your purchase