Thursday, December 21, 2023
I realized something as I was uploading the files from today’s trek. I had shot the same number of exposures as I had on my last trek to North Wilkesboro. This was not some exorbitant number of exposures either. It is all too easy to get a digital camera and just fire off shot after shot because the shutter releases are free after all. I’m not shy about pressing that button either and I have been very vocal about averaging about a 10% hit rate over the years. This is kind of what grabbed my attention during the import. You see, my last trek resulted in a total of 36 photographs shot during the session, which yielded seven keepers which was quite good considering how I was feeling about the trek afterwards. It was that 36 exposures that hit me kind of hard when I saw it for the first time. You see, back in the film days…not the “I’m special because I shoot analog” film days; I’m talking about the original film days when that was what photographers had to shoot with. For a 35mm camera, one of the customary rolls of film would be 36 exposures. This would be like the extended play version as the 24 exposures was probably more common and easier to process. But I digress.
I had no idea how many exposures I had shot during the trek today because I didn’t really keep track of it at all during my time. I just found the compositions that I liked and shot the image before moving onto the next scene. The first time I had any idea of the number of exposures I had shot was when I imported the files into Lightroom. I thought there was a refresh error or something because I saw 36 exposures once again, which was the same as last time. It only took me a moment to realize that I had deleted 29 of the last group of photos so what I was seeing was the count from today’s shoot. Hmm, 36 exposures each from two different treks. This means that I could have realistically gone out with a single roll of film for each day and filled that roll up so I could get it developed. There was something nostalgic about seeing that 36 exposures for the second time. I’m not sure why that is because I was never a “film photographer”, I just did family snapshots and such with an instamatic 35mm camera. I have no want to shoot film, so there is no reason that I would have keyed in on the 36 exposures except for the fact that it is cool that I just arbitrarily stopped shooting at that point both times.
For years, I have said that I shoot digital with a film state of mind, which might play into this as well. What I have meant by that is that I don’t go into a situation thinking that each frame is free, and I can shoot thousands of photographs each time I go out with no impact on my wallet. While it might be free in digital format, shooting that many frames just makes it harder to go through the culling process and pick out the photos that you want to edit. When I say that I shoot in a film state of mind, I am saying that I will take my time getting the composition and exposure right before tripping the shutter. It slows me down in the field, and speeds me up during the culling. I enjoy thinking through a composition and doing my initial culling using the live view of the camera before I ever consider pressing the shutter. There have been plenty of times when that process has made my hit rate really high like a recent trek to Taylorsville. Of course, when the lighting is difficult or changing quickly, I am forced to make a lot more exposures with each composition because I am always trying to capture the best light that I can.
I realize I might be getting ahead of myself by talking about how many exposures I have shot, and things like a hit rate. We haven’t even introduced the trek I’m talking about yet, so I am going to rectify that right now. While I have been past this location a few times over the last few years, I had always convinced myself that there was nothing there to photograph because of how the different vehicles were positioned in the yard. There were several vehicles on the property that interested me like a GMC pickup, a Cadillac, a Biscayne, and an Impala. Over the years these vehicles have just gotten better and better, but I still didn’t have much faith in being able to capture them effectively, not to mention I was going to need to get permission before I even attempted to try. Not feeling confident about the outcome, I didn’t want to waste the ask for nothing.
It wasn’t until I was meeting a client on the road where this property was to discuss a Spring shoot for his two classics that I happened to check the property out again. There was also another one further down the road that I was interested in shooting as well which I had seen before. I’m sure that my maturing as a photographer has had something to do with my ability to see more options with both of these properties now, but I was starting to see a lot of potential with both of these properties and felt that I really needed to come back and give them a try. After meeting with my client, I continued to think about these two locations and decided to go back out there to scout them a little more seriously with a mind that was focused on that particular type of photography.
The day that I went back was a bright and sunny day and I knew that there would be no sense in bringing a camera, so I took the Miata for a fun day trip with a bit of scouting. When I arrived, I drove by both properties twice and had mixed feelings about the potential with either of them. There was nothing clear cut that I could do, but I felt that shooting isolations would be the key to success with both spots. It would come down to whether or not I could get permission and I was going to need some clouds in the sky to diffuse the light, while keeping it directional. Those days have been rather hard to come by here lately, and it was just over a month before the weather was looking good in East Bend for these subjects.
The problem I was facing was that I was going to be a little busy during the day because Toni was leaving on a trip for the weekend. Wednesday evening her tire pressure light had come on and when she got home, I checked the tires to find that there was a nail in the left rear one. This is twice in about three months that she has picked up a nail and we are starting to think that her car is doing community service by doing roadside debris pickup. When I found the nail, there wasn’t time to get it to a shop to have it patched, so that was going to have to be first thing in the morning. Once I had that under control, I wanted to see her off, so I waited until she got on the road around 2pm.
The clouds had been pretty good all day, but shortly before she left, I could see them starting to thin out and clear to the West. I knew that I would have a bit more time considering I was going to be about an hour further East. As long as I had some clouds, I would be fine, and there was still the issue of needing to get permission and then being able to make the compositions work. I wasn’t putting a lot of pressure on myself for this trek because once again, I really wasn’t feeling much like going out, but I had decent conditions, and they were likely going to be the best conditions for the foreseeable future. If I couldn’t get it to work out, I wasn’t going to let it bother me. In fact, I had recently done some math and found that at the rate that I am posting to social media, I have a backlog of photos that will take me to May 22, 2024, if I didn’t shoot another frame between now and then. Don’t get me wrong, I am not basing how often I go out on my daily social postings, I’m just saying that I have had a very active second half of the year when it comes to adding images to my collection.
It is nice to be able to go out and not have any pressure on me. Those are the times when I usually hit the jackpot and get a lot of new photos, or some really great ones. If I feel like I need to create images, I typically have a very hard time finding the right subjects and the photos look very much forced which I don’t like. It also puts a lot of stress on me to create which is one of those killers of creativity. So, here I was headed out at around 2:30 with an hour’s drive ahead of me and sunset coming in at 5:15ish. I wasn’t going to have long to work, and I was also running out of cloud cover.
When I arrived in the area of the two locations, the sky was mostly blue, but the sun was currently being covered by a small area of clouds which looked to be sticking around for a while. I slowed down when I got close to the first location which had the most subjects to choose from. Not much had changed with the lay of the land and I still wasn’t convinced that I was going to be able to do much with the cars. Isolations were definitely going to be the main technique to pull from for this location. Still not feeling very confident, I went on to the other spot to see if that offered any better options. There were just two vehicles there, a delivery truck and a pickup. I could see a composition on the pickup and felt that there were some isolations to be had on the delivery truck. The garage door was opened to the shop that the trucks were parked beside. I was thinking that this was going to be the easier of the two locations to shoot, so I pulled into the driveway and approached the open bay door. I announced myself, but there was no answer. I went to the neighboring building which also had an open door, with similar results. There was a house at the end of the driveway that I walked up to and knocked on the front door. I could see that there were cameras pointed to the entryway, so I knew that this house was occupied, or at least monitored. I was hoping that somebody would come to the door, or maybe talk to me through the camera. Neither of which happened, which left me standing on a property with two opened buildings. I didn’t want to be held responsible for any property, so I decided to get back in the truck and head back down the road.
I was starting to think that I might just try looking for a target of opportunity on the way home because I still wasn’t convinced about the first property that I had been to. As I approached that property for the second time, I slowed and pulled off to the side of the road to look at the cars in a bit more detail. The light was looking good on them, and there was definitely plenty of visual interest in the patina that they each offered. I just didn’t know if I could pull it off with how close they were to other vehicles and some pretty major distractions. I had just about convinced myself to bypass this place once again when I saw movement in front of the house.
One thing that I have learned over the years is if I can find the property owner out in the yard, I shouldn’t pass that up because the next time I come through, they might just not be home. With that thought in mind, I pulled into the driveway and hopped out of the truck. I approached the guy in the yard and greeted him. The response was a little short, and I could tell that he was a bit suspicious of why I was there. I went ahead and cut to the chase about who I was and why I was bothering him. His demeanor changed and he agreed to let me photograph the cars. We actually spoke for a few minutes, and he told me a little bit about the cars and some about his history. What had started feeling like less than positive interaction had turned into a very nice conversation. You just never know who you might run into when you stop to ask permission to photograph rusted cars.

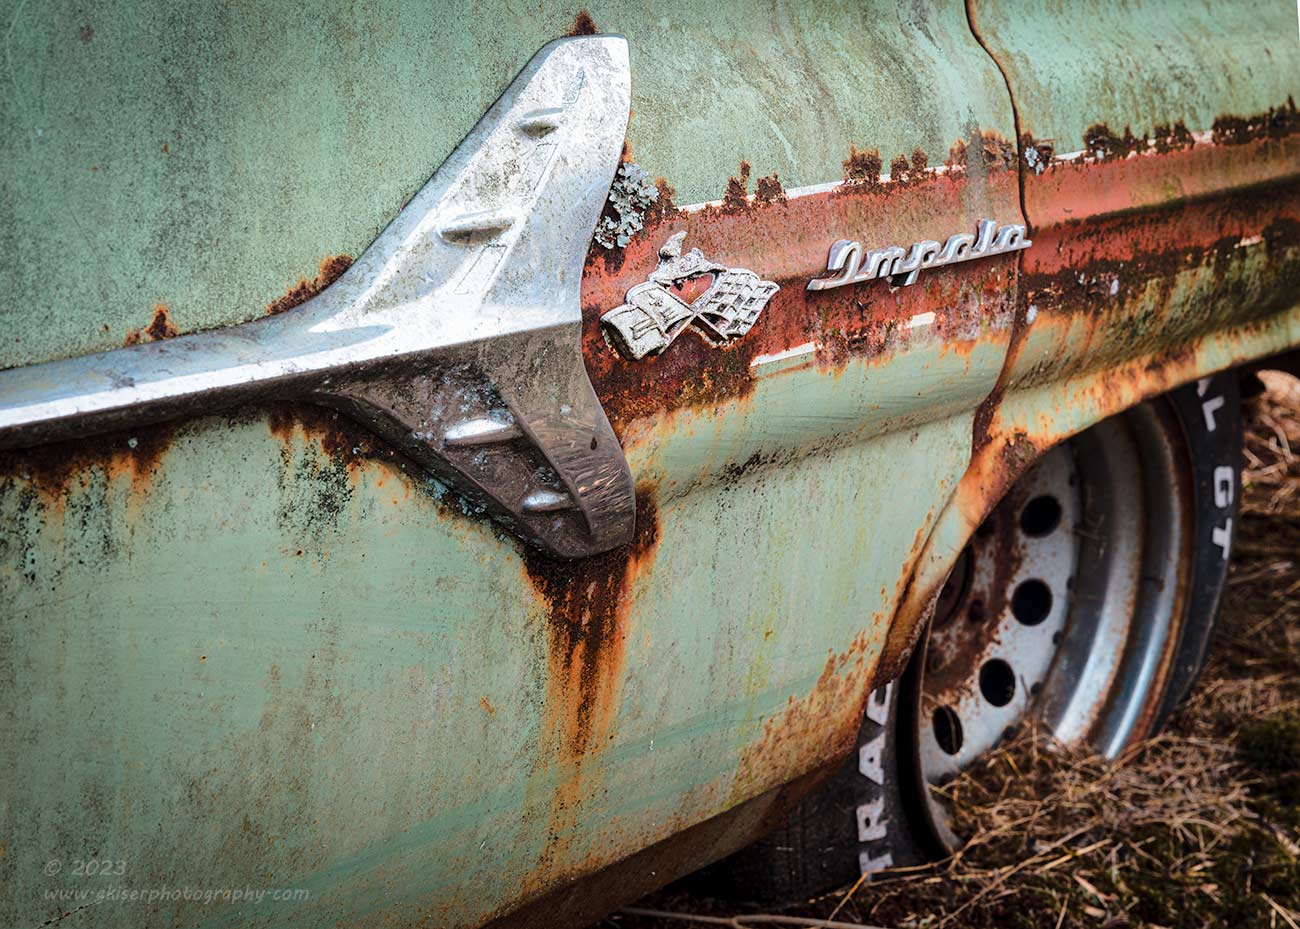
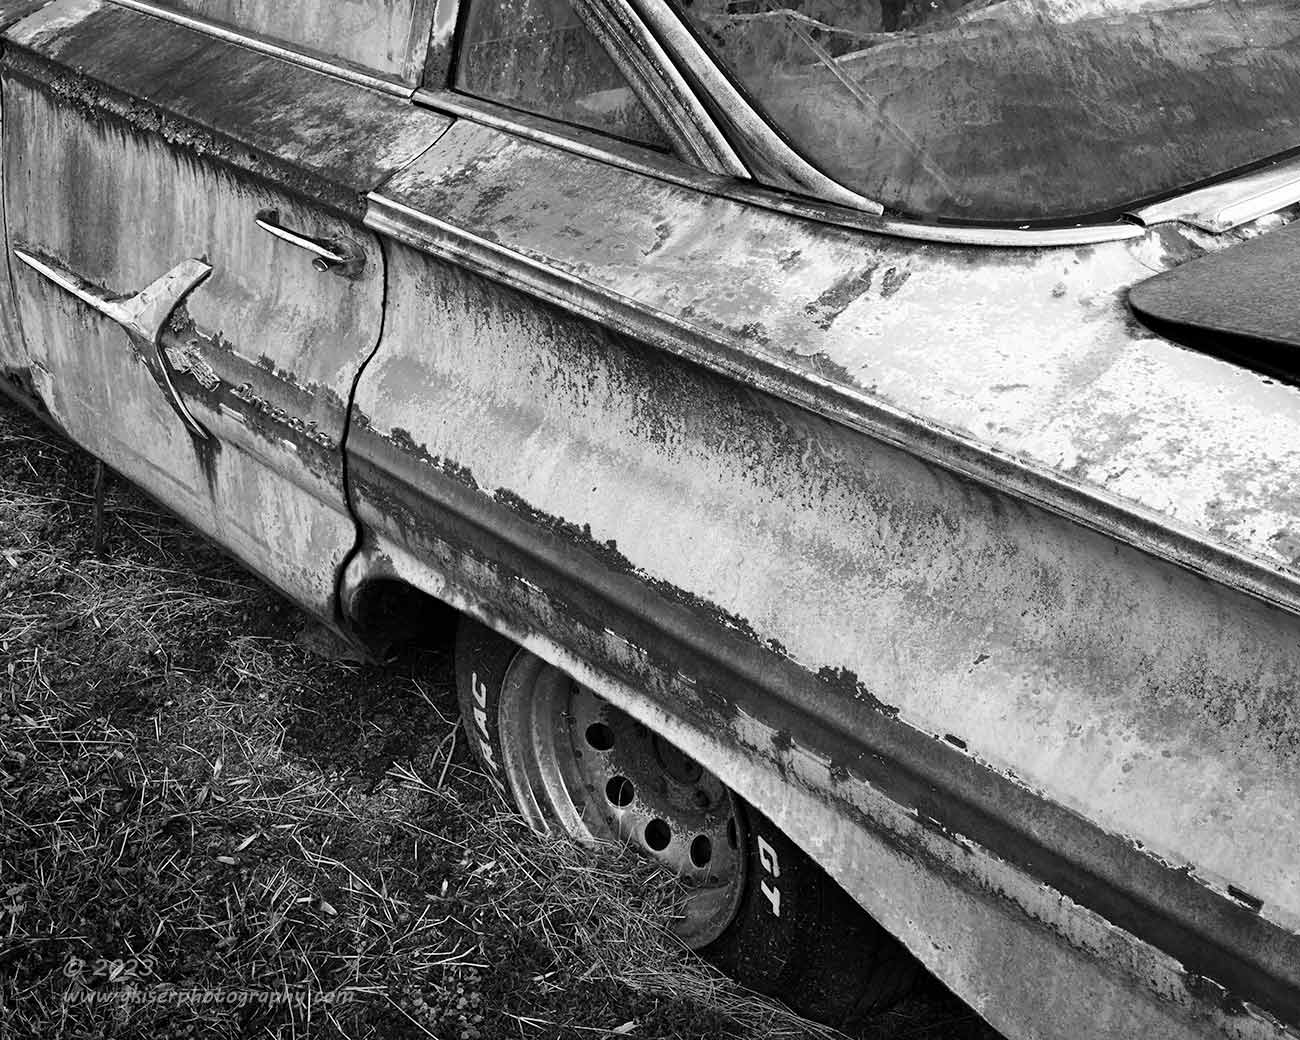
Now that I had permission to photograph the cars, I pulled the truck out of the way and got out to look at what I figured was the most interesting of the cars. It was a four door Impala which had an amazing patina to it. It was in a position where I wasn’t going to be able to get an overall shot of the car, but there were plenty of options for isolations. The trim and emblems were largely still in place which always make for a good photograph. I found the first point of interest with the driver’s side rear which had the arrow and Impala script still in place along with a period correct mag wheel. I went back to the truck and grabbed all of my gear because I just didn’t know what I was going to run into with all of these cars.
I started out with my 24-70mm lens because I wanted to get a little perspective distortion with the side of the Impala for a little visual excitement. I started working from the front of the car and found a composition that I liked with the arrow being used a foreground. It balanced nicely with the wheel, but the Impala script basically got lost in the composition from this angle. After that first shot, I decided to move to the rear of the car and shoot it from that side to give the script a bit more impact. It worked for that purpose, but I didn’t like the composition nearly as much as I had from the front.
Instead of forcing a composition with those elements alone, I backed up and looked at another shot that included the rear wheel and the quarter panel. This one started to come together a bit better, but the Impala script was still getting lost in the sea of larger elements. I kept reframing until I had part of the windows in the frame and a large swath of the quarter panel. This felt really nice to my eyes, and I liked the drama that the diagonals provided to the scene.
I started out with a square crop in the camera because that was what felt most balanced, however when I got it home, I stretched it to a 4:5 aspect ratio which was easy to do since I had shot it vertically in RAW which kept the full horizontal composition. I also went with a black and white presentation for this one since the color really didn’t have much bearing on the image. By removing the color, the ground worked well in the composition as a texture instead of just empty space within the frame. The emphasis was all about the lines, shapes, and textures in the frame which was a different focus compared to the first frame that I had shot from the front of the car. That one had much more emphasis on the reds and greens in the scene contrasting to the chrome bits. The color played a much bigger role in the first composition which was why the color remained in that one, but not the second.

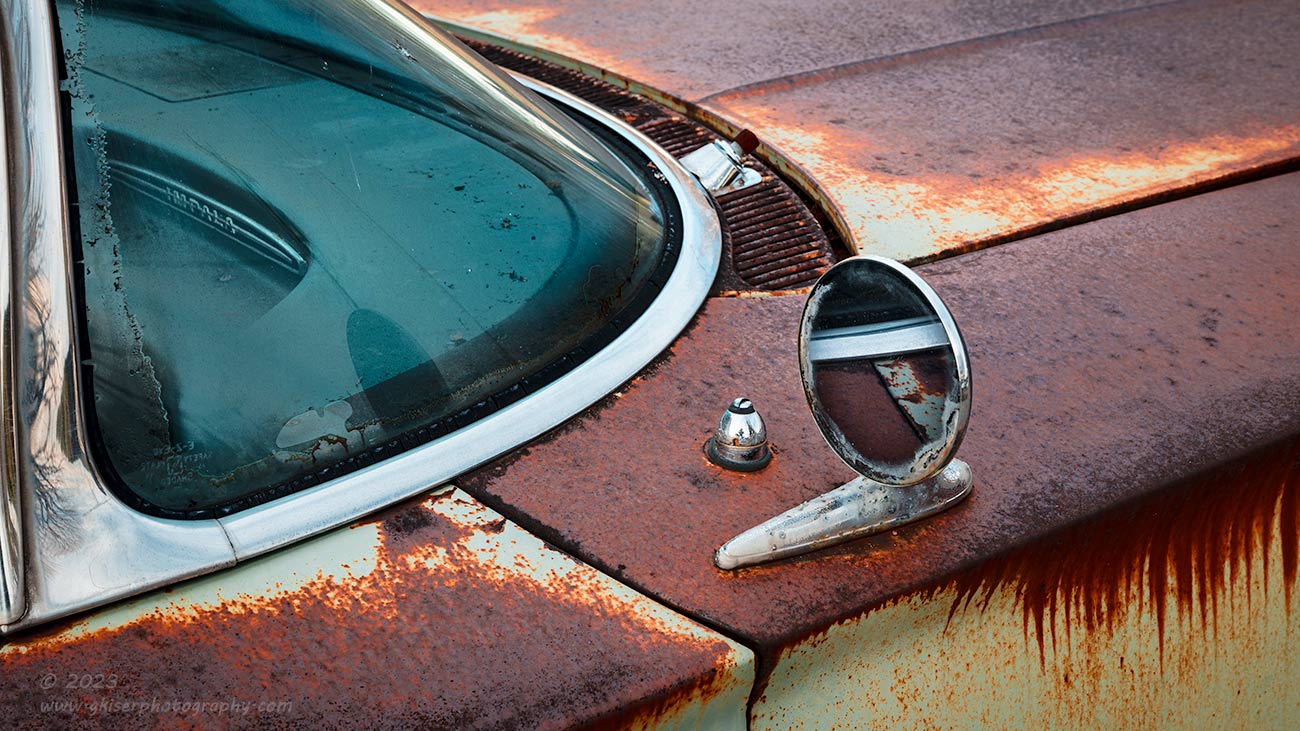
I had shot a total of five frames at this point and figured that I probably had one in can which made it much easier to start looking for other compositions. I walked around the car and found the windshield post on the passenger side which has turned into a strong composition for me with several different vehicles now. I noticed that there was an Impala emblem on the dash that helped to tell the story of the car and I wanted to incorporate that in the composition in some way. I played around with the angles and decided that the mirror was going to play a big part in the overall composition as well as the emblem inside. I worked out a composition that featured both elements while having the rest of the body panels make as much sense as they could. I shot two more frames with this composition so that I could ensure that there were no reflections of cars driving by on the road in the chrome.
While I was on that side, I moved backwards to the rear of the car and looked at the C pillar which is another area that I have had really good luck photographing over the years. The curves and the design of the rear window made for some interesting shapes. The decision was made to figure out a composition here as well. It didn’t take too long to arrive at a composition that I liked. I only fired off two frames here as well in order to make sure that I didn’t get any traffic in the reflections. My goal had been to do this as a color image, but when I started editing it, I felt that with the color, the image was more about the patina rather than the shapes of the stainless and glass. By removing the color, the attention went firmly to the brightwork on the car and the patina just turned into a texture that was quite pleasing to the overall image. The other benefit to removing the color is that the seat covers were no longer as visible, nor was the various debris that was hanging from the ceiling of the car. Making it black and white just cleaned up the whole image in many ways.
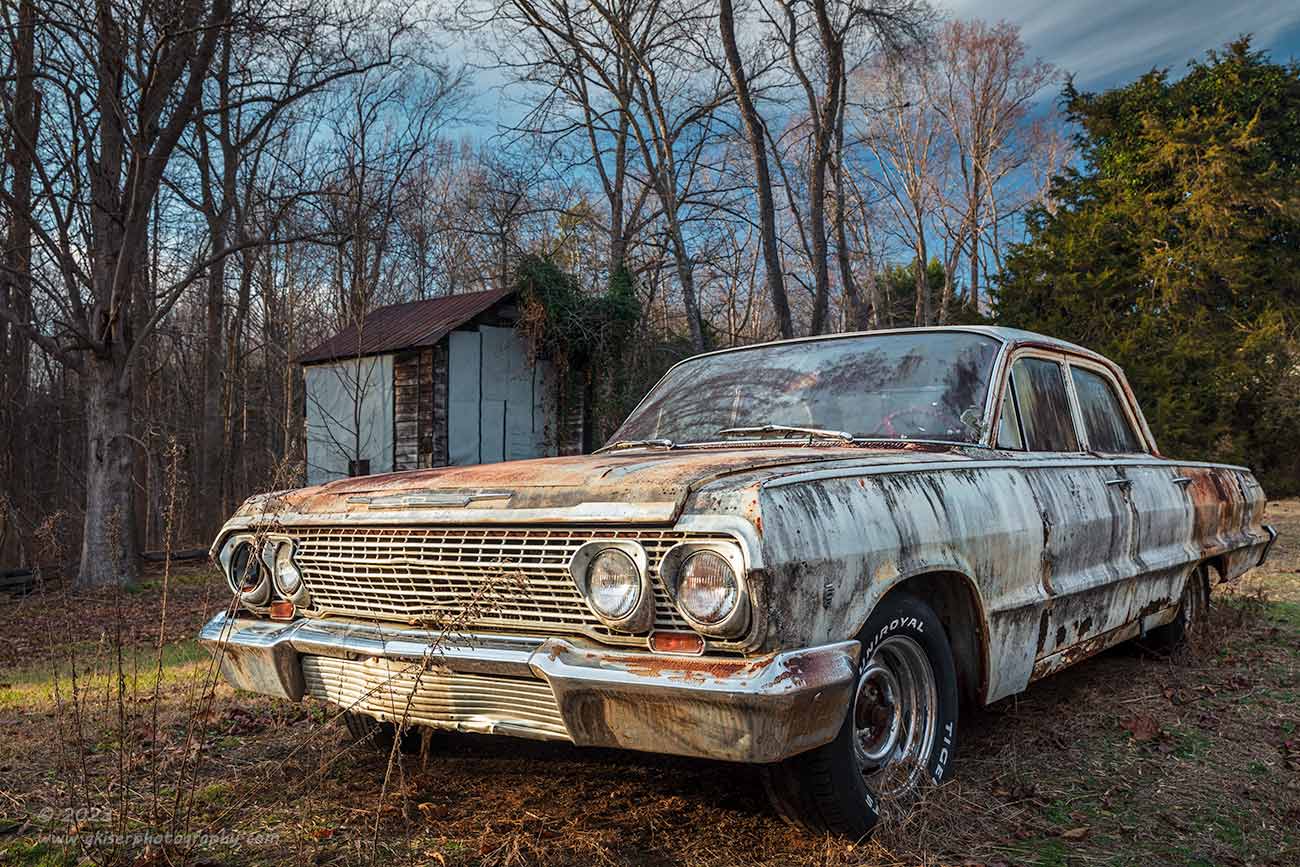
I was starting to figure out this Impala and was having a very good time photographing it. I always say that you need to slow down and listen to the subject to really figure out how it wants to be photographed. This works whether you are looking at a grand landscape, a waterfall, barn, or old car. By slowing down and getting to know the car, I had already captured four keepers out of the first nine frames shot. The next frame was one from the driver’s side front corner which caught my eye because of the wheel that was mounted. It was another period correct wheel, but this one was a steel wheel painted white. I think that the tie rod was broken because that wheel was turning hard to the right, while the opposite side was pointing straight.
Having the one wheel turning right, gave me the opportunity to get a quarter view of the car while still seeing the round shape of the wheel. That turned into my next composition which was pretty basic to set up. In fact, since there was no traffic at this point, there was no reason to shoot more than a single frame of the composition. That was my tenth exposure and second keeper in a row. With that one done, I felt that I had spent enough time with the Impala, and I wanted to move on to the Biscayne that was on the other side of the yard.
While looking at the car from the road, I thought that it was potentially going to be a candidate for an overall shot which I was interested in capturing. The driveway was slightly elevated allowing me to get a bit lower on the embankment on the driver’s side. This took advantage of the fact that the sun was hitting the front of the car, but not the side. The side light helped to give this photo lots of depth and a bit of a color contrast between the warm sunlight and the cooler shadows along the side. What I had to worry about was a piece of equipment behind the car that stood kind of tall as well as a house next door which had a fire starting. There was also a small shed behind the car with some tin walls.

I spent some time working the angles to see what I could eliminate. There was going to be no chance that I was going to eliminate the shed, so I made my peace with including it. The piece of equipment and the house were two things that I could mask with the car though. By getting down well below eye level, I was able to put the house behind the roof of the car completely hidden. The smoke coming out of the chimney wasn’t bad at this point, so that wasn’t much of a concern. I found that I could just barely get a good side angle on the car by making sure that the top of that piece of equipment behind the car was just out of sight behind the C pillar. I pushed the envelope of positing the camera as far to the right and as high as I could make it so that the car presented the way I wanted it to, while still covering the distractions.
This composition represented the most time I spent on a single photo with five frames shot of it. I did this to ensure that I had the right light, and the grass frozen with a fast enough shutter speed. The first shot was a bit overexposed, so I dropped the exposure by a third of a stop and went again. From there, I did three more exposures as the wind calmed and the light changed. As luck would have it, the first photo was the best of all of them with the sharpest grass and the best light. This also happened to be the third keeper in a row at this point. The overexposure wasn’t a problem thanks to the information captured in the RAW format. I just dropped the exposure and finished doing the edit from there. The end result is one of my favorites from this trek and I think really captured the essence of the old car.
With that one in the bag, I started to work my way around to see what else I might want to photograph of the car. Unlike the Impala which had the characteristic three lens taillights removed, the Biscayne had the dual taillights in place. This was one of the big styling differences between the models as the Biscayne was a lower price point version of the design. Since the taillights were present, I wanted to make a composition with them as a focal point. As luck would have it, the “Biscayne” emblem was still in place on the quarter which really sealed the deal for the composition.
This is where a little knowledge of what you are shooting comes in handy. I had learned about the difference in the taillights when I shot a Biscayne some years ago and the owner told me about this key difference. Since I knew that, it only made sense to include that in the composition so that those who knew would really understand. I chose to go with the composition on the right side because the sun was hitting the side while the rear panel was in the shade. This would add to the dimension of the composition and show a bit more depth to the scene. The problem that it created was that the taillights would no longer have any meaningful light on them causing them to appear quite dark.
To counter that, I decided to go with a black and white presentation for the second of the two exposures shot of this composition. That allowed me to manipulate the shadows a bit easier and bring the taillights back up without causing problems. The conversion also addressed another problem with the scene as I looked at it in color. There was an abundance of warm tones throughout the scene and that became a distraction for me. I wanted the attention to be on the emblem, the lights, and the texture, not the various shades of orange and red. The black and white conversion did everything that I needed it to do resulting in an image that tells the story that I wanted told.
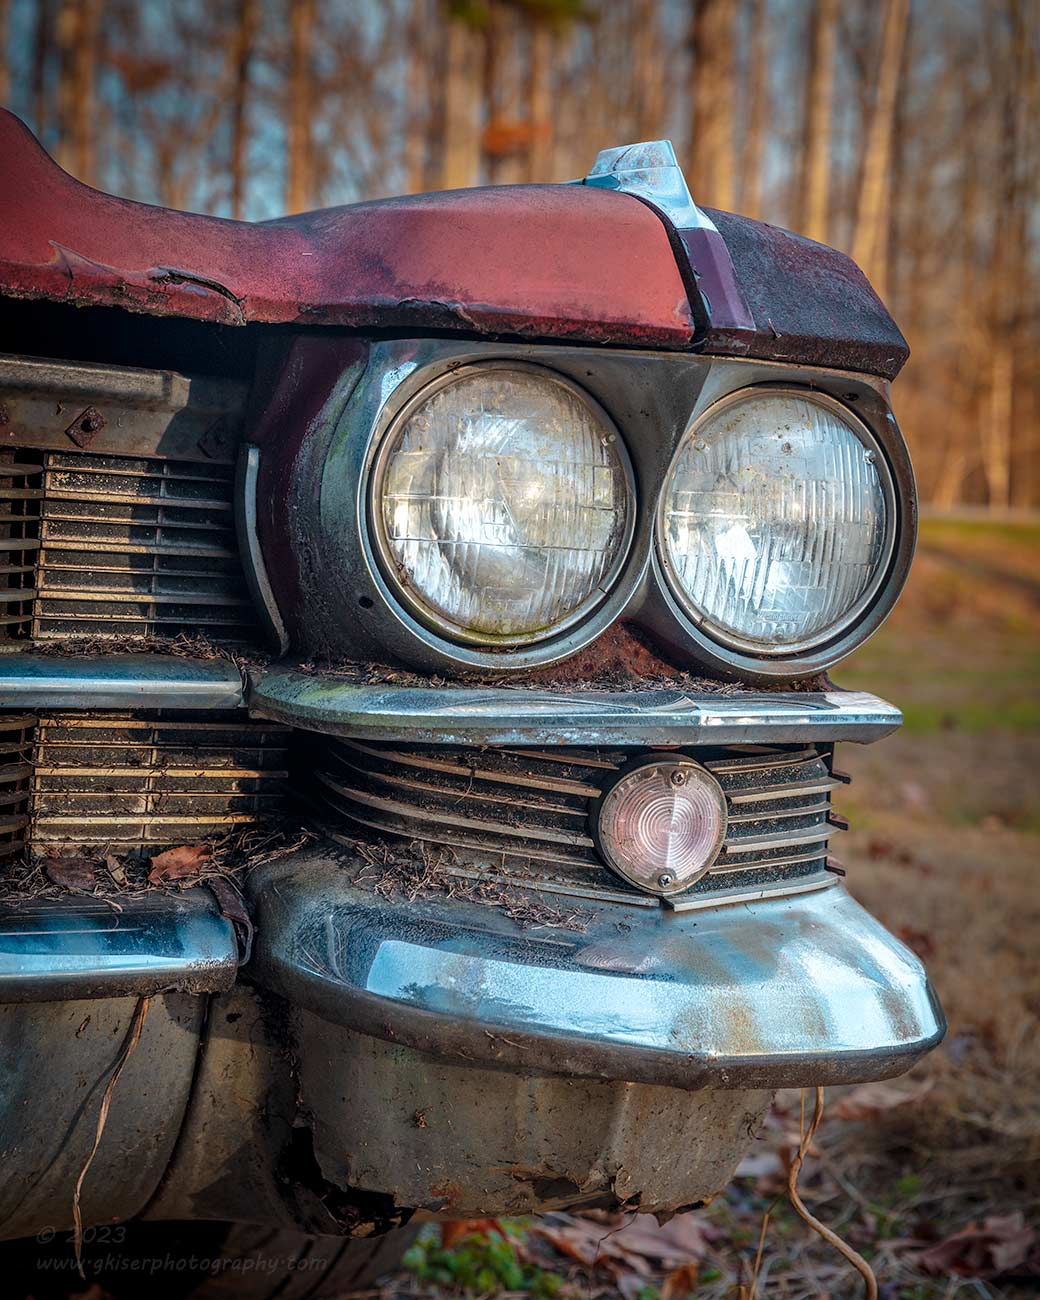
While the Biscayne was much easier to shoot than the Impala, I didn’t want to get bogged down with it since the light was starting to fade. I knew that I wanted to do something with the Cadillac that was parked by the fence before I called it a day. I went over to give it a look and found that the front corners were set up the same as a Cadillac that I had photographed in Randolph County many years ago. I remembered having a lot of fun with the design as it looked like a robot head to me. Not wanting to recreate the same composition, I started to look at things from different angles. I found that the driver’s side was the best one to work with in the existing light which looked even better with the sun shining on the trees across the road.
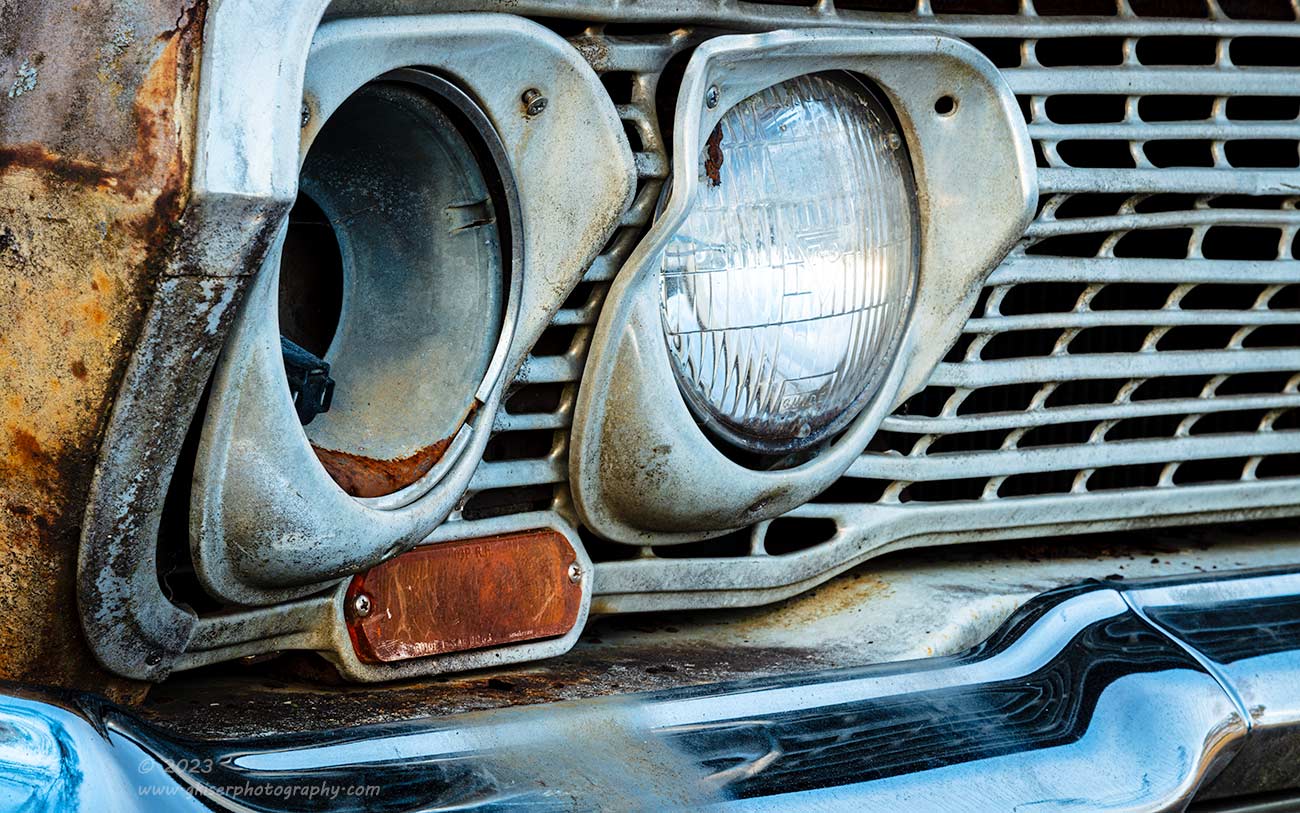
I shot three variations of the composition that I liked here and ended up keeping the second version. This was cropped down to a 4:5 aspect ratio to fit the composition a little better. I have also found that vertical photographs feel unnaturally tall in the native 3:2 aspect ratio. The change in the framing really helped direct the attention to the shapes of the front corner, and the limited depth of field gave that much needed separation from the background to give the photo plenty of depth.
I wasn’t sure if this was going to be a black and white or a color image when I shot it, and it wasn’t until I started to edit it that I found that color was the way to go. After a little color tweaking I was happy with the complimenting color palette that was present, and the warm background light just set the whole thing off. Had I removed the color, so much of these subtle elements would have disappeared. Black and white worked great for the original composition I shot years ago, but this had a lot more going for it in terms of the colors present.
When I got done photographing the headlights of the Cadillac, I moved over to the driver’s door and started to work on a composition where the window framed the steering wheel. I made two exposures of that composition, but ultimately decided that the composition didn’t work the way I wanted it to. Without a clear visual path in the frame, I trashed the two exposures and moved back to the Biscayne. I swapped out my standard lens for the telephoto lens because I have been having so much good luck with that lens here lately.
The attention was turned to the headlights on the Chevy, and I rattled off three exposures from the driver’s side. I felt that they were pretty good, but I wanted to try and work some from the passenger’s side since it was missing one of the headlights which added interest. The part that I was going to miss was the dimension that the shaded fender provided thanks to the side light that I was working with. From the passenger’s side, I was looking at more of a front light scenario which disguised the depth of the scene. It wasn’t overly crucial because there were plenty of visual clues for depth in the headlights. Overall, the composition from the passenger’s side worked out the best, and after two shots from that side, I was satisfied that I had what I needed.

Now that I was armed with the long lens, I went back to the Cadillac and started to poke around the driver’s door once again. I wasn’t looking for a composition of the steering wheel framed by the window like I had done before. What I was after was a composition that I had spotted with the standard lens but didn’t have the reach to make it happen. Now, I could punch into the scene and isolate the rearview mirror and the vent window. I loved the shapes that these elements created, and I enjoyed the back and forth that they offered a composition. It was very easy to frame up with the long lens, but the lighting was looking very dark as the car was in the shadows by this point.
I was fine with the photo looking dark and while I could have boosted the exposure, I chose to keep it kind of dark and moody with the burgundy paint looking almost blood red in the shadows. I was actually quite happy with how this was looking and ended up shooting three variations on the composition. When I got home, it was the last of the three that I liked the best, but it wasn’t nearly as interesting as I had remembered it. The warm tones overpowered the scene and the small section of the hood that was included was a brighter red which seemed to pull my eyes out of the frame pretty quickly. Since it had been the shapes which had interested me the most about this scene, I decided to go with a black and white presentation to showcase the shapes as their own elements. This immediately helped the photo and I felt that I was back on track to a meaningful photograph once again.
The light was fading pretty quick at this point, and I had seen a composition that I wanted to try of the GMC truck that was on the other side of the driveway. Not wanting to lose the light that I had left, I went back over there with the long lens. I had tried it with the standard zoom, but there was too much in the background to make the photo work. I needed to have the compression of the long lens which I was now working with. Originally, I hadn’t wanted to photograph the truck because it looked too nice. I had told the owner that it appeared as if it could drive right down the street if the one tire was replaced. He answered that it was an operational vehicle and all he needed to do was to put air in the tire. He even drives it around the property several times a year to keep engine running. That kind of made me not want to photograph it, but when I started to look at it from the front with the tree behind it, I started to really see a beauty to it. It was worth shooting a few frames on.
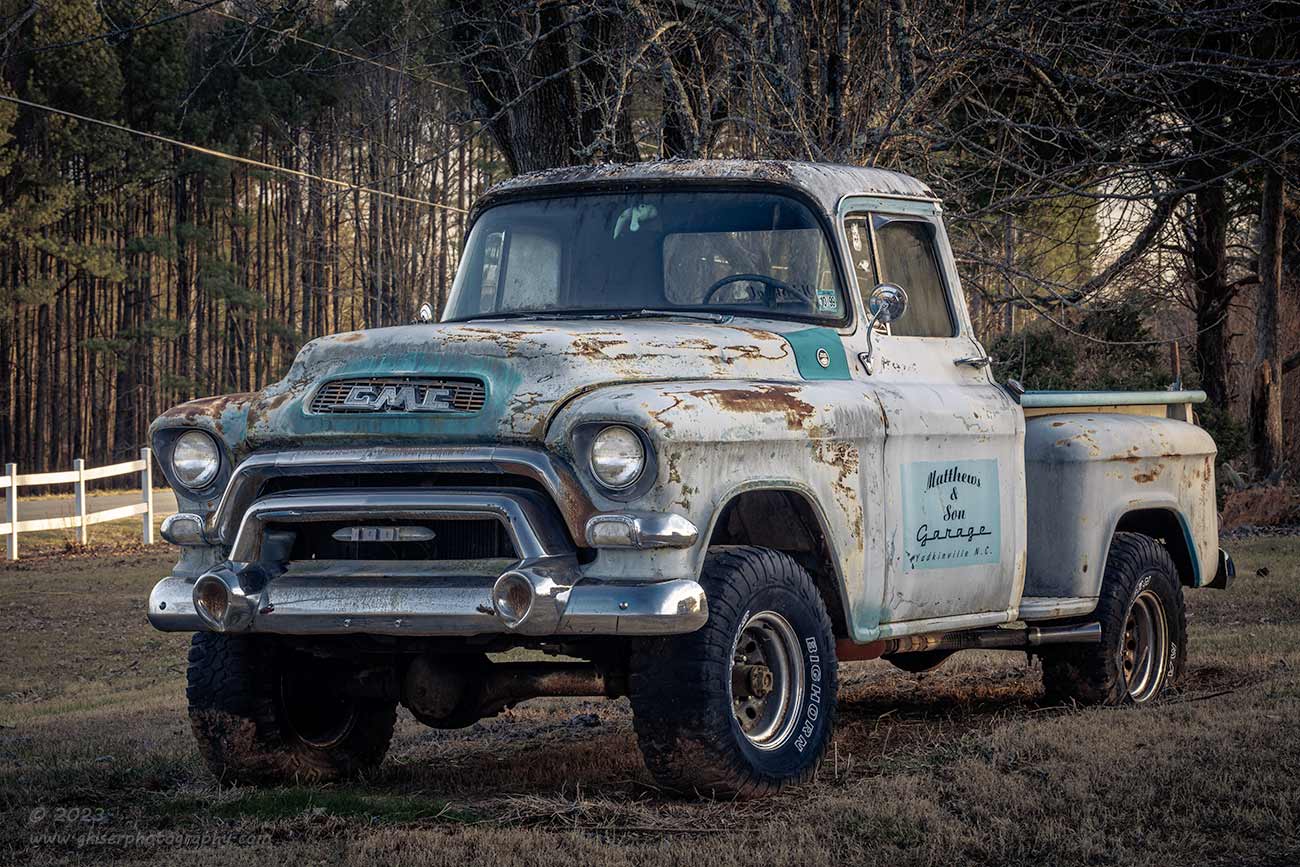
The problems that I was running into with this truck was that there was a house behind it, along with a bench that was closer, and another object that I can’t remember which were all distractions. On the passenger side, there was a white fence which wasn’t bad at all, and there were power lines along the side of the road. This was why I needed the long lens as the standard zoom, even at 70mm was getting too much of the background in the shot. By moving to a lens that would allow a 115mm focal length, I was able to simplify the scene. I effectively removed the house, bench, and that other object from view, while incorporating the fence leading right up to the corner of the truck. The power lines were still in the frame, but strangely enough, I didn’t hate them. They kind of worked with the fence to draw the eyes in closer to the truck.
Once I had the composition figured out, I shot a total of three exposures with slightly different depth of field settings. It was the last of the three that I wanted to keep and edit. This was an interesting one to edit because of the colors that were present. The truck was basically primer gray with some teal bits showing here and there. There was a sign on the door as door art that was a similar shade of teal, but not exactly the same. Looking at the image straight out of the camera, it just didn’t look as manly as I wanted it to. The colors in the scene softened the look too much. However, after trying a black and white presentation, I realized that the colors were important, but needed a little grunge added to them.
I went to my favorite desaturated color profile that really allows me to build the colors up the way I want to. It didn’t look all that special in that profile to start with, but I knew what I was going to be able to do with the file by using that as a starting point. The edit started to slowly come together as I broke the image down to subject and background in order to do a dual direction edit. I added just the right amount of grunge to the truck in terms of selective saturation, some color temperature tweaks, and a proven formula of contrasts within the truck. The background got a different treatment in white balance as well as general toning. The end result is a very fitting look for this burly truck. It is in no way inaccurate, but the mood that has been set with the color grade is very helpful for the image, I think.

While I was working on the overall composition, I started to become very interested in the shape of the grill around the headlights. I’m sure that this doesn’t come as a surprise to anyone since I love capturing headlights. However, the headlight was just a secondary element in the composition that I was considering. I much preferred the angles of the grill and how they looked like a grimace of sorts. I chose a vertical composition for this view and got the angle right before getting the exposure set and starting to make photographs. There were another three of these and you are looking at the very last image of the day. This is number 36 after just an hour working the different cars. It was also the first one that I edited from the batch.
The light was quickly fading by this point, and I had shot pretty much everything that I had wanted to get. Before I packed it all in, I spoke with the owner a little bit more and learned more about this truck. I had never really thought about it before, but there was no 4WD option for this generation of truck, yet I was looking at a 4WD without a doubt. He explained that after he bought the truck, he had learned that this was an aftermarket conversion from NAPCO, the same company that made the 4WD systems for the Jeeps in WWII. It was interesting to hear how they did the kits and now the kits costed more than the trucks did brand new.
With that added information, I was very glad that I had taken some time to shoot the truck which originally, I had not been overly interested in doing. The overall view of the truck shows off the 4WD system quite nicely and now that I know the story behind the truck, this is now a very meaningful photograph. I’m glad I listened to my instincts and tried to get a composition that would work on this truck. That initial urge also led to the follow up isolation shot that turned out really good as well. That truck made for the fourth subject to be in front of the camera during this trek. Each one of the subjects had been very interesting in their own right.
This is just another example of why we shouldn’t dismiss locations without trying them first. Granted, there has been some more aging of the vehicles since I first saw them, but I think that it was the quality of light that really made this location work. I was able to use the low sun in a number of compositions to show depth and dimension, and the warm quality of it as it dropped in the sky added yet another dimension to several of the photos. It really was an hour well spent, and I can’t explain how surprised I was to find out that I had twelve keepers from this location. Originally, I wasn’t even sure if I would get a single good image. There are several here that I really love. In fact, I wish I had more time to live with these as I think that some could be in contention for this year’s 12 most significant images. I just can’t include any of them because they all still have the new photo smell to them and since they are new, they are exciting to me. I do know without a doubt that these are all strong photographs and fitting for this stage in my personal development.
If you would like to learn more about how to capture these artistic isolations and work with cars in a distraction rich environment, consider signing up for one of my newest workshops scheduled in the Spring of 2024. We will be looking at the “Art of Decay” which is a more advanced version of the Decay Workshop that I have offered in the past. In this workshop, we will look at how to create isolations that still capture the essence of the subject and carry their own stories. This is a way of photographing vehicular subjects in crowded conditions, but it is also a way of really finding your artistic voice and moving beyond the snapshot.
I do hope that you have enjoyed this trek and the photos that have resulted. This might be my last trek of the year, but I’m going to try to sneak one last one it before the end. I hope that everyone has a safe and happy Christmas. I’ll be publishing my 12 most significant images of 2023 close to the end of the year, and there will be a year end review of 2023 in my January 1st installment of Behind the Camera. I hope to see each of you back for those.
Until then….