Wednesday, March 4, 2026
Welcome back. I know it has been a long time since you last heard from me. I would even understand if you were getting tired of hearing from me after the onslaught of blogs that I have been writing here of late. I blame it on the nicer weather compared to most of February. It is nice to be able to get out with the camera again and get some new photos after pretty much a solid month dealing with really crappy conditions outside. For the most part, I think I am all caught up with places that I have wanted to shoot with the exception of that one property in Lomax that is just not seeming like it will pan out. I really am planning on taking a little break from photography for a few days and get some other things taken care of around the house and spend time doing things not photography related.
At the end of the last installment, I had been working for 19 minutes and had shot a total of 19 frames. I was more than surprised about that since this was only supposed to be scouting trip that might have resulted in a couple of photos. I was just getting into the groove and had no desire to throw in the towel just yet. I’m thinking that this is the “flow state” that I’m hearing more and more people talking about. Back in my day, it was simply being in the groove, but then again, my day had disco in it. We were cooler back then, but that is a debate for another time.
At any rate, here we were working on this deep maroon MGBGT that had only managed to be a supporting player years ago to a Corvette that it shared a shelter with. You know, that was over six years ago, and the condition of this car hasn’t changed all that much, but the location has greatly improved. No longer did I have to worry about the side of a building, or the supports of the shelter, or even the white Corvette that was parked next to it. I traded all of that for a wide-open background that I loved and a bit more room between neighbors which included a flatbed trailer and a Jeep Grand Cherokee. I had just enough room to convince me to give this car a try and it was working out very well so far.
The last composition that I had worked on was an abstract of sorts of the rear of the car featuring the taillight and the MG badge. Because this was such a unique car, I felt that it deserved a more typical and establishing detail shot of the entire rear corner. I had done something similar to the front of the car but had eventually decided that it didn’t really stand out enough to keep in my collection. With the badge indicating the specific car, I felt that this composition deserved a little bit of visibility.
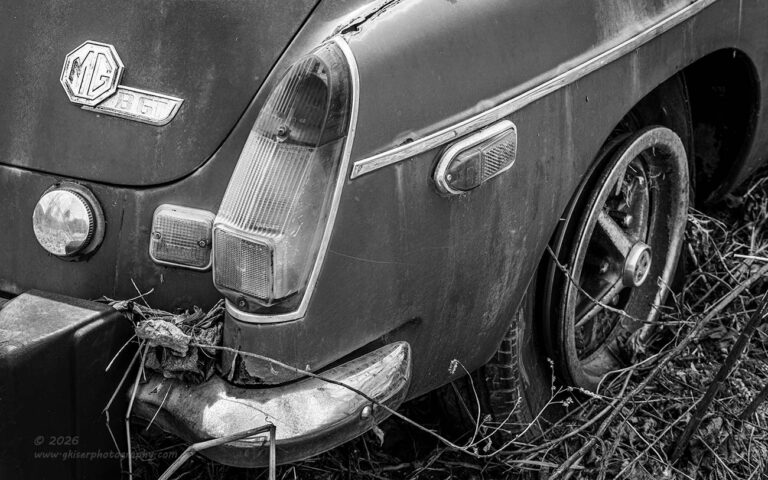
I changed up the position of the camera but kept the elevation roughly where it was so that I had two diagonals pointing at the taillight. The diagonal on the right is easy to spot with the molding, but the one to the left was actually an implied diagonal from the badge with the little flag added onto the lower right. You can also see the biggest difference in the camera placement when you look at that reverse lamp that is carefully covered with the fender bulge in the previous composition. Now that light adds to the taillight to form a single shape. There are plenty of ways to break up the different elements in this composition and the vast majority of them end up with odd numbers which I do like in a composition.
The overall effect of the composition is effective and establishes a lot of the different story elements to the car. You can see a lot of clues about its current state of affairs which I felt was important here. You can also see a lot about the car. What you don’t see is the color of the car which I really did like. The reason that the color is not present here is because of the room that the color occupied in the frame. It really sent the image over the edge with all the maroon tones filling the frame. There wasn’t enough balance to the color palette, and I felt that the real story had nothing to do with the color which is why I had no problems removing it from the frame. The resulting black and white image was far simpler to look at and didn’t have that high energy feeling thanks to the color that would have filled the frame. Another benefit is where the reverse light and the taillight meet. I had them touching so that they essentially formed a single shape, at least in the theory of figure/ground which I’ve learned to use in many different compositions. I’ve also used that theory to help teach composition to some of my mentorship clients.
As you can see, a detail as small as the placement of two different lights can be determined by a full theory that has been studied and taught for years. These are the tools that I love having in my head when I am out in the field with the camera. There is no time to research theories, or to thumb through notes when you are putting together compositions. You need to be able to recognize things for how they might fall into those theories and then determine if the theory is correct for what you are shooting. In the case of this MG, I didn’t sit there and think about the theory, I just placed the camera where my instincts told me would make the best composition. I was paying attention to the lights as well as the other elements and their relationship to each other. This was all subconscious and just fell into place. Now, that I have the time to look back on the images to see what worked and what didn’t, that is one of the details that works and I know why it works. Conversely, I knew why I wasn’t working on the previous composition where I needed to eliminate that element altogether. This stuff just works out in my head as I am finding the compositions. There is no need to do a check list or pull out a note pad, I trust my gut these days and know that I will see it when I see it.
While I wasn’t going through a checklist as I was making compositions, I was constantly telling myself that I wanted to get better at abstracts and wanted to really dial into the heart of the compositions. I’ve said it many times in the past that photography is a subtractive art while painting is more of an additive artform. Essentially, the success of a photograph usually comes more from what you don’t have in the frame rather than what you do have in it.
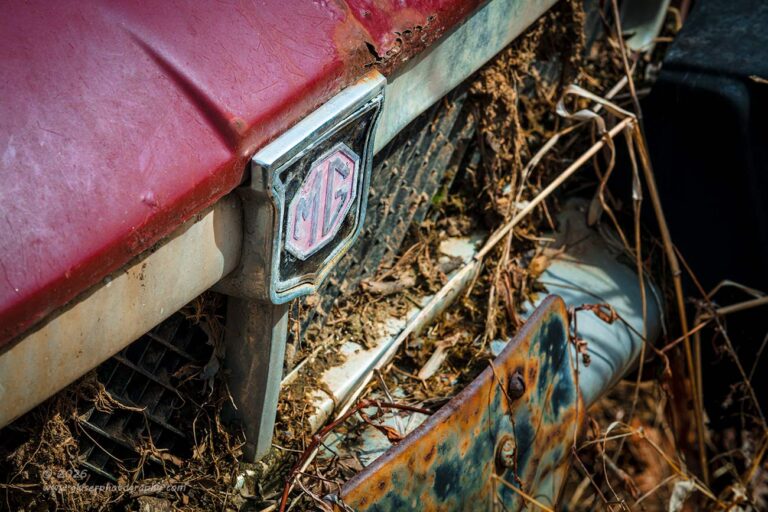
With that in mind, I wanted to go back around the car and see if there were ways that I could reduce the scope of my compositions even more than I had. The front of the car was a natural place for me to start out since that was where I had spent the majority of the time starting out. Don’t worry, I didn’t go to the headlights as I would normally do. In fact, the headlights never really drew my attention with this car. It was always the grill and the emblem on the grill that provided the point of interest for me. I suppose that the debris that was collected in the grill and on the bumper added to that interest for me. Even the rust on the front tag bracket worked well in my eyes.
You have already seen how I went about photographing this part of the car originally with the last installment of this blog. It worked well, and the 16:9 aspect ratio helped to really focus the attention. I still thought that I could do better with it. I mean I had been out here for enough time that I was starting to hear how the car wanted me to photograph it. This is such an important part of the process for me, and it is one that I can’t rush. I need to let the subject and scene connect with me so that I really understand it in ways that you just can’t upon first glance. For me, that is what makes a difference between a photographer and somebody with a camera. A photographer will always take the time to get to know the subject. I was getting there with this car and was starting to understand what made it unique.
I started to look at the grill from the passenger side because I wanted to have the sun coming in from the side for a bit more depth. I also really wanted to have the lettering closer to the camera and on the left side of the frame as that will make it read better. From that starting point, I started to really work on how I wanted to crop the image to include only the parts that were important. I also wanted to keep those elements very concise. They had been spread out previously and by working with a tighter angle, I was able to draw them closer together. The new composition fit into a 3:2 aspect ratio and included everything that the former one had, but in smaller bits. What I did like and had expected to not care for initially was the black bumperette. This is an ugly addition on US spec cars for crash protection. I don’t care for them, and they cause problems in photos most of the time by destroying the lines. I had used them as bookends for the previous composition and this time I only included one which was kind of dominant at the right side of the frame. This turned into a great addition that provided a solid vignette that went with the grill insert that was in the shadows. This became my new framework, and it created a situation where you saw the black bumperette while not actually seeing it. I don’t think that this composition would have worked without having it there. I also think that this composition is stronger, but both work very well and serve two different visual purposes.
This one is much more about the badge on the grill while the original one is more about the grill and the debris on it. This is a great example to show how something as simple as framing can have such a huge impact on what the main subject is in a photo. I really enjoy playing around with compositions as I try to find those little nuances. I’m pushing myself further in that direction with this goal of improving on my detail shots and abstracts. In the spirit of using synecdoche in photography, the establishing composition is like a short story with lots of detail and background. A detail shot is like a Haiku, short and sweet. What I am trying to get figured out is the single statement with a mic drop at the end. It won’t be the answer for every subject, but it is certainly a direction that will lead to many more possibilities as I find different subjects to photograph.
I mean look at where we are so far with this simple MG. The first time I had photographed it (loosely stated), it could only be used as a secondary character for the primary subject. I saw nothing else that I could have shot on this car at the time. That was in late 2019, shortly after going full time as a photographer. Working the little details like this was something that I just hadn’t explored much at the time. Over six years later, you can see what that understanding has done for my photography. Now, I’m looking to whittle those details down even further which will give me a lot more options when I have an interesting subject that is in a terrible location.
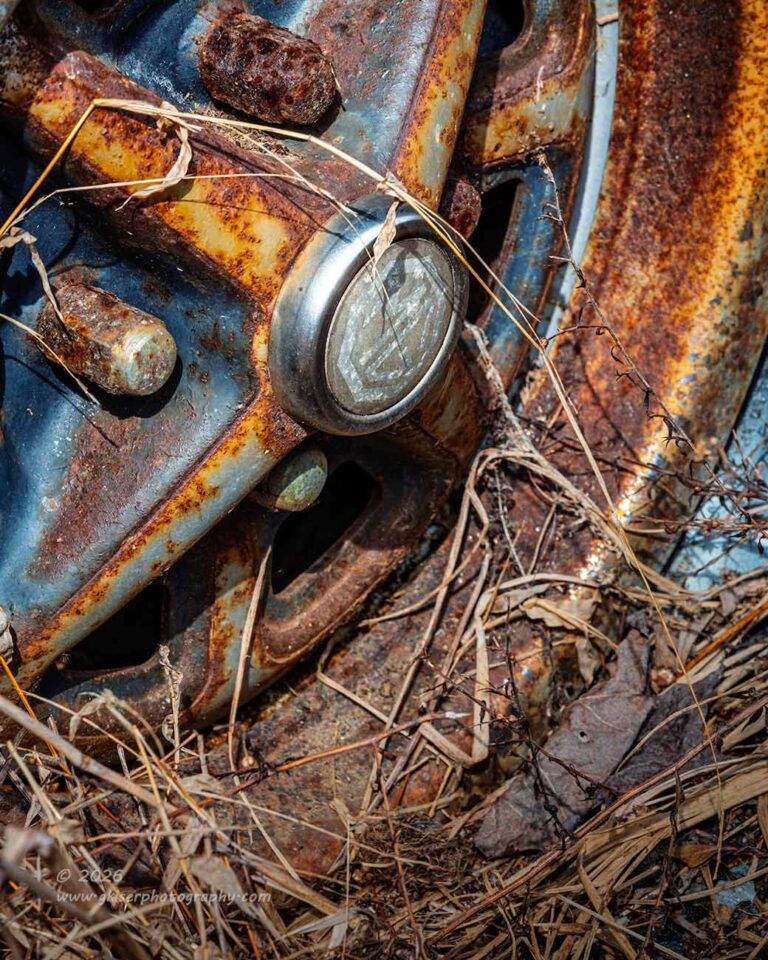
One of the details that I am starting to really take notice of is the wheels on these old cars. So many of them are equipped with original wheels and they are showing the same aging as the car, or in some cases even more. That was the case with this MG. As we saw in the last entry, I was drawn to the wheel after starting with my standard front corner composition. I caught myself doing the same old thing and decided to pull it in a little more. The resulting image was one that was a lot more concise and to the point, but after thinking about it, might have still included too much. Since it was the wheel that really interested me, I wanted to really get in close and work out a composition that featured just that wheel.
I started to find the position that would work, but this was not as easy as it might have appeared. I had to move tall grasses out of the way while picking the right angle and height for the camera. Then it came down to figuring out where to place the edges. It all started out as a horizontal image which I wasn’t able to figure out so I flipped the camera to vertical. This really helped me to isolate the portion of the scene that I wanted. The question came into play if I wanted the tire to be a part of the composition or not. That spilled into how much of the wheel did I want, and what details did I have to leave in the frame.
That is the danger when subtracting elements from a photo. You can actually go too far and destroy the photo by not leaving enough visual information within the frame. I knew that I was going to be cropping into the wheel because it was the shape and the patina that interested me the most. I didn’t need to photograph the wheel, but I needed to photograph what made it a wheel if that makes sense. I started to pay attention to things like the shape of the wheel itself, the number of lug nuts, the number of holes in the wheel that I included, and even the shape of the barrel of the wheel and how it related to the other straighter lines. It all came together and I had to get a composition that included only what was necessary to the final image.
It was a great exercise, and I really like the outcome of it. I think that I succeeded in boiling down the entire composition to just the part that excited me and it made a completely different photo than the one that also included a portion of the fender and the marker light. Looking back on both of these and thinking back to how I had initially composed the frame really made me happy at how far I had come with just this subject. I was seeing things differently now, and it was starting to pay off. It wasn’t second nature just yet, but it was a more achievable outcome than it had been in the past. This is how to keep photography fresh after years of doing it. There is always room to improve your skills, and this is going to be one of those years when I am really pushing to do just that.
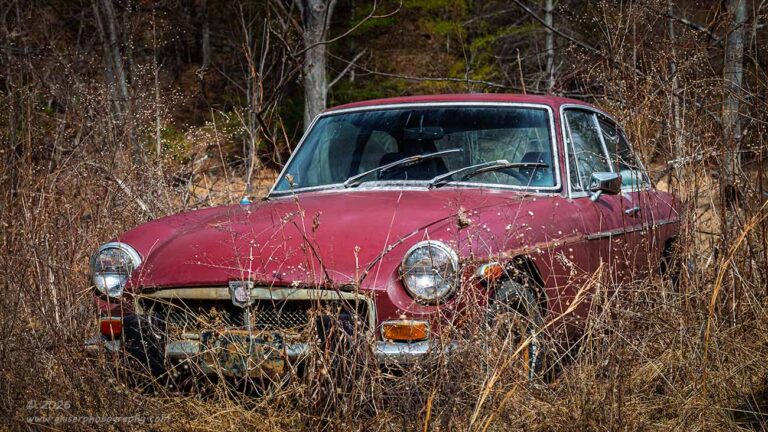
I did some more walking around the car in hopes that I would find some more details to shoot, but it was just too difficult to get to many of the areas of the car. I was actually trampling a lot of the grasses down doing what I was doing, and it still wasn’t helping. Instead of spending more time looking close at the car, I thought a better option would be to walk away from the car with the longer lens attached so that I could see how the whole car looked through the telephoto. This is usually the better option lens for an entire vehicle because it keeps the lines and proportions as designed. It is just usually a more flattering lens for automotive photography. Now this has nothing at all to do with artistic interpretation as I’m showing more and more by using the wide-angle lens. That lens will introduce perspective distortion that has to be considered when framing a photo and used to good effect, or you risk making the photo look very odd.
With the telephoto lens, I moved away from the car a good deal more than I had with the wider lens. This was a more comfortable working distance for me as I am much more used to how things fall within the frame. As with the beginning of the session, I started with a horizontal composition with some key differences. Not having the perspective distortion, I was able to get lower to the ground with the telephoto lens. If you compare this composition with the opening one in the previous blog, you will see that perspective distortion in practice and how the angle of the camera has to be changed depending on the lens choice.
I don’t like either one better than the other one. I think that they are both effective but tell very different stories. This composition is less about the texture contrast between the smooth paint and the brush as the main focus is the fact that the car is surrounded by the overgrowth around it. The story is in the obscuring of the car rather than how the car looks in the setting. By getting lower to the ground, that story is told much more effectively. To accentuate the shape of the car, I chose to do this composition as a 16:9 aspect ratio. This gives more weight to the length of the car while the other version needs the full 3:2 aspect ratio to allow the car to fit within the frame. The lines and presence of the car are completely different between the two versions and while similar, make for very different photos.

As I had done with the first set of compositions at the beginning, I wanted to get the mountain in the background but with a different perspective. I thought that was going to be a matter of flipping the camera as I had done with the wide-angle lens. I rolled it over in the collar of the telephoto lens and just didn’t have the ability to get the entire photo in the frame like I wanted with enough extra headroom to crop down to a more reasonable aspect ratio. I didn’t want to back up far enough to fit the scene because that would likely put me in the road. Instead, I opted for a wider lens, but not wide enough to introduce that perspective distortion. I had a photo like that already. I just needed a bit wider than 70mm to work.
I swapped out to the standard zoom and started to find the right distance from the car to make this work. Again, I had to worry about the Jeep to the right and the trailer to the left. That still dictated the sides of the composition. I did that little compositional dance that I enjoy so much and eventually landed on a spot where all the elements were scaled proportionally. As it turns out, I was at 35mm which was actually within the range of my wide-angle lens and starts the overlap of the standard zoom. I didn’t really pay any attention to that in the field as I was just looking at how things were looking through the viewfinder. What I find very interesting is that the previous version of this composition was shot with that wide-angle lens with a focal length of 25mm, only 10mm in difference. That 10mm made a huge difference though as you can tell by comparing the two. The 35mm focal length is actually considered very close to how the human eye sees which is generally credited with being 50mm. However, 35mm takes into account the peripheral vision as well and some say that the 35mm focal length is actually closer to human sight than the 50mm. I tend to agree with this, and the more I shoot portrait work, the more I am finding that I like the 35mm for the shots that typically would be done with a 50mm.
Enough of all that gear talk about lenses. I know you aren’t here for that. You just want to hear about the story behind the photos. I did really like how this version of the vertical image was coming together. The trampled down grasses made for a clearer view of the car and the lower perspective allowed the trees to play a more important role in the frame. The sky was a welcome addition in both versions because that established a scale for the background which I do like including when I can. The fact that there was some nice texture in the clouds was just an added bonus. It all just came together so nicely.
It dawned on me that I had just worked in reverse from how I had started this session. You can really tell how that all worked by how I broke this blog up into parts. I don’t usually do it this way, but because I am trying to teach myself to see differently, I needed that second chance at the different compositions. As a side benefit, I get a chance to really illustrate some key differences in how lenses work and how I am planning on improving on my detail shots. I guess in a way this blog is as much a tips and tricks as it is a narrative on a trek.
Even though I am no longer doing workshops in favor of concentrating on my mentorship clients, I still enjoy teaching photography. There are times like this when the teaching just has to come out. If someone can benefit from some of my thoughts, then that is icing on the cake to a successful trek. I know that there are a lot of photographers that read these blogs and many of them have reached out to me this year and told me that I have helped them or inspired them. I can’t begin to tell you how important those moments are for me. It is all too easy to fall into the trap that nobody cares about my photography and that all I’m doing is spinning my wheels and wasting my time on a hobby. Hearing from others who are trying to learn photography that I am helping them and inspiring them means that my photography has meaning outside of likes and comments on social media. I never wanted to be a “content creator” and I don’t view my photographs as content to be consumed. I am a photographer, and for me, this is serious business and something that do pour my heart and soul into. I’m happy that I’ve backed away from the business aspect of it and can concentrate on the love of the art and voice that it gives me. As you can see, I’m in a place where I can experiment and be able to stretch my creative skills without worrying about what others might think of my work. You are literally coming along with me as I am really looking for personal improvement. From a business standpoint it is safer to just go with what works and sells which leads to stagnation and disappointment in your own work.
Thank you all for joining me on this trek. I’m not sure what I will be doing next, or when that will happen. I know that I am planning on taking some days to rest as I think I deserve it. If you look back over the recent blogs, I have been exceedingly busy since the middle of February with a ton of new photos added to the collection. Just in this trek alone, I have added ten keepers from a total of 40 frames shot over the course of only 42 minutes. Somewhere in there I must have taken a lunch break for two-minutes. I do want to thank Don again for giving me this tip even though I had already been here before. It was well worth the repeat trip if for no other reason to show myself how far I have come in better than six years. These are the moments that motivate me to continue moving forward because I’ve proved that I can.
Until next time…