Saturday, May 20, 2023
The day started at 4am when the alarm went off, and here I am at 2pm the following day starting what I hope to be the last part of the blog from the day. To say that this was a fruitful trek would be an understatement. By the time I had finished, I had a total of 192 photos captured with a mix of landscape and decay subjects. Those 192 frames made for a total of 24 keepers which I’ve introduced you to 16 of them so far. When we last talked, I had just come across a Chevy Apache and GMC truck situated rather close together. These two trucks seemed to compliment each other quite well with the colors that they possessed. You knew as you were reading the last bit of my previous blog that I wasn’t quite done with these trucks after getting the shot with the pair of them. I am never able to leave a situation like alone after just one composition. Nope, I had a desperate need to further explore these trucks as individuals as well as together. I had just scratched the surface here, and I figured that the introduction of them was a good enough place to insert a little bit of an intermission for you.
To remind you of what I had to deal with here, the two trucks were surrounded by other vehicles which I didn’t want to include as well as the building behind them. The overcast sky was very bright as I looked through the trees which meant that I was going to need to avoid the sky for fear of overexposed areas of the frame thanks to having to shoot in the shadows to get the trucks. The subjects were just too good not to make a valiant effort to capture though.

The first one that I chose to work with on its own was the generally more interesting Apache. It was also the more difficult to capture because of its location. It was the front end that I wanted to highlight with the photo. I’ve always found the headlight design interesting with these trucks since having four lights was a bit of a luxury with pickups in the late ’50’s. The grill was also a very interesting element to the truck that seemed to fit with the fender emblem which had already been featured with the shot of the two trucks together. For this shot, I wanted to concentrate on the front of the truck and I wanted to make it a little different from the view that we are used to seeing. The perspective was not going to be an issue since the truck was raised up at the front, and the rear of it was right on the ground. I just had to get the camera low enough to make the angles a little more obvious to the viewer. That was easy enough to do, but that forced me to have to include a section of the sky that I didn’t like. It took a bit of working the camera back and forth and playing with the focal length before I had the sky all but eliminated. It was the sky that dictated the crop of the truck at the door edge. I wasn’t able to get the entire cab because of the sky, but I needed to keep the windshield in order to have the entire fender emblem. That also dictated the inclusion of the wheel. Fortunately, the wheel was partially buried which reduced the need to include a lot of the ground beneath the truck. The close crop here helped to make the right side of the frame make more sense while I had a bit more breathing room above and some nose room in front of the truck to the left of the frame. There was a tree which kind of framed the truck and made it feel crowded, but the inclusion of a bright green weed right at the edge pulled the eyes past the tree, giving the truck the room that it needed visually.
As with so many of the other photos that day, I was waiting for a break in the breeze to make sure that everything was tack sharp in the photo. It was that last of three images of this composition that had the best combination of sharp elements. It was a good thing that I seemed to be in the habit of shooting safety images for this day of trekking as I was getting used to the last of the series being the one that worked best. This is also another reason that I will typically cull the images from last to first. Logic dictates that the images that you are most happy with are usually the ones that you shoot last because you feel there is nothing left to improve on. The same thing works with the safety images. There is a fair chance that you will get a sharp image early on, but if you think that the wind might have gusted just right during the exposure, you will try again. These last shots are usually done with the absence of any wind and I feel comfortable that it is all still which has been the case more often than not.
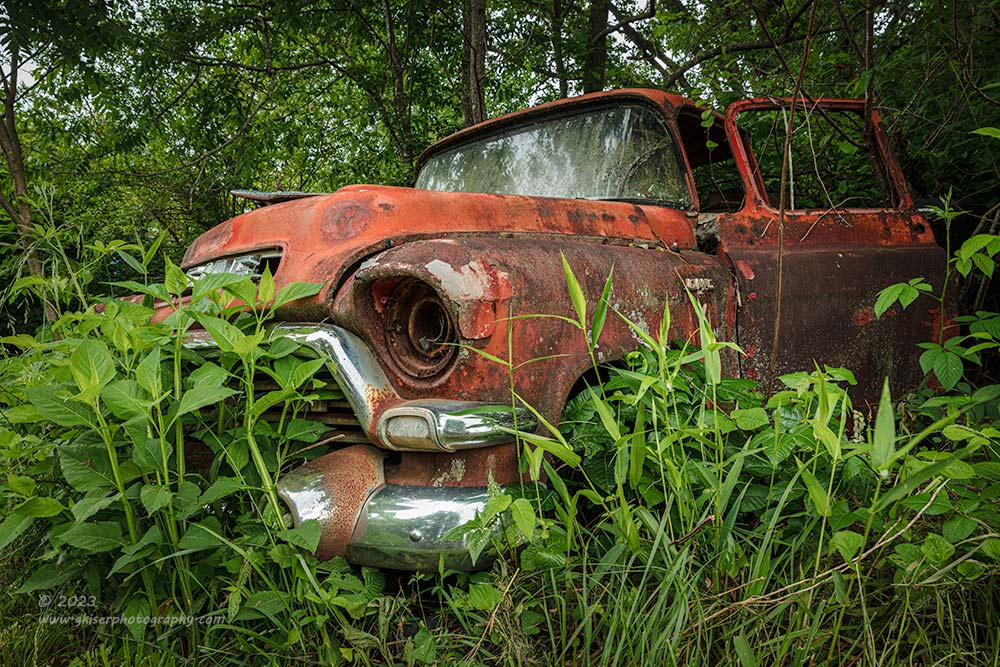
When I was happy with the Apache, I moved my attention to the GMC sitting next to it. It was another example of having to really pay attention to where I put the edges of the frame. I started off with a shot that included the open door as well as the exposed front clip of the truck. I wanted to make sure that I had enough of the warm hues to play against the vibrant green that was surrounding it. If got everything dialed in and waited for a lull in the breeze. I made the exposure and looked at the back of the camera. Everything looked still in the frame, but there was something that I didn’t like about the composition. It seemed like the truck was proportioned poorly in the frame and I needed to zoom in and concentrate more on the fender and hood. That was my next composition here and I made two exposures with the more intimate capture so that I had a safety frame.
This was one of those times when the back of the camera lied to me. I was confident that the more intimate capture was going to present better than the more open version. However, when I was going through the images, I gave a star to the safety frame of the intimate shot which was nice and sharp. I then came to the one broader capture that I expected to pass by, but it had a presence that I hadn’t recognized before. It got a star too. When I made my next run through the images, I directly compared the two compositions and found that the single shot that I had opened with was the winner of the two by far. That was the one that I went on to edit.
A lot of times, this is why my frame count can be so high. As I work through compositions, I will routinely capture an image or two of each variation as I work towards improving it. The thought is once I land on a composition that I like, I might as well record it, and then improve on it. Occasionally, my improvements aren’t any better than the original, and in some cases like this one, they are actually worse than the original. It is hard to tell by looking at the 3.2″ LCD display on the back of the camera which variation works the best. It is usually a pretty good indicator, but like this time, I needed to see the photo in a larger display to really get the benefit of the perspective.
This composition just comes together beautifully with the greens and oranges complementing each other. I also really like the smooth leaves and grass juxtaposed with the rusty textures that I think I could reach out and feel. The chrome bits help to give the front some shape and structure as well as pulling the eyes away from the white sky shining through the leaves. As I share with those that take Lightroom instruction from me, the glass is usually something that I will darken a bit in post, but this time I left it as it was because I needed it to draw the eyes in and away from the sky. Knowing where the eyes are going to look in a photograph is key when you are designing the composition. Always remember that the eyes go to the brightest parts first, then the areas of highest contrast (sharpness), and finally to the areas of saturation. In order to combat the bright sky, I had to keep some very bright elements around my main subject, and I counted on the contrast of colors and textures to overshadow the sky. I think that it worked out quite well in the end.
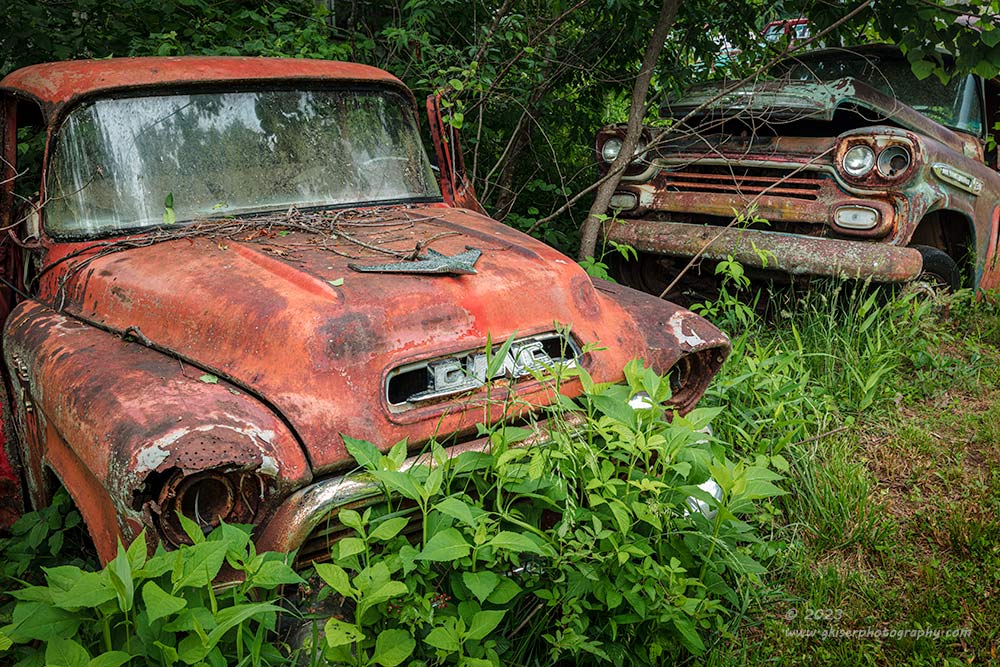
As I started to work around the old GMC, I happened to see the passenger side headlight bucket and the evidence of a body repair on it. The holes from the slide hammer tell more of the story about this truck and I think that it makes it even more interesting. I began to work on another composition here knowing that I had already done three others from this pair of trucks. This is the way it is when I find something that really interests me though. I will work it until there is nothing left of it. I thought about doing an isolation, but that just felt like a copout in a lot of ways. I figured that there was a more interesting composition available, so I began opening up my field of view. In short order, I was back to looking at the two trucks again and was liking how it was coming together. As with the first composition that I shot, I knew that there was going to have to be some heavy cropping in with the frame. I couldn’t include the rear of the Apache, and had I included the entire GMC truck the visual weight would have been way off forcing the Apache into a void where it wouldn’t have been seen. I also had to pay attention to the red truck that was behind the Apache through the woods. It was small, but a distraction, nonetheless. I had to keep that in mind and shoot this for how I intended to edit it. My goal was to desaturate and burn that bit in just a little to take some of the emphasis off of the red truck. For me to do that, I had to include the distraction along with enough of the tree to provide a natural frame for my image. If the distraction was cut right through with the edge of the frame, its power would have increased exponentially, and the eyes would have been drawn out of the frame. By adding that bit of a frame to the distraction, I was able to keep the eyes in the frame.
It comes to my attention that I have been using the term “Cropping” quite a bit in my blogs recently. I also know that I am an advocate of not cropping an image without reason to maintain the resolution of your camera. I just wanted to clear up that I use cropping interchangeably when it comes to framing an image in the field and then cutting part of the image away in post. Both have their places, but when I talk about cropping into a subject with the camera, I am talking about how I frame up the image. In the case of this photo, it was shot at the camera’s native 3:2 aspect ratio which is still in place. I chose to crop the Apache at the edge of the door and windshield. The GMC was cropped just behind the passenger fender, and then through the bumper using the greenery as a buffer between the subject and the edge of the frame. Those crops were all done with camera position and focal length. The image that I captured looks just like the image that you see here in terms of framing. I absolutely hate to change the crop of an image in post because I am losing resolution that I paid for with that camera, and I don’t care to do that. Now, if I was looking to change the aspect ratio of the image from 3:2 to 4:5, 5:7, 1:1, 16:10, or 16:9, that would be a different story. I would only lose pixels in one dimension and that would be a compositional choice because not everything looks good in a 3:2 aspect ratio. For instance, the next photo that I will share had too much wasted space at the bottom when viewed in the native 3:2 aspect ratio. As a creative choice, I took a row of pixels out of the bottom of the frame and made it a 16:10 aspect ratio which made more sense for the composition and created a more engaging photo.

This is the photo that I was talking about. This Falcon was sitting between two other vehicles covered in vegetation and brush. It was a four-door car so the style wasn’t all that important to me. In fact, the color wasn’t really doing much for me either. I almost passed this car by, but there was one aspect of it that caused me to stop and consider a photo. There were lots of little details that worked together to catch my eye, but they were all centered on the taillight. The light was round, and the trim to the left had a bend to it that mirrored the curve of the light. There was a bramble that was also curved around the light which linked it to a collection of brambles to the right which curved in the opposite direction completing the visual that brought it all together. The other aspect that the brambles provided was that there were letters across the trunk lid that spelled out “Falcon”, which I would have been obligated to photograph in their entirety under most circumstances. However, since everything but the “F” was obscured by the brambles, that was no longer a need. The “F” just kind of hung there and caused no problems with the composition.
I’ve done compositions like this in the past, especially at junk yards and they always turn out interesting. I love the story that they tell of how long the car has been there. I’ll be the first to admit that had the car just been sitting there, I doubtfully would have done anything with it. It was a white four door car with minimal rust. It was the fact that it was getting reclaimed by the Earth that really interested me and that was the story that I wanted to capture here. The shapes made it possible, and that was what drove the composition. I’ll talk a lot about using shapes to come up with compositions when I am mentoring and doing workshops. This is why I do that because our eyes respond to shapes and the shapes help direct the eyes while providing some key visual interest. Just imagine this photo without the different curves, if it was just a photo of the rear of the car. It kind of loses its appeal at that point. Taking things like this into consideration is what helps create an “art” image as opposed to a “snapshot.” When we take it that next step and provide just enough clues to engage the viewer into looking well into the image, that is where “fine art” begins.
As I finished up with the Falcon, I had only shot two images, one of which being the safety. I started to look around to see what I had missed. I was about back at my starting point which meant that I was about to be done with the day. I was seeing nothing new that I hadn’t considered yet, but there were still about 25 or more cars that I hadn’t photographed, so there were a lot of opportunities. What was left was more or less reserved for isolations because the vehicles that were in positions for more overall captures had already been worked. I’m sure I could have stayed out here forever working on isolations, but I was quickly starting to realize that I was kind of tired of looking at the details after paying so much attention to every hammer hit on the house for the previous six days they had worked on it. I recognized how this was affecting how I was seeing the world around me, and I chose to embrace it. I didn’t want to get into every little detail, I just wanted to get effective compositions that showcased what interested me as a whole. That was how I had been working thus far and felt no reason to change things up just to get a higher photo count.
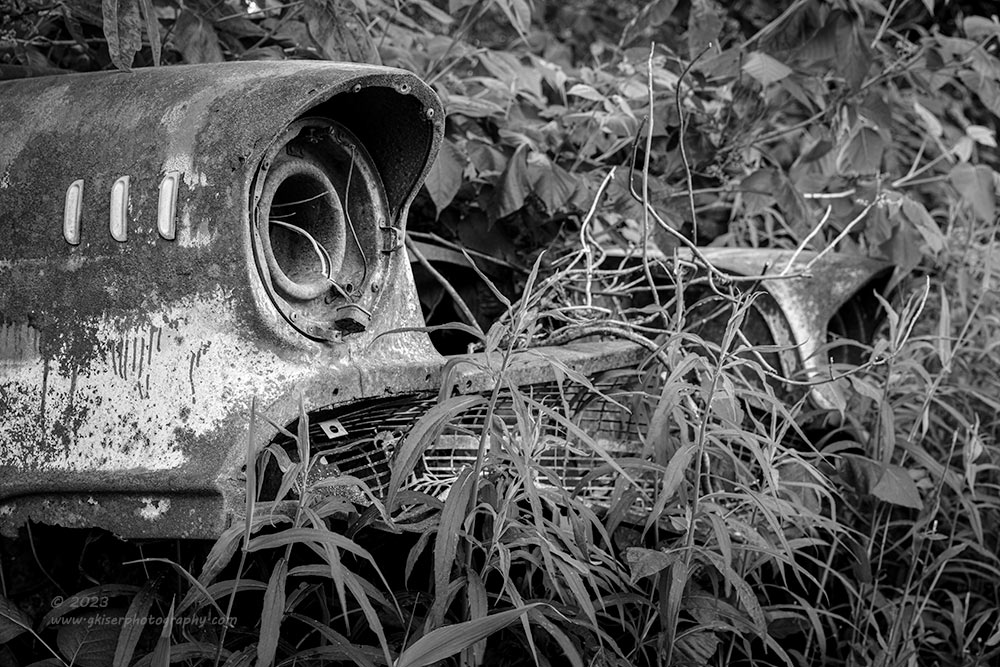
One of those subjects that caught my eye as I was coming out of the path into the side field was the front of a ’57 Chevy that was protruding from a quagmire of weeds and vines. It was interesting to me and I knew that there was probably an isolation there, but it was the entire visible part that appealed to me. Of course, an argument could be made that this was actually already an isolation in comparison to the entire car. For me though, an isolation is when you take a very small portion of what you see and form a photo around that. That wasn’t the case here, it was the initial presence of the car that attracted me and that was what I started to form the composition around.
The only thing that I really avoided was the rear half of the fender because there was a large metal rod draped across the fenders before angling down to the ground. It was a huge distraction, and I didn’t want to mess with that, so I just cropped into the car a little bit more and focused on the headlight buckets visible through the vegetation. As with several other compositions that I had shot during the day, the pairing of the greens and rust tones looked great, and I thought they would work together well in the final photograph. However, when I started looking at one that passed the culling process, I didn’t like the colors at all. The colors made the entire image very static and dull. It was just a rusty car surrounded by greenery. What was getting lost was the shapes and textures as well as the individual leaves that were visible. The best way to address this shortcoming was to convert the image to a black and white photo.
By losing the color, our brains lose valuable information about what we are looking at. All that is left are clues and the viewer is enticed to look further into the frame. Remember what I learned in my quest for what Fine Art was? It is not just as simple as converting to black and white, but when I start to remove the context from an image and leave a good portion up to the imagination, I’m on the right track. All I know is the switch made this a much stronger photograph and one that deserves more than a passing glance. The same couldn’t be said for the color version no matter what I did to it in post. I’m actually quite happy with this very simple image and it is one that I just don’t get tired of looking at, but I guess I’m a bit biased since I created it.

There wasn’t much to work with other than the very front of the Chevy, so after shooting the three variations, I moved on to the next subject. The question was, which subject that would be? I was back in the open field where I had started this adventure. I was looking around trying to find something else to shoot. The sun was coming out and it was starting to get hot which was still a very welcome change from this morning while slogging around in water filled hiking shoes. My feet were damp, but no longer drenched…at least that was how it felt. I did happen to notice that I was being swarmed by mosquitoes as the temperature climbed and not seeing any bodies of water nearby, I started to wonder if my feet were attracting them.
As I was looking at the different cars, I stopped by the Oldsmobile once again. This one stood out for me because I just don’t see that many from this era. The shape of the body was interesting, and it was very much a product of the space age of car design. The overall photo that I had gotten earlier of it kind of hinted to the design, but for the most part, the shape was obscured except for the silhouette provided by the body line along the top surfaces. This was my chance to capture some more lines and details of the car. The front was obviously well hidden from view, but the rear and the sides were open for some photos. As I walked around the car, I kept coming back to the taillights and how they were sculpted into the rear quarters. I also noticed the “Super 88” emblem on the trunk lid which told a lot of the story. That became the prompt for the next composition that I was going to work on.
I wanted to do something where I had the emblem opposed with the curve of the taillight trim which had a link with the edge of the trunk lid. The lid was open, and if you know me, you know that I wasn’t going to close it or change anything about it. I had to find a way to make it work as it looked. There was a rather dominant weed growing up right next to the light that had a vibrant green tone to it. As I had leaned on several other times during the day, the Spring green and the rust were looking very good to be when paired together. It would also make for a nice contrast in textures as well as color. With that in mind, I set up a vertical composition with the top of the frame around the emblem and the bottom of it by the corner of the bumper. The weed and a good chunk of grass was included to fill in the bottom left corner.
I ended up shooting two frames of this composition and I realized that it wasn’t inspired at all. It looked like a snapshot in the worst way. I had included the elements that I thought were important, but I had also included too much that didn’t help the photo. I decided to recompose and try again. This time, I was in much tighter which eliminated the bumper which served no purpose to this composition. I knew that I would be shaving at bit off the ends to make this a 5:7 aspect ratio, so I overshot the top and bottom a little bit, but managed to make sure that all the important ingredients were left intact.
I committed to this variation on the composition and ended up shooting seven different frames of it as I tried to hit a shot at 1/10 of a second with no wind. I actually had the shot after five exposures but decided that there was a leaf that was getting too close to the taillight, so I moved it out of the way tucking it under another weed nearby. This left a single stalk in just the right position behind the light. I shot two more exposures with the weed moved and it was that last one that made it through to the editing process. It really is all about the details.
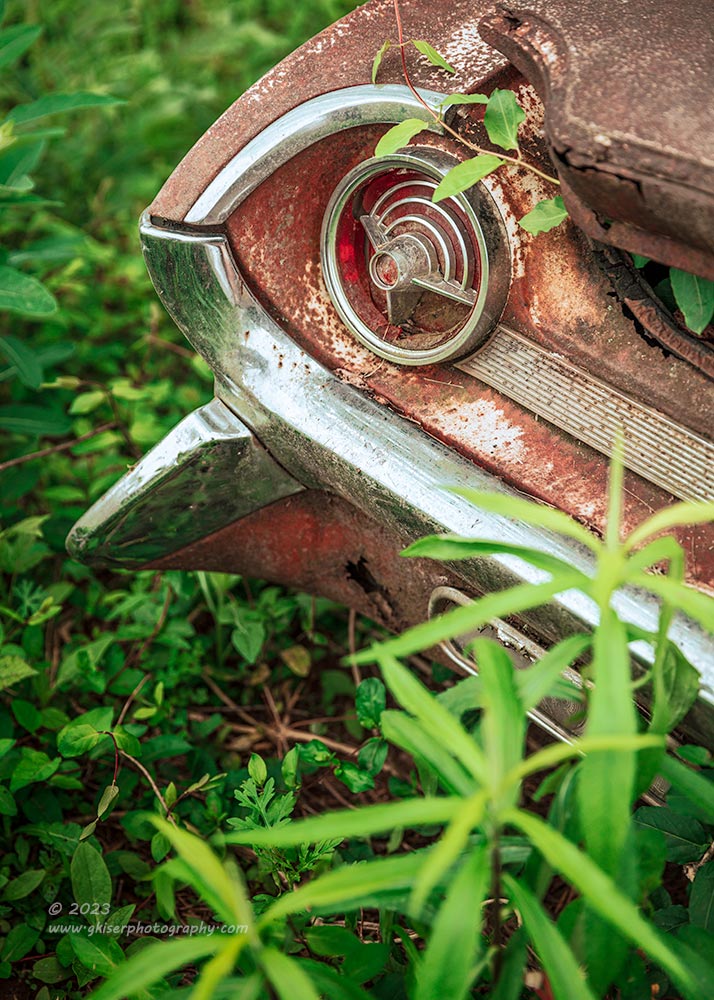
I had more fun shooting the taillight than I had anticipated, so I moved over to the other one to see if there was anything there. Obviously, the emblem was not on that side of the trunk, so the composition could be very different. I also noticed that the fin that was below the bumper was in one piece on this side. It had been crushed on the other side and just looked like a slab bumper end which was why I was able to crop it out in the framing without any problems. The driver’s side fin was interesting to me though and it was an opportunity to get something very different on this side. I started to work through the compositional possibilities with this side and started to look at things from the center of the rear bumper. That was the best way to show off the angles of the fin while keeping it in line with the other body lines.
I started out with the horizontal orientation to give more separation for this composition from the last one. I quickly dismissed that idea as it just felt very flat when looking at the design in a horizontal frame. When I switched to vertical, things changed, and I was paying more attention to the fin. I chose to use the edge of the trunk to establish the framing of the top of the image and allowed it to come down well past the taillight and fin. In fact, the car only takes up about half of the frame while I used another weed to provide some color contrast in the lower half of the frame. For this, I played with depth of field to really make it look the way that I wanted it to. My gut was telling me that I needed the weed to be blurry, but I wasn’t sure how blurry I wanted it to be. The last of six frames was at f/2.8 which is wide open for the lens. That was the one that I ended up liking the most but I’m glad that I went through several variations to make sure that was the case.
The funny thing about these two photos is that there are a lot of similarities to them, but they are nothing at all alike. The camera shows a different perspective with both, and the eyes move completely differently through each frame. When I was shooting them, I figured that I would end up with only one of them being a keeper, so it was a treat to see them as being so different. I’m really liking how they both turned out and I think that they captured the essence of the Oldsmobile quite well, and possibly better than the overall shot did. I still like the overall from a landscape point of view because everything in it just works together for the story that I was wanting to tell.
When I got done with the last taillight, I had 181 frames on the camera. It had been a big day for sure. I was tired and ready go get home to rest and get started editing the photos. I had no idea how many I would end up processing, but I had a feeling that there were going to be a good many from this part of the day. It just felt like it had been a very successful few hours. I made a quick look around to see if there was anything else begging to be photographed, but I didn’t see anything. That was a good indication that I was mentally exhausted and ready to turn off my creative brain for a while.
As I was walking back to the truck, I saw the guy I had been dealing with for the renovation on the house. I hadn’t known that he lived right across the street from the shop until just then. I went over to say hi to him and we talked for a few minutes. He asked if I had gotten any good photos from the old cars. Since I had the camera in my hand, I just did some image playback for him and showed him some of the compositions that I had shot. I was actually very impressed with all the photos that I was seeing. That gave me a lot of hope for having a good many new images from this trek. I had no idea that would be as many as it turned out to be though.
While we were talking, he told me about a house that he and his wife had bought as a potential rental house after they did some repairs to it. It was close by, and I knew right where it was. I had remembered seeing it but didn’t really like the overall look of it when I saw it back in the Winter. Since I had the permission now to get on the property, I thought it was worth another look. Seasons will always make things look different. We finished up our conversation and I loaded the camera up in the truck.
When I climbed up in it, the seat felt so good, and I just wanted to go home. I had been on my feet the entire day working the camera and I was tired. I wasn’t sure if I had any creative energy left, or even if I had the energy left in my hands to work the camera smoothly. I could come back another day to look at the house. But then again, I was looking up at the sky and realized that it was probably not going to get any better than this any time soon. I decided to make the quick drive to the house to see what I thought of the house in the Spring.
When I got there, I was just starting to get really comfortable in the truck, so it was not a pleasing thought to get out again. I just did a drive by to start with which gave me an updated idea of how things were looking. The grass was tall just like I had been in all day long. I actually really liked that aspect of it and I thought that it helped to tell the story of the house. I circled around and parked in the driveway before getting out to get a better look.
I went from one side to the other to see what the best angle was going to be for it. As it turned out, the driveway offered the best view of the house, but there were a couple of things that I didn’t really care for from a compositional standpoint. The first was the Private Property sign on the porch. It was affixed to the post for the roof. Normally, I don’t have a problem cloning these signs out, but since it was on an important trim detail, I didn’t like the idea of doing that. I could have pulled the top section of the far post over to “rebuild” the missing one from the deletion, but that would have been very labor intensive to do, if I could even make it happen while being believable. The second part that I didn’t like was the breaker box that was mounted on the wall of the house in the front porch. Moving around, I found that I could mask that box with the second post while keeping the front door and windows from being awkwardly cut by the other posts.
The more I thought about it, the more sense the photo was starting to make. The sign was the biggest sticking point for me and something that I had to rationalize for the sake of the photo because I was relatively sure that I wasn’t going to be removing it in post. The more I considered it, the more the sign played a part in the photo. The house is certainly in a state of decay at this point with visible rust on the roof, peeling paint, discoloration, and the high grass would indicate a certain amount of neglect. Of course, I know the story of the house now and the new owner has only had the house for about six months now. There is a lot planned for the house and it won’t be long before there is a family in it once again. That sign represents a certain amount of care for the house that alludes to the rest of the story. With it making sense to the overall story, I was fine with leaving it in the composition. At least that is what I told myself as I turned the truck off and opened the hatch.

I had already figured out where the camera was going to go and due to the proximity of the house, I decided to fit the wide-angle lens to it. I also added the polarizer and a 3-stop soft ND grad to pull the sky back and give the photo a bit more atmosphere. I got things framed up and checked to make sure that the breaker box was covered and that there were no awkward intrusions to the windows or doors by the posts. Once everything was all set, I started making exposures.
After my first three, I decided to tilt the camera up a little bit to get more of the sky and lose some of the grass. It also helped to put the house in a better position within the frame. I committed to this composition and tried some different shutter speeds to see if moving grass or still grass suited the scene better. I was also watching the sky do the different things it was doing. The clouds were moving towards me so the bright area was going to increase in size which I thought would be helpful to keep the eyes on the house itself. I kept making exposures as that change was happening, all while considering the possibility of doing a long exposure.
This would have been a great time to do a three-minute exposure to show the clouds moving over the house. They were moving in the right direction and at a speed where it would work out well. There was enough definition in the sky to make some interesting patters as well. I was even fine with the grass blurring as it blew around over the course of several minutes. The only catch that I couldn’t abide by was the fact that the trees would be moving. This was not something that I was prepared to deal with. I needed them to maintain their textures, but there was enough movement out of the branches that I would have lost most of that structure during the long exposure.
With that, I shelved the idea for the long exposure and after nine frames I considered a different issue. I knew that I was shooting with a wide-angle lens at 27mm which was going to introduce some perspective distortion. Since the camera was just above eye level, I didn’t expect it to be terrible, but there was the chance that it would be noticeable in the final image. I had just a little bit of room to make the upright adjustments but wanted to give myself a bit more wiggle room. With that in mind, I opened up the field of view to 25mm and shot a final two exposures with one being a safety. This way I had two images to work with should I find that the upright adjustment was needed.
Once I finished the eleventh frame of the house, I had my 192 images from the day ready to be culled. I was pretty much exhausted but felt great being able to get out and do that much photography in a single day. It was still early despite the fact that I had been up for nine hours and out of the house for eight of them. Nothing would have pleased me more than getting home and stretching out in my chair and taking a nap, but getting home around 1:15, there was no reason not to get started on the photos. I ended up spending about six hours editing the new pictures which turned into 24 keepers which was amazing to me. I’m not sure why I did this, but I did the edits in the order in which I shot them with the exception of the first one that I edited. Something about the old house stuck out to me and I wanted it to be the first to have the pixels massaged.
I culled those last eleven images down to two. One of them was the fourth frame I shot right when I tilted the camera up slightly, the other was the last image of the day with the extra wiggle room for the upright correction. I liked the brief splash of sunlight on the house in the earlier one which was the only frame where the sun was shining on the house. Teh perspective distortion wasn’t terrible with it, but I decided to see if a correction would be worthwhile. I picked two vertical points, and the correction was finished. It didn’t really affect the breathing room on either side of the image as much as I had thought was possible, so there was no need for the slightly wider shot. I just went ahead with the one that had the sunlight in it which became the first image I finished from the batch. The rest of them, I edited in the order they were shot.
We have now come to the end of the third blog about Saturday’s Trek, and I’m happy to say that this wraps it all up. I appreciate you staying with me through the entire day, and I hope that you have enjoyed the photos as much as I have capturing them. On treks like this, where I end up shooting everything under the sun (landscapes, woodland, waterfalls, decay, and rural) I often wonder which genre is most enjoyed by you. I know that I have fans that gravitate to one over the other, but it is hard to tell which images are the ones that are generally enjoyed more than the others. Drop a comment or an email and let me know for the sake of curiosity. It is so hard to tell through social media because comments and likes are so dependent on whether or not the posts are even seen. I know that the links to the blog entries are largely unseen unless you are subscribed to the blog. You are subscribed, aren’t you? If not, it is very simple to do. Just go to my home page at www.gkiserphotography.com and scroll to the bottom. You will see “Subscribe to Blog via Email” and all you have to do is insert your email address. A test email will automatically be sent to your account that you will use to verify. From there, you will get emails with each new entry here in the blog. It is the easiest and most of the time most efficient way of keeping up with my new images. Occasionally, there are issues, and the emails don’t go out, but I’m just about figured out how to deal with that when it happens.
Don’t forget that every photo that you see here in the blogs or in the gallery are available as prints. I offer some standard sizes that can be ordered directly from this website, but if you want something a bit more special, or larger, those are special order and have to go through me to ensure the right print is created. No matter what you choose, you can rest assured that the print will be high quality and will be treasured for generations to come. I’m very thankful for my clients that support my art by having prints made of their favorite photos. They give me the opportunity to see the photo that I have created in the intended form. Since printing is an expense, I don’t print for myself as a rule. There are certain photos that I will have done as prints for the house, but even with a big house, we are running out of wall space quickly. I treasure those moments when I get a chance to see one of my photos in print form, even if it is just for a few hours before packaging it up for delivery or shipping.
Thank you for being a part of my journey with photography. It is not always a pleasant journey, but there is always something to look back on and smile about. I hope that you feel the same way after reading about all of my adventures.
Until the next time…

Remember to use the code KISER10 to get 10% off your purchase