Tuesday, May 27, 2025
I’ve been kind of quiet over the last week or so, but I have been very busy at home taking care of a lot of Spring chores as well as getting ready for a workshop and then finishing up everything from the workshop. That still isn’t quite done just yet as the image review is scheduled for tomorrow and I’ll be meeting with the participants virtually to discuss some of the selected photographs that were shot during the day. The learning process is ongoing, and I always look forward to this image review after a workshop.
With the rain falling pretty steady today as I am getting ready for that image review, I happened to think about some equipment maintenance that I needed to be doing. It is nothing exciting like cleaning lenses, or a sensor even. In fact, there is nothing at all that needs to be done with my main landscape kit. I’ve been using it regularly and keeping it clean and ready to go at every turn. What I haven’t been using for a while and is needing a bit of attention is my studio and portraiture kit. You might be thinking that they are one in the same, but you would be mistaken. Over the years, I’ve ended up running two complete systems that handle specific tasks very well. On the one hand, I have my landscape kit built around my aging Canon 5DS R DSLR camera which is largely considered obsolete by the talking heads on the different social media platforms. My other kit is built around a much more current Canon EOS R5 Mirrorless camera and also brings in a lot of studio lights as a part of that kit. You might be asking why I’ve done it that way, and honestly it isn’t important for this discussion. However, if you are interested, I did a Behind the Camera on that topic a while back.
What is important here is that I use the older stuff a lot and that keeps batteries rotated and troubleshooting up to date. The newer kit seems to find itself sitting idle in the camera bag until I need it for a studio session, or other portraiture opportunity. There have been very few of those in the past few months. Speaking of which, if you are interested in doing a session with me, or just need a professional headshot done, let me know. While this isn’t a primary focus for me, it is a type of photography that I do enjoy and would like to do more of.
OK, enough of that. You can imagine that spending time in a camera bag unused is not only sad for the camera, but it is not really healthy for it. I’ve been meaning to get things out for a while and go through the batteries to make sure that they are still charged and ready and that the studio strobes still work as they are supposed to. If I’m going to go through all the hassle of pulling this stuff out and getting it set up, I might as well get a few photos, right? Well, nobody is knocking down my door for a studio session, so I kind of have to get creative and figure something out that will allow me to use the equipment for a bit and make sure that it all works as it is supposed to.
This kind of leads us to the subject for today’s shoot. You see, for the past several months now, I’ve been considering photographing a chess set. OK, I can hear the mumbles. No, this isn’t any old chess set, and it certainly isn’t one of those plastic piece sets that shares the same board as the checkers that come in the box too. No, this set is one that is special to me. You see, it is older than I am, by a good bit. I can remember seeing at my grandfather’s house ever since I had memories. I was still a kid when I found out that this chess set was one that Mom made when she was in school and taking a ceramics class. She had decided on this set because her dad loved playing chess. Presumably, this is why he kept it all set up on a shelf in a small office off of the den. He taught me to play chess at a young age, but not with this set. No, this one was too valuable to trust a kid with who was just learning the game. I had to learn on a wooden set that was probably even older than the one Mom had made. It was much smaller and easier to work with, so it was for the best, however, I always wanted to play with the big chess set that Mom had made. You know, to this day, I still haven’t played a game with that set.
It came into my possession when we were starting to downsize my grandfather’s house as he was using less and less of it. I tried to display the set for some time in the living room, but it became too large for the space and eventually it had to be stored in the storage shed. When we moved into the house in Purlear, there was room for it to be out again, and it lived in both my office and in the family room upstairs which is where it was this morning. I’ve been wanting to get it back down into the office, which is not my studio for a while now, but really haven’t figured out where I was going to put it so that it would be safe when clients would come over. I also needed it to be out of my way so that I could use all the space to set up different sets as needed for client shoots. I’m still not exactly sure where it will go, but I have a couple of ideas that I’m going to try and work with when I am done with this blog and start putting things away. For now, though, I am charging a few batteries which I’m glad that I noticed needed a bit of a boost.
After bringing the chess set back downstairs again and getting it positioned squarely in the middle of the studio, I started to put the pieces on the board. I realized that this was not the right thing to do just yet. I needed to see how things were looking through the lens first and foremost before I positioned anything. This was not something that I have done enough that I just knew where things would need to be in the frame and I only had an idea of the lens that I wanted to use. My idea was to get my 100mm macro which would be super sharp while giving me a pleasing depth of field for a bit of depth to the scene. My other option was going to be my EF 35mm f/1.4 Mk2 which has been adapted to the R5. I needed to see how things would fall in the frame because I had an idea of what I wanted to do with this whole concept.
I went ahead and fitted the macro lens, not that I needed the macro capabilities, but I thought that the focal length would be spot on for the size of the set that I was working with. To give you an idea, the King measures at nine inches tall, so there was absolutely no need for using a macro lens for getting close in. Here is one of the main reasons why I am reluctant to make a mirrorless camera my primary camera for field work. As I was putting pieces on the board, the camera would keep going into power save mode and going to sleep. Every time I would come back to it to see how the pieces were looking in the frame, I would have to wake the camera up. Of course, this ate through the batteries where were only at 60% to start with. With the old DLSR, I didn’t even have to turn the camera on to get the composition set up which I love about that old technology.
Once I got the composition roughly sorted, it was time to put up a backdrop. Knowing how much space was visible behind the table was important to knowing which backdrop to use. Since I was happy with the telephoto lens, I didn’t have much space to fill with a backdrop. A simple pop-up backdrop on a stand worked perfectly so I didn’t have to drape black muslin all over everything. Now, I could have gone ahead and shot this scene just like this. I had plenty of light in the studio thanks to the ceiling lights, but that light was boring and flat, not to mention carrying a green tint to it. No, that lighting was never an option when I started to think about this scene.
From the beginning, I wanted to make this a higher contrast low key image. I figured that black and white would be a good option, but I kind of liked the idea of color. As I was thinking about color, I actually considered using gels pretty strongly for a bit of mood to be added in. For the contrast, I was going to have to use relatively small light sources at higher powers. Most of the modifiers that I have, and use are designed for subjects the size of people and even my hard light modifiers are seven inches in diameter. When dealing with a small subject like this, I would have to have my lights positioned across the room to make the light as hard as I wanted. The other option was to get the light even smaller. I had only two options for that and those were my Westcott optical spot and a snoot, both of which would produce a light from a source much smaller than the standard reflectors that I had for my strobes.
I set up two of my studio strobes and found that my B light battery was nearly flat at less than 25% capacity. I pulled that battery and put it on the charger while I went to my C light battery pack and found it to be right at 75% full. My A light was in good shape with nearly a full charge. My key light was modified with a gridded snoot to illuminate the King on the board while the fill light was the Optical spot through the kit lens. I could have made the optical spot smaller than the snoot, but I liked the idea of introducing cookies over the scene which could only be done with the optical spot. In case you didn’t know, a cookie is simply a gobo, or a slide that casts a shadow on the scene for a bit more depth.
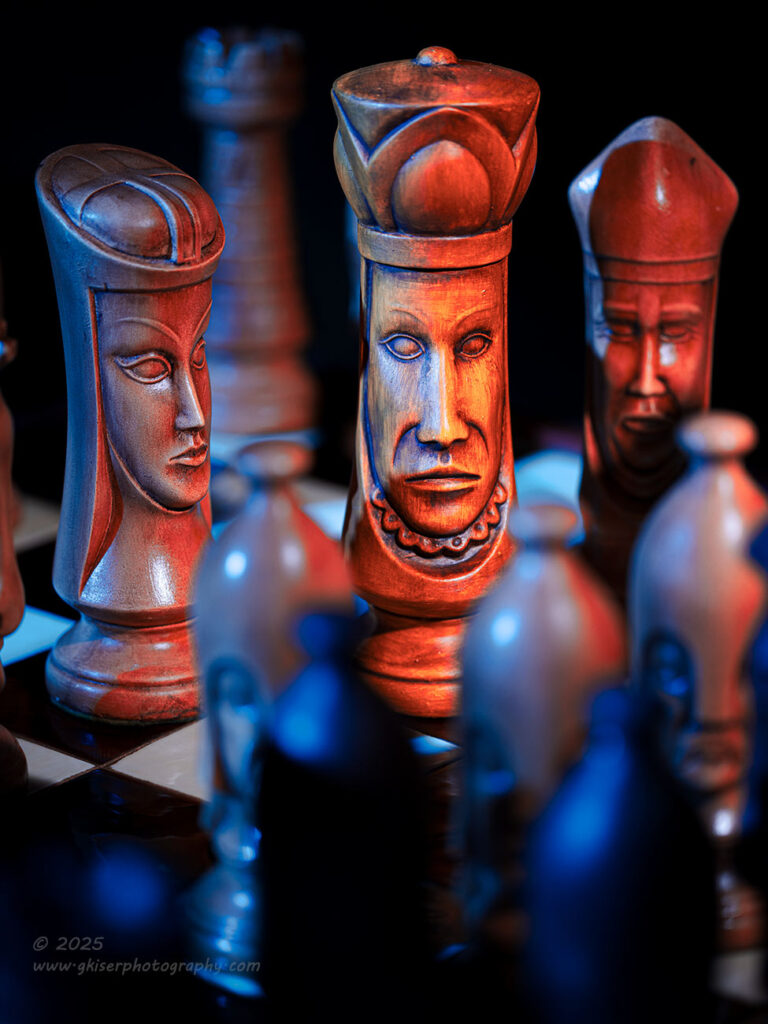
Now that I had the lights figured out, I went ahead and put a blue gel on the optical spot to give the scene a bit of a nighttime feeling. I positioned the light so that it would illuminate the entire board as a fill and then I dialed in the intensity of the light by feel and not by using a light meter. This light was just meant to lift the shadows and didn’t need much power, but because of the distance I was using it at, I ended up firing that strobe at half power to get the little kick of blue into the shadows. The key light was much easier to expose for. Even with the snoot and the grid attached to really control the light, I was around 1/64th power on that strobe.
After I got the base exposure and light placement figured out, I started to shoot frames to then check where the shadows were falling and to adjust the placement of the pieces. The whole point of this was to draw the attention to the king while telling a story around that focus point. I needed certain things to be seen while other things could be obscured by shadow, object, or position. This became very frustrating because I kept having to wake the camera up, and I found another problem as I was doing this because occasionally the flashes wouldn’t fire. I eventually figured out that the flash trigger battery was failing so I replaced those which was another bit of maintenance that needed to be done.
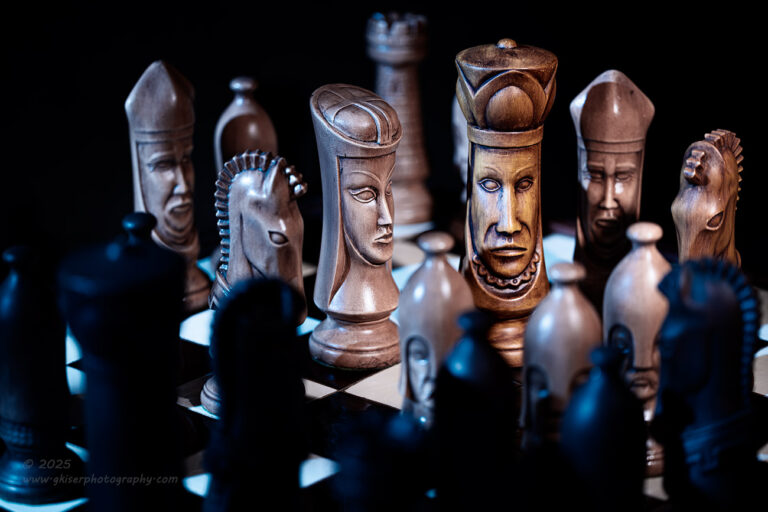
I eventually landed on a photo that I liked which you see as the first keeper of the day. It established the story that I wanted to tell, and the lighting was pretty much what I had envisioned. The hint of blue in the shadows was faint, but worked well with the earth tones that Mom had painted the pieces. I ended up using one of my favorite desaturated color profiles in Lightroom to process this image and I think that it came out really nice. I still wanted more from the scene, and I had to remind myself that I could change any number of parameters to make different images.
I had considered using two different gelled lights for this scene and went to find a gel to fit the snoot. It had been so long since I had even used the snoot, I had no idea where the gels were and to avoid breaking the rhythm that I had going, I used one of the optical spot gels which was just slightly larger than the snoot opening. A little gaff tape and I was in business. I now had red on the key light and blue on the fill. Color theory has to come into play when I have this much control over things. I had to work through the exposures on both lights to balance them since gelled light works to fill in shadow and if you actually expose it correctly, you won’t get much color at all. Essentially, I was underexposing the images at this point, and I would have to raise the exposure in post to keep the colors as I wanted. This was actually a great refresher for me since I don’t work with gels all that often, and it has been about a year since I have used gelled light.
To really get a feel for the light, I decided to move in closer and work on a new composition that really focused on the king. It was back to waking the camera up after every adjustment to see if the change that I made was in improvement or not. I had to keep the face clear of obstructions but also keep it looking random and not overly staged. I was balancing a lot of creative aspects with this shot while visualizing what the colors would do to the scene. The end result was having the camera in portrait orientation to really focus the frame on the king while allowing the other pieces to frame him. The darker pieces were placed in a way where they didn’t pick up the key light and would only be lit by the fill which amplified the distinction in sides. You can see now, why I had to use very small and controlled light sources for this session. I wanted the light to be specifically placed on the scene to help tell the story, not just to light it.
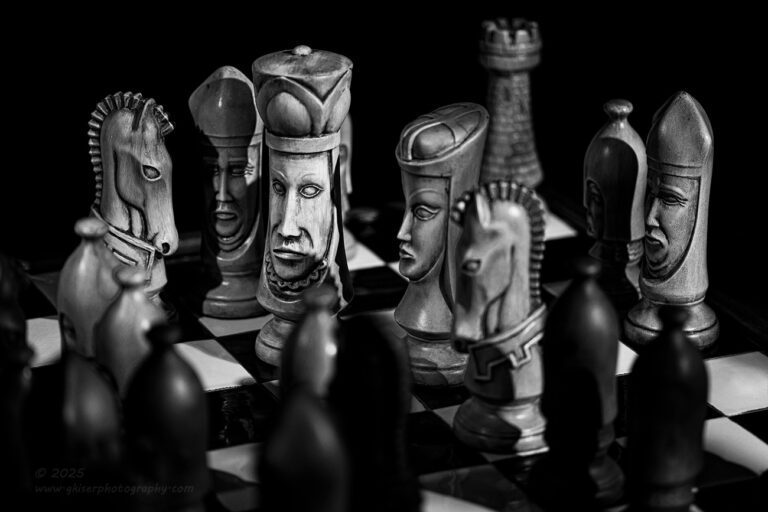
I was starting to get the hang of how this was going that that felt really good. I don’t do still life photography much at all, so I really expected this to be a slow process with lots of failures. I had landed on a lighting recipe that I really liked and decided that I was going to start moving the camera around to get different angles and looks. I also went back to the full composition as seen horizontally to take advantage of the lighting. To add one more piece to the puzzle, I introduced that gobo to the optical spot and used a tree cookie. I defocused it so that it would just bring about some subtle shadows to the scene, but nothing too dramatic. This started to look really good in the image review, and I worked on piece placement for a while. Of course, there was a lot of waking the camera up which made me really want to pull the DSLR out, but that would defeat part of why I was doing this shoot.
Oddly enough, I had become very interested in the different colored lights from the gels, but when it came time to process this particular composition, I felt that the colors actually became a distraction. I wanted to see what it would look like in black and white and found that this particular composition worked very well without color. A side benefit to having the color lights was that I was able to adjust the brightness of different aspects of the scene based on red and blue colors after the conversion to black and white. There is something that I learned as a benefit to gelling light when doing black and white photography that I might not have thought to do before.
Things were really coming along well, and everything was working as expected. I did want to step it up a notch though and bring in some more visual interest. My compositions were getting smaller once again in terms of scope and I wanted a bit more detail added into the scene. Remember that gobo that I had in the optical spot? Well, I just needed to focus that lens for the gobo to give harder lined shadows which I did. I could now see the limbs of the tree silhouette which was what I wanted at this point. That, of course, added a bit of difficulty as I needed to make sure that the shadows didn’t block anything important in the scene. This meant using the modeling light to precisely position the optical spot and then firing off a test frame to see if everything worked out the way I wanted it to. More waking up the camera. I’m just not a fan of mirrorless cameras when it comes to still life photography. This would have been much easier with the DSLR, but I had no way of mounting the lens to the old EF mount which dictated sticking with the R5.
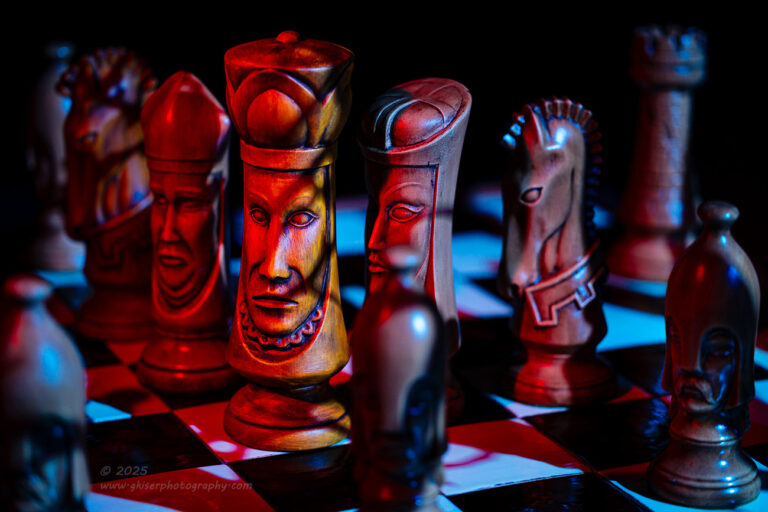
I did really like how that version of the concept turned out. The reds and blues looked very rich, and the shadows added a bit of drama that I had really not anticipated. I really need to think about using these gobos on a key light when doing portraiture. I believe that they will add another dimension to the image and to be fair, that is what the optical spot was designed to do from the beginning. I’ve just been more comfortable using it as a background feature and not over the face of my subject. Again, something else that I have learned from doing this simple exercise today.
What I was really starting to appreciate with these photos was the way that the details of the different pieces rendered. Because this was primarily about the chess set, I wanted to really focus on the way that the pieces looked, and I was able to do that with the hard light sources that accentuated the natural shading that Mom had added when painting the pieces something like sixty years ago. The colors set a mood that fit that shading, and the compositions told a story that hopefully went along with all of that for a cohesive looking set of images.
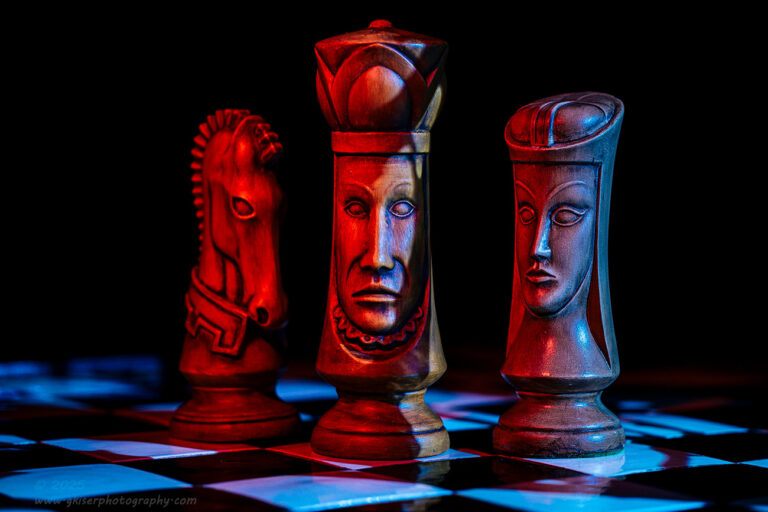
Even though I had been working with a lot of the pieces to tell a story, I wanted to get a much more simplified composition before I was finished. As I had been doing, I wanted to focus the attention on the king but wanted to bring in two other aspects. It only seemed logical to bring in the queen and then I had to decide between the bishop and the knight. Because of the split color of the light, I felt that this symbolized a choice to be made. Because of that, the knight won out and I set the photo up with the king flanked on one side by his wife, and on the other side by the symbol for his military duty to the realm. Yeah, I might be getting too far into this.
The fact remains that there is a story to be told and seen here. What I really love about this scene is without all the other elements vying for attention, the viewer is left to focus squarely on the faces of the pieces. The details are there to keep you interested and the way they are presented makes you connect with them even though they have empty eyes. This might be the most engaging photo from the day and it one that I really enjoy looking at. That is saying something because I am really quite happy with all five of these photographs. I do need to do more of these still life sessions because there is so much that they can teach me, and it gives me the opportunity to come up with some photos that you have never seen from me before.
I do hope that you have enjoyed these photos, and if you are a bit of a nerd like me and like chess, consider a print for your gaming space. I think that these would look really fascinating as prints on a number of different media. I don’t know how many of these ceramic sets are out there, but I would venture a guess that this one is a one-of-a-kind since it was made by Mom. That makes the subject unique and the way that it was photographed also adds to that uniqueness. Talk about a conversation starter on your own wall!!
Thanks for joining me for this studio session. I’m not sure what is next on the trekking menu, but I do have a bunch more to take care of in the coming weeks, so I’m not sure how much time I’ll have to get out and get photos. I’ll try to fit some in though, so keep your eyes out. I’ve also got a brand new Behind the Camera coming up in a few days that might interest you. It is all about the art of noticing, so don’t let it pass unnoticed.
Until next time….