Tuesday, July 22, 2025
Good to see you again! Hopefully, you have already read through the first part of this blog which I posted yesterday afternoon. The irony of doing a two-part blog for just a single car at a single location is not lost on me. In fact, I am still kicking myself for making so much work for myself on a week that I am pretty busy. I really can’t complain though, because I have needed the business for a good while now. In addition to the portrait shoot the previous weekend that I am still working with the clients on, I have a good deal of mentorship appointments that have been going on this week. Two of those are happening this afternoon, and I still have to get the yard mowed, because Friday, I will be traveling to do corporate headshots for one of my commercial clients about an hour and a half away. Toni reminded me that when it comes to business, it is usually either feast or famine. I’ve been hungry for several quarters now, so it is nice to have some demand back and be back to work. It does make it difficult to work on my personal projects and treks, but I have been able to do that for quite some time now.
The personal projects and treks are where I can really experiment and learn new things about photography, and also how I like to capture my subjects. These lessons usually have implications well beyond my landscape and decay work and flow into the client sessions. Everything that I do with the camera provides me the opportunity to learn which makes me better at all that I do. Since it had been a little while since I have been out on a trek just for me, that was what I intended to do yesterday. I just wanted a little taste to exercise that creative muscle; there was just no way to know that a simple car in an odd location would provide me enough photographs to fill up two blog entries. The smart money would have been on capturing three or four frames at best. I mean, when we look back on the trek where I shot a Nissan pickup, it was in a much better setting with more opportunities for compositions, yet I only kept a single image from that session. Here I was looking at a car, up on ramps in a driveway, right next to a house, a trailer, an SUV, and a full-sized pickup along with lots of discarded personal items. The car itself was missing several important bits like trim and a hood. Even when I got started with the photos, I was struggling trying to find ways of shooting this car.
However, in a short amount of time, I started to listen to the car, and it told me how it wanted to be captured. Once that started to happen, the compositions started to flow pretty quickly. As we saw in yesterday’s blog, I already have seven photos in my collection from only 24 exposures over 40 minutes of working. I thought about calling it a day because that should have been the handful of images that I was after, which was all the time I really had to dedicate to the second stage of any trek which includes editing, processing, and blogging. The fact was, I wasn’t finished and felt that there was still more that this car offered in terms of creative options.
That brings us to today’s entry which will wrap up this simple trek. By this point, I was firmly in the mindset of working the details and capturing the isolations on this car. One of the areas that had really interested me, but I hadn’t really done much to capture was the way that the paint was crackled on the roof. Of course, this was a two-tone car with the cream-colored roof that went so well with the mint paint that I loved about it to start with. One of the nice things about that off-white paint is when it starts to break up and reveal the rust below it, the whole thing starts to take on this wonderful warm hue as the rusty tones start to bleed over to the paint as a stain. The cracks become very dark which creates a wonderful sense of texture due to the contrast. I love working with surfaces like this, and it was time to turn my attention to that roof, but what sense does it make to photograph just a roof? That is where creativity gets to come in.

The trick for this kind of photograph is that I have to focus on things other than the roof which just becomes an element that is being captured. I like to look at this as the power of “and,” and this is one of the things that I have started to teach during my workshops. While photography is largely a subtractive art, where you remove distractions from the frame, it also works in the other direction to create more visual interest. In the case of the textured roof, I needed something to establish shape to the composition, something to give a visual pathway. Adding something that balanced out the warm tones would also be beneficial for the overall balance of the image.
Fortunately, the car was this wonderful mint green which already worked well with the rust tones, but as designed in this paint scheme, it also worked well with the cream-colored roof, which had its share of warmth through the rust staining. I knew that the rear pillars on this coupe would make for some interesting lines because I had worked this type of composition out on a ’57 Chevy some years ago. I still had my telephoto lens on which I knew was pretty good for this kind of composition, so I got the camera into position behind the pillar on the driver’s side. I changed up the aspect ratio to 4:3 which I have started to really like for vertical shots. From here, it was just finding the right visual balance to the image.
You will, of course, recall that the reason for shooting this image was for the roof, yet the roof only takes up maybe 20% of the frame. That goes against the theory of fill the frame with what you like, and I completely understand the confusion here. The truth is, what I really liked about this scene would have been really boring if it filled the frame. By adding 80% to the photo which included a strong diagonal with a gentle curve, some color contrast, and even some tonality contrast to define the shapes, I ended up with a much more engaging composition with a bit of an abstract touch to it.
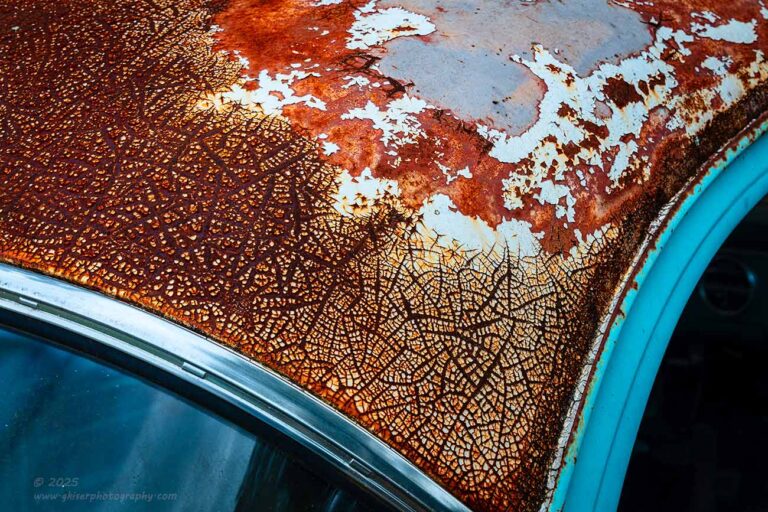
I did want to include more of the roof, so I checked on the other side to see what I had to work with over there. The aging was quite a bit different, and there was a very different aspect on the passenger side. This side had an area of the roof where the paint was pretty much missing which left a smooth area which broke up the texture. This added another point of interest, or more importantly, a visual break from the extreme texture of the roof. This allowed me to include more of the roof than before without overloading the eyes of the viewer. The colors were also deeper on this side due to a slightly different aging process based on how the sun has been hitting it I assume.
I took the original idea of a composition and started to fine tune it. In short order, I found that this side worked very well with a horizontal frame which minimized the windows as compared to the vertical composition. The benefit here was less negative space, but space that balanced well with the absence of paint which I was including at the top of the roof. Essentially, there were three areas of negative space which formed a triangle that worked to balance out the shapes of the car for that added balance. The gentle curves of the framework provided the structure, and it all worked to keep the eyes flowing over the texture that I found so interesting.
Between these two photos, you can see how the power of “And” works in different ways. In the first photo, I added elements until the main point of interest only fit about 20% of the frame, yet it was all balanced. In the second, the elements that I added to the frame accounted for much less of the total image, but still provided that same visual balance while the main subject now fills around 50% of the frame. Both of these images were based on the same concept, but the execution was very different between them both because of the way that the texture disappeared on the roof on the passenger side. Every photo is an opportunity to change the framing based on what is available to you, and that is something that I love about this kind of photography.
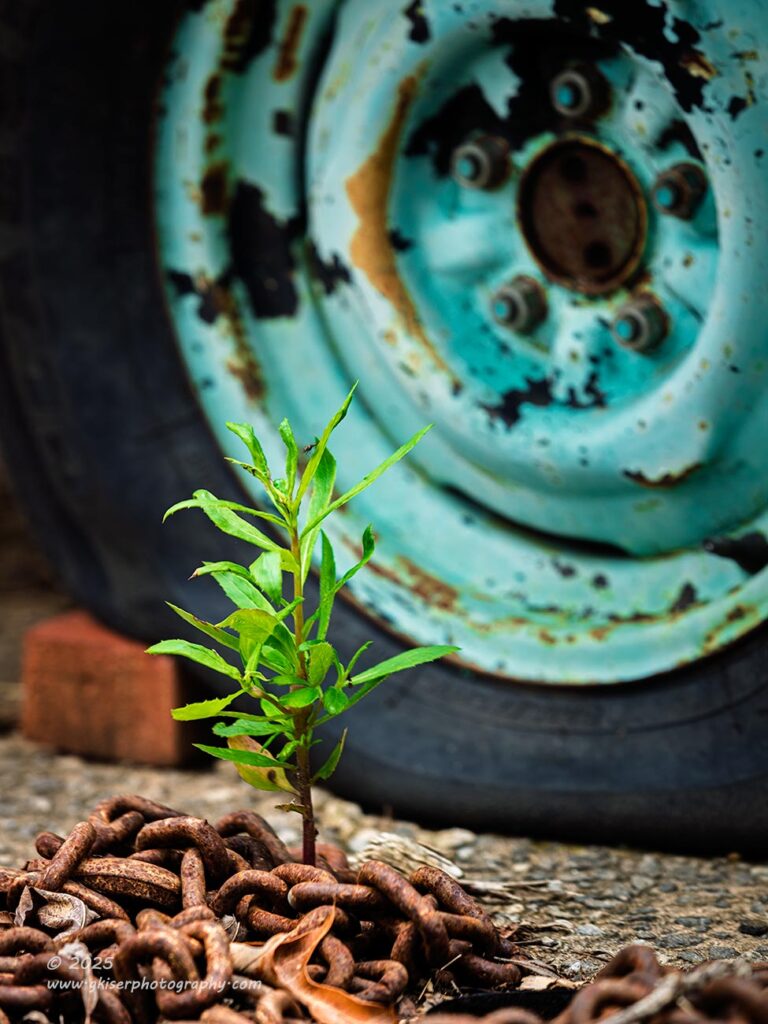
For my next trick….uh…photograph, I started looking much lower than the roof. Something that I had found interesting while working on the roof happened to be right at my feet. There was a pile of chain on the ground by the rear wheel of the car. Of course, I looked at the chain as a potential rusty composition, but it was the small tree that was growing out of the chain that really interested me and sparked my imagination. I couldn’t help but look at this fresh sapling growing from a steel chain in the driveway and wonder just how that happened. There was no dirt, no soil, not care and cultivation. I mean, I see what all Toni goes through in our yard to get things to grow, but here we had a perfectly healthy specimen growing out of a pile of metal on concrete. How long had this been here? How tall would the tree grow? I’m seriously not even over how it started in the first place. This was something that forced me to ask questions, and those scenes make for some very interesting photographs.
With that in mind, I started to look for a composition. Part of what made this interesting was the chain, but I needed something to tell more of the story of this little tree. The car was the obvious answer, but the problem was, if I included the car, the tree would be lost. I wanted to give a sense of scale to it, and a sense of location, but not at the expense of it getting lost in the scene. Now, I had to start subtracting elements from the scene. The easiest thing to do would be to include just the wheel and tire, but that brought about a different set of concerns. With the wheel being painted the mint green, the green of the tree would get lost and further minimized in the scene. However, if I got the tree positioned over the tire, the contrast would not only make the tree visible, but it would pull the eyes right to the main subject.
With that in mind, I started to work the angles and found that shooting from the front of the tire (perched right on the edge of the trailer that was parked next to the car) placed the tree mostly over the tire, and included the brick used to chock the wheel. This was another part of the story and started to indicate the condition of the car along with the tire that was nearly flat. The chain filled in the foreground and the composition was really starting to look nice. The final part of the puzzle was to reduce the depth of field to really keep the attention on the tree. I resisted the urge to open the lens wide at f/2.8 because at the focal length I was shooting at, the entire tree would not be in focus. I stopped it down to f/4 which allowed the entire thing to be in focus while still allowing the wheel to go soft in the background. I didn’t really have high hopes for this image when I shot it, as it was more an experiment, but after living with this one for a while, it is one of my favorites from the day because it was so unexpected yet really works well as a photograph.

I would be fibbing if I said that the reason that I started looking higher on the car for compositions was for any other reason than my back was hurting from working with that little tree. I’m getting too old to contort in these ways for photographs, but I will probably continue doing it until I am in traction. Now that I had that shot, I did want to stand up again, which I did…eventually. There was some creaking and moaning as I got fully vertical again, but I swear it was the old car making all those noises, not me.
With the windows down in the car, I had some pretty good access to the inside. As you know, interior shots have long been a difficult thing for me because it is very hard for me to organize the elements on a dash for a photo. Some photographers can do it as second nature, and I am envious of those who can. I am improving and starting to find different ways of capturing dashes. This one really caught my eye because it had the same mint and rust color palette as the exterior of the car. I also really liked the arched instrument panel and the simplicity of it all. I had already worked the dash from the driver’s side but had a completely different view of it from this side. The long lens was just what I needed here, and I started to set up a shot. The first thing that I had to do was figure out what to do with the steering wheel. This is the hardest thing for me to deal with because it takes up so much room in the frame if I include it all. What I’ve learned over the years is that it is better for me to crop out large portions of it in favor of focusing on the horn and the dash. The remaining part of the wheel just creates a curve in the frame which I have to place with intention.
I chose a crop that allowed the general shape of the wheel to be understood because the human mind will continue shapes that we understand. With what I included of the wheel, we can easily understand the entirety of the shape, which that arch is repeated on the dash with the instrument cluster. The dials are another shape that is repeated throughout the image and the smaller circle helps to link the horn on the steering wheel. By elevating the camera, I created a diagonal between the wheel and the instrument cluster while minimizing the detail out of the window to just greenery rather than the other vehicles and houses. By reducing the depth of field, I was able to blur the background to where it was just a color and texture, keeping the main focus on the interior. I will say that this photo turned out quite nice and it really wasn’t too difficult to compose. Maybe I am getting better at these.
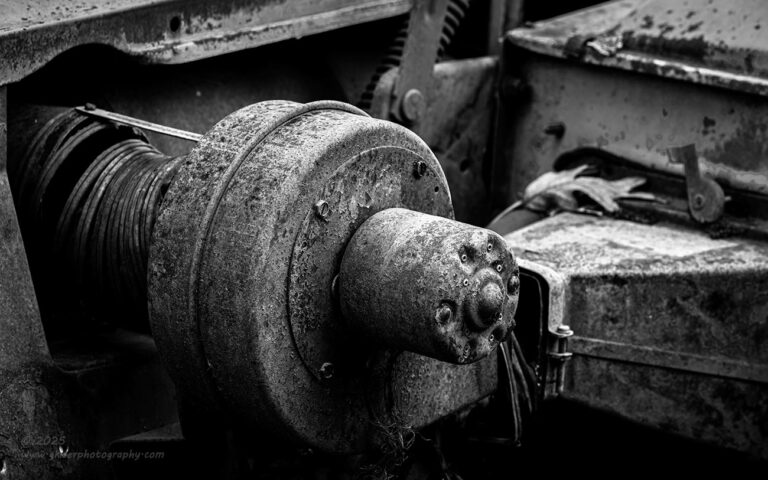
Now that I was doing pretty well at the oddball isolations, I went back to the front of the car where I had tried to get a shot of the blower motor in the engine compartment. Originally, I had tried it with the standard zoom but didn’t really like how it was looking. Now that I had a bit more reach, I decided to give it another try. Almost immediately, I liked the way the composition was coming together better than before. For some reason, this whole scene just indicated the neglect of the car as the hoses were all rotted away, and everything had a coating of rust on it. The leaf sitting on the firewall was that final part of the scene.
I know that most will not really care for this photo, but it reminded me of how I had turned a simple section of framework on the Mercury into one of my favorite abstracts from the day a couple of weeks ago. I liked this scene in many of the same ways and wanted to capture it. After working with the angles for a bit, I finally landed on something that I liked and started to make a few exposures. It could have worked as a color or as a black and white image, but in the end, I felt that the color overcomplicated the scene. The faded paint on the tops of the fender and cowl were causing exposure problems in color and looked really bad when toned down. However, in black and white, I had much more control over the tonal relationships and found that gave me a much better visual balance and visual pathway into the image.
This image is one of the reasons that I love doing personal work and sharing the results. It is not an image that anyone would have necessarily expected to be shot, and I’m sure there are no photographers that go out looking to photograph old blower motors, but it was interesting to me, and I wanted to shoot it to see if I could. At this point, I learn the most when I shoot crazy subjects and compositions that aren’t expected. If you happened to click on the last two links, you will find two different Behind the Camera entries that really explain the types of things that I am talking about here.
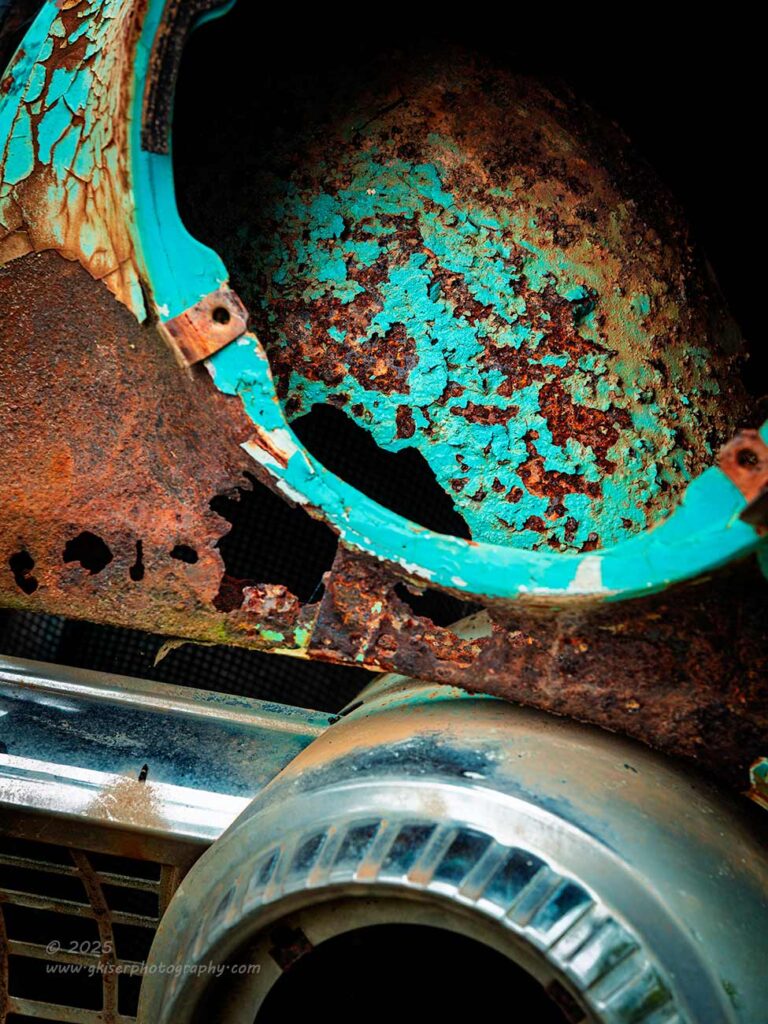
Something that will come as no surprise to anyone that has followed my work for more than a week or so is that I love the headlights on these old cars. Sure, they were all the same unit you could pick up at the local auto parts store, and none of them were unique; but it was how the auto makers incorporated them into the bodies of these cars that made them so special. I’ve talked about how the headlights are like the eyes of a person in a portrait and will allow you to see into the soul of the car. I treat the headlights just like the eyes, but after years of doing that, I have realized that I have really restricted my ability to create compositions on the fronts of these cars.
With this particular Ford, all the lights had been removed leaving gaping holes where they had been. I’ve still had plenty of success photographing the “eyes” with the headlights removed, but there was something different about this car from what I have noticed before which prompted this next composition. The inner fender, just behind the opening for the headlight was just as visually interesting as the exterior surfaces of the car. It still had the same paint and rust which I had loved on the exterior of the car, yet it was on an inner panel which disappeared into shadow the further up into the fender it went. This was really interesting to me, but had I shot the typical frame of the headlight opening, that fact would have been lost. I wanted to capture that inner fender, but I needed some other elements to really sell the composition.
Going back to that power of “And”, I realized that if I only shot a portion of the headlight opening to get the inner fender, I needed to balance that out with a portion of the turn signal housing the bumper below it. That gave an opposing arch to go with the one framing the main subject. In order to link the two, I slid both arches over to the right of the frame and included a bit of the bumper, grill, and fascia of the car which added texture and tonal contrast thanks to the chrome. From here, I just worked with the scope of the framing and tried to establish a visual balance between everything. This is another shot that turned out much stronger than I expected and it is likely going to continue being one of my favorites from the day. I think the part that I love the most is the deep shadow at the top right which adds this sense of mystery to the whole image, but it all just works together so well as a whole.

While working with the empty headlight bucket, I couldn’t help but notice the V8 emblem sitting there on the fender. Yeah, I had already shot this same emblem previously, but it had been a smaller element in a much larger composition. I really wanted to get close to it and capture the detail of the emblem because the way the paint was cracked all around it made for a very interesting look. I knew that I didn’t want to do a straight on composition of it because I’ve played that out too many times over the years. It was never a very compelling composition, but it was effective in the right situations. These days, I much prefer getting more dramatic angles on these emblems for a bit more visual tension. One composition that I have recently found which works great is shooting from an extreme angle from the front where I can get just a hint of the bumper and the top arch of the wheel. The result is a composition of shapes that frame the emblem in a relatively abstract way.
That was just what I did here and was able to include enough of the wheel to really bring in the textures of the rust and flaky paint. The colors really sold the image which cemented why I was interested in this car despite the location that it was in. I will say that I shot this from the driver’s side because the light was better on that side, and the condition of the car was more photogenic. However, the photo didn’t read all that well in the original form, so I flipped it horizontally in post. This allowed for the wheel to introduce the main subject while the bumper bounced the eyes back into the frame. All in all, this was a very successful image, and it was the one that finally made me think that I was done.
I’ve talked about that moment when I just say to myself, “that’s it, there is no more for me here.” That was where I was at. There was no need to look around the car for anything else. There might have been, but my creativity had reached a point of satisfaction with this one car. In my defense, I had been here for just under an hour and a half and had shot a total of 44 frames in that time. The frame count wasn’t that high, but I had been consciously keeping track of my progress through the day. There were very few safety images taken which are duplicates in case of an errant bug, bird, or gust of wind. I didn’t fiddle with the compositions and shoot every evolution of them this time. I trusted my gut as to what was going to work and what wasn’t which meant that many of the variations of compositions just didn’t get shot at all. I would only press the button when I was pretty confident that I had something great. With a total of fourteen keepers out of 44 frames, I’m beyond thrilled at my hit rate which is around 30% for the day.
Now, that 30% hit rate came at a cost because the time spent editing and processing was multiplied from what I had been expecting, and as you can see here, the blog is much more involved than it would have been. I think that it was worth it, and I have really enjoyed working on these photos and sharing them with you. I hope that you have enjoyed them as well. I would love to talk with you about matching you up with a print or two if any of these speak to you. It is always so exciting to see these photos in a nice large presentation because that is the reason that I create these photos in the first place. It kills my soul that so many of them stay in the digital space, but I just can’t afford to make prints at the rate that I would like to for myself. Not to mention, there is absolutely nowhere to put additional prints in the house. My only way to see my own work in print form is through clients like you who want to have that same experience. There is something magical that happens when you can hold a print and see it on a wall. Even after I create the composition, capture the image, work with it in Lightroom, and live with it on a computer monitor for a time, I am still floored when I see one of my images in print. There is just no describing how much more impactful they are once they take a physical form. If you enjoy my work, you owe it to yourself to get at least one print just to experience that thrill. Of course, if you would like to make a collection, that is even better. Who knows, there might come a day when my work is seen as something significant from this period in photographic art. A man can dream, can’t he?
In all seriousness though, I do appreciate you being along for this journey of mine. I’ll see you on the next one.
Until then….