Welcome back for another month of my Behind the Camera series. It is here that I will take some time to answer a question that has come up during the previous month, or just use the time to talk about something that has been on my mind. This year, I’ve actually taken it up a notch and developed a rough schedule for the topics based around what I knew I would be doing during that time. We have spent the last couple of months dealing with self-discovery and defining our own style. While those topics dealt more with the psychology of photography than the actual craft of it, I wanted to change gears for June and talk about some techniques that can be used in photography. At the end of April, I did a workshop at Stone Mountain that had waterfalls included in the subjects that would be captured during the day. Since I was pretty sure we would be spending some time at Widow’s Creek Falls, I wanted to wait and do this entry after that workshop.
You might be wondering why I’m doing this again since one of my earlier Behind the Cameras already addressed this topic. In that one, I spoke more about the differences between long exposure waterfalls and the very fast exposures that freezes the water. I spoke a little bit about how I captured my waterfalls and the techniques that I used. It was a nice overview of waterfalls, but I’ve had some changes in approach and personal tastes since that time which warrants an updated entry on waterfalls. I also wanted to get more into the process of it, and how the images are actually created.
If you have gone and reread that previous entry on waterfalls, you will already know that there are two camps on how to capture the falls, and you know which one I fall into. I’m still a huge fan of the long exposure captures of moving water, but the way in which I capture it has changed in the last year or so. When I first started photographing waterfalls, I got stuck on the “long exposure” part of the equation and I thought that the longer the exposure the better, and I wanted to blur out all of the water. While I still like this effect for some situations, I’ve found that a little less heavy-handed application of the “long exposure” element is better for my tastes. The photos are still technically long exposures, but my definition of long exposures has changed.
I used to consider a long exposure anything more than a second or two, and the longer the better. These days, I really consider a long exposure to be anything slower than hand holding speed like longer than 1/30 of a second. That may seem fast to you when you consider counting it out in your head, but it really isn’t. I did a family portrait session at the beginning of May where the family was out on the porch of a cabin for the images. It was cloudy and drizzly for the entire hour I was there. I was using an off-camera flash and had dialed in a 1/200 of a second exposure. Looking at the photographs, I could see the rain streaking across the frame and at 1/200 of a second those streaks were about a 1/5 of length of the face. While not related to waterfall photography (although it is falling water), it does illustrate the point that motion is recorded at what we would consider very fast speeds.
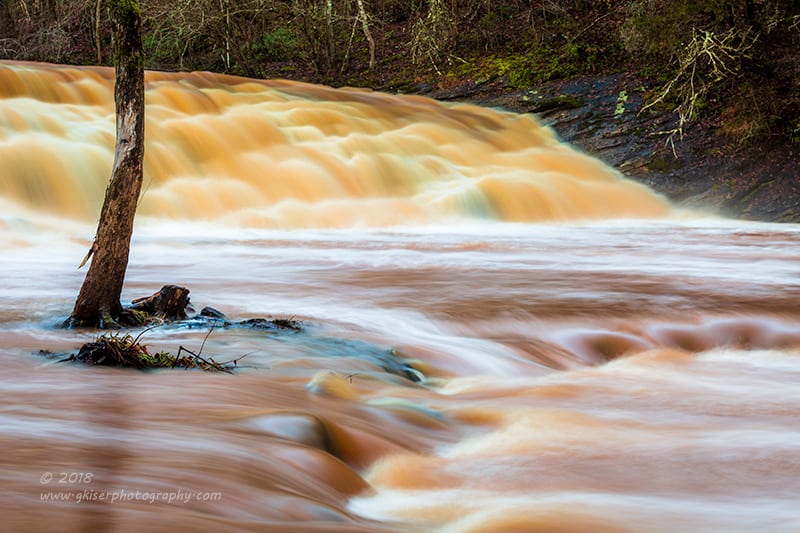
Canon 5D Mk3, 70-200mm f/2.8L II, Singh-Ray Color Combo Polarizer
In this example from 2018, I chose to shoot this waterfall with an exposure of 2 seconds at f/13. It achieved the look I was going for with the muddy water smoothed over allowing the attention to remain fixed on the shapes beneath the water. Honestly, I might do the same thing today since it was the color that I was after primarily, but this was a typical setting for me when it came to waterfall photography across the board. My favorite shutter speeds were 2 seconds to 3.2 seconds, and I would occasionally slow it down to even 5 or 8 seconds. I have a few waterfalls that were even done at 25 seconds, and longer, but rarely would I drop below 1.6 seconds for anything that I shot. That was just the way I worked. I set the ISO to 100 which was my lowest native setting and worked the aperture until I got something that I deemed long enough for the scene. Since I shot primarily on cloudy days, the dim light helped to force a slower shutter speed which made me happy.
With all of this talk about long exposures, it would seem understandable that I would use an ND filter with my waterfall photography. In fact, the question often comes up during my workshops dealing with waterfalls that they think that they need an ND filter. Even though I was looking for those really long exposures, I did figure out a long time ago that by using a polarizer (required for glare) as well as an ND filter would force an exposure that would be just too long and there would be no detail left in the scene. Since the polarizer does an important job of reducing the glare and allowing more contrast to come into the scene, I will choose that filter over an ND any day of the week. That polarizer will also reduce the amount of light that enters the lens by a stop or two depending on which polarizer you choose to use. Even though I was looking for nice long exposures, I felt that there was a point where it was too much. That is kind of where my change of heart has come into play for this topic.
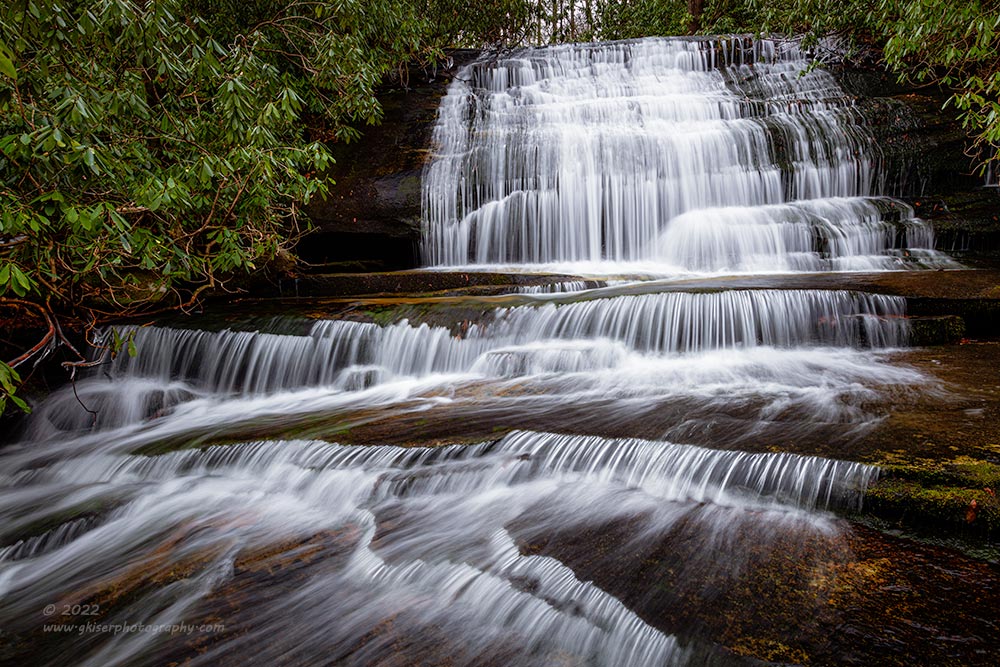
Here we have one of my last waterfall photographs. Once again, I have chosen to capture this at f/13, ISO100, but my shutter speed was merely 1/2 of a second. Aside from the different colors in the water, you can see a difference in the representation of the water itself. There is quite a bit more definition to the cascades of water here while the motion is still very apparent. I could have shot this with a shutter speed of 2 seconds, or what would have been my preference of 3.2 seconds, but there would have been a lot of detail that was blurred out and the character of the image would have been much different. That is where my change of heart has come into play when it comes to photographing waterfalls. I want to see the nuances of the water, and not just the broad shapes beneath it. Using a slightly faster, yet still long exposure does the trick.
When you look at a waterfall like this one, the entire image is pretty much moving water. There is a little bit of foliage that is there for framing purposes and a bit of color contrast, but the vast majority of the scene is taken up with the moving water. Had I gone with a 3.2 second exposure, 75% of the frame would have been white with very little difference in character. In short, while it would have been a cool effect, the chances of lingering and looking at the photograph for a long time would be very small. How interesting is a large white blur within a photograph? As I started to consider that possibility a little over a year ago, I realized that I needed to bring more detail back into the water and concentrate on showing more of the nuanced character than just the broad strokes. I guess it is kind of like differences in jewelry where a necklace is a necklace. However, there is a completely different look between pearls and a gold chain. Even in gold chains, there are subtle differences that speak to some more than others. Long exposure waterfall photography is just like that. The differences are subtle, but they are used to convey the story and the visual flow.
I have found that while I used to default to 2.5-3.2 seconds shooting waterfalls, I have gotten to a place where I usually prefer 1/2 of a second or quicker for them. Now, this is all dependent on the focal length that I’m using because the same shutter speed will result in very different looks between wide-angle and telephoto views. That makes perfect sense because traveling at the same rate of speed, the water will cover much more of the scene at 200mm relative to a 16mm view. That being said, the narrower the focal length, the faster the shutter speed will need to be, and the wider the focal length, the slower it would need to be for the same effect. With that in mind, look at the previous two photos where the first one was shot with a telephoto lens at 2 seconds, and the second was shot with a wide-angle lens at 1/2 second. That is two full stops of shutter speed difference, but the effect is even more pronounced that that because the water covers more area in the same amount of time at the longer focal length.
Changing how I choose to capture waterfalls has affected more than just the shutter speed that I like to use. It has also introduced one of those times when I actually raise the ISO for landscapes. This is usually only something that I do when wind is an issue and I need to freeze the foliage. Otherwise, I much prefer to leave the ISO at the lowest setting for the cleanest possible image. Now that I am shooting waterfalls at 0.6 of a second, I find that with the aperture set to f/11 to get the depth of field that I need, the exposure is too dark with the even lighting of a cloudy day. Not wanting to lose that valuable depth of field, and no longer wanting to use a 2-3 second exposure, I am left with a single option. I have to raise the ISO.

This is one of my favorite compositions of Widow’s Creek Falls and it is an isolation down at the bottom. For this one I wanted a shutter speed of 1/5 of a second, and since there wasn’t a lot of need for depth of field, I could comfortably open the lens up to f/8. However, that was still giving me a very underexposed image which forced me to raise my ISO from 100 to 400 which was two extra stops of light. That would have been f/4 had I opened the lens up enough, but that would have caused depth of field issues at the focal length that I was at. It goes against everything that I hold dear when it comes to creating a clean image, but I’m seeing the validity to using a higher ISO in landscape photography in certain cases. This is now one of them and I’ve found that dealing with the negatives in post isn’t the worst thing when the results are like this.
I figure at this point; it makes sense to discuss ISO for a minute. This is the part of the exposure triangle that seems to really mess folks up. It is a fuzzy concept in a way because it is not something physical like the shutter speed that you can imagine the lens opened up for a specified amount time. Even the aperture, you can visualize like an iris closing or opening within the lens. You can see what it does for depth of field in the images that are shot. ISO is something that is really mysterious because it doesn’t show motion, nor does it apply to depth of field, which leaves the question “what does it do?”
I’ve had folks explain that they use a certain ISO because of the light, but they couldn’t explain why, only that it was darker, so they needed a higher ISO. These are the same people that have their cameras on a tripod shooting something that has no motion to it at all. They just think that because it is not bright, they need a higher ISO. The fact of the matter is the ISO is like the volume knob on your radio. Down at the lowest setting, you can barely hear the music, so you turn it up until it is comfortable for the listening environment that you are in. At some point, that volume gets too high, and you get speakers sounding scratchy and the quality of the sound decreases very badly. This change is gradual at first but then gets worse very quickly. That is the way that ISO works in a way. The lower the ISO, the cleaner the image because there is no digital noise (similar, but not as pleasing as grain). However, like with a low volume, you have to be in a very quiet place to hear it. The same goes for the camera which works on light. There has to be plenty of light available for the camera sensor to capture the scene (or hear the music). As the light drops, you have to provide more light to the camera either by keeping the shutter open longer or opening up the aperture. If those two don’t work, you can turn the volume up, or in the case of your digital camera, you can increase the ISO. The more you increase the digital gain on that sensor, the more static you introduce into your music, or noise that is introduced into your image. That is why I always wondered about folks that had a camera on a tripod taking a picture of something static in low light. They could have just as easily increased the shutter speed because if nothing is moving, there is no difference between 1/2000 of a second or 30 seconds. However, by increasing the ISO, they were increasing digital noise which would potentially soften the image or reduce saturation and contrast.
In the case of waterfall photography, which is dealing with long exposures, it would stand to reason that there would be no reason to increase the ISO because you are looking for slower exposures. However, if you have a certain shutter speed in mind, you have to work the aperture around that and there are times when that shutter speed will force an aperture much wider than you can deal with for the scene. This is when you use the ISO setting. How much you will be able to use this depends on your camera, and it will pay to understand what the limits are on your particular rig. What I mean is this, when I was shooting with my old Sony F-828 years ago, I had a low ISO setting of 64, then 100, 200, 400, 800. Even at ISO 64, there was a bit of noise to the images, but by ISO 200 they were beyond help in post processing. If I shot at ISO 800, the images were unusable for anything but a small web image to document something. That set the stage for me only wanting to use the lowest ISO and actively avoid raising it. As I have progressed through cameras over the years, the technology has gotten much better in regard to high ISO performance. My 5D Mk3 and the 5DS R both are much better performers than the old Sony and I have shot both successfully at ISO 400 in certain cases. As long as the light is good, I haven’t had a problem, but in low light when I am pulling out shadows, I’ve seen almost too much noise at ISO 320. However, during a well-lit day when I am needing a faster shutter speed, I have been able to shoot at ISO 800 with minimal noise present in the images. That is pretty much my limit, although if it means getting a great image, I will push it to ISO 1600 if I have to. The mirrorless cameras that are out today have amazing sensors when it comes to high ISO performance and if you have one, chances are you are able to shoot at ISO 800 with little to no noise at all. Noise likely won’t start to be an issue until ISO 3200 or more which is truly amazing. It just comes down to knowing what your camera is capable of and working within those parameters.

Now that we have the roll of ISO figured out, let’s take a look at this one from Mouse Creek Falls. It was during flood conditions much like the opening image from Shore Styers Mill and the water has some very similar qualities to it, but it was photographed quite a bit different. Instead of 2 seconds like I probably would have done years ago, I opted for a much quicker 1/5 of a second exposure here using an ISO of 320 and an aperture of f/10 which gave me the depth of field that I needed. Had I gone up to f/11, I could have simply selected an ISO value of 400 which would have been the same overall exposure. The result of the 1/5 of a second shutter speed is much more visual interest in the water rushing by. Since it is Big Creek that is my foreground, that visual interest was of complete importance which made the selection of a shutter speed the most important part of this exposure.
So, do I just arbitrarily look at a waterfall and think 1/5 of a second? You know it! I’m just that good. No, seriously I don’t have that ability to look at a waterfall and determine the proper exposure values without some trial and error. I would like to share how that part of the workflow goes when it comes to waterfalls. I approach the composition as I would any other looking at all the elements that I want in the scene. I consider the direction of the water and the textures that will be possible since I can’t see in long exposure terms. I just have to imagine how it will look, and how I would like it to look. Once I get the composition set up, I figure out my baseline depth of field which will usually start at f/11. I have my ISO set at 100 to start with and see where the shutter speed falls. Unless it is way out there in left field, I will make a quick exposure to see what it looks like. Generally speaking with the conditions I shoot in, that is between 2.5 and 3.2 seconds.
Once the image comes up on the image review, I zoom in and look at the textures of the water. I will make the determination whether I want more or less detail. These days, I will probably want more detail in the water so I will check the depth of field and see if I can open the lens up a little bit. As I do that, I let more light in, so I can go with a faster shutter speed letting in less light to keep the exposure the same. Once I get to that aperture where I no longer have the depth of field that I need, I will start to adjust the ISO to offset the faster shutter speeds. When I get close, I will step the shutter speeds a third of a stop at a time to see what the differences are. I will usually get to a specific shutter speed for a scene, and I will then bracket on either side of that because the LCD is not the best at determining detail in moving water, but it will get me close. For every waterfall composition I shoot these days, I will have a three image bracket with shutter speeds around what looks good to me. I’ll make the final determination when I get home and look at it on the computer monitor. It really jumps up my frame count on waterfall treks because there will be three images taken for every one that I want to capture. This method has really worked out for me though and I end up with lots of options to play with for that final image.

Part of the workflow also deals with filters. As you well know by now, I will mount a polarizer any time I am photographing a waterfall. What this does is allows me to twist the filter to remove all, or part of the glare from a scene. That glare comes from the surface of the water, or the wet surfaces of the rocks. In fact, anything that has any moisture to it at all will benefit from a polarizer because it deals with glare from moisture whether it be in the air, or the cells of vegetation, or the water in a scene. Once the glare is removed, the contrast is stepped up in a scene for a bit of visual drama and the saturation levels are increased as well. In the case of the Singh-Ray Color Combo Polarizer, the warmer tones are enhanced as well, which I tend to prefer in my images. This is the type of filter that I highly recommend any landscape photographer have, especially if they are ever going to take photographs of water.
You will notice in the above photo from South Mountains State Park, that another filter was used along with the polarizer. The Singh-Ray Galen Rowell ND Grad was utilized here, but not for the reason that an ND filter would be used. I was happy with the motion in the water at 0.6 of a second which was possible at f/8 and ISO 125. As you can see, I even boosted the ISO here and shot with a wider aperture than I typically would have to allow for a faster shutter speed. So, why did I use another filter? Well, I needed to control the bright sky and the part of the mountain that was getting that direct sunlight on it. That corner was much too bright for the rest of the scene which was in the shadows. The ND grad filter is dark on the top half and clear on the bottom half. Since the filter is 4×6″ in size, I can adjust the filter division line to land at the horizon in my composition. In this case, it was at a diagonal point in the corner which meant that only a small portion of the dark half was covering the lens and most of it was covered in the clear portion of the filter. That is the beauty of the Lee 100 filter mounting system because it allows me to use as many as three filters (in my current configuration) and cant the filters in the direction that best suits the scene.

Do I ever use an ND filter with waterfalls? Yes, I do on occasion but that is usually when the lighting is very bright. It is those times I generally don’t shoot waterfalls, so it is rare to see me using an ND filter with waterfalls. Here is an example of putting a 10-stop ND filter to use at Graveyard Fields which allowed me a 30 second exposure at f/9 and ISO 100. Obviously, this is a much longer exposure than we have been talking about here and you might be wondering why this photo doesn’t look all that different from the Grogan Creek waterfall I share earlier. You still see the definition of the various cascades as they fall, but this one looks a bit softer overall. The difference here was the amount of water flowing over the falls. There was less water, and it was moving slower in this image from Graveyard Fields. With that taken into account it took a longer exposure for the water to fill out the scene. I had tried different shutter speeds, starting at 1/5 of a second and slowing down to the 30 second image that you see here. It just goes to show that there is no recipe for how waterfalls should be captured when it comes to shutter speed, or even lighting. You just have to read the scene and figure out what works best for your tastes and the scene in front of you.
Speaking of photographing waterfalls on those cloudless days, there are several ways of looking at this. First, you can get there early in the day or late in the evening when the sun is still low. You can find decent light in the shadows as I did with the one from South Mountains above. The trick to this way of dealing with the light is you will have to adjust your white balance to shade, and even then, will probably have to warm the scene a bit more. The shade reflects the blue from the sky and you will find that the light levels will be very low in the shade for a waterfall. This will make the water very blue, and the shadows even bluer. You can see a bit of that in the one that was shot in the shadows, especially when compared to the upper right corner where you see the golden glow of the sun on the mountain that almost looks like a sunrise.
The other way of dealing with a cloudless sky is to shoot waterfalls that are under an open canopy like the one from Graveyard Fields. The idea is to get even light on the waterfall to avoid specular highlights which are very distracting in a composition. If there is a haze in the sky that will help to diffuse the light even though it doesn’t reduce the intensity. As with all waterfall photography, it is best to expose for the highlights and let the shadows fall where they will. This is so much more important when you have direct light falling on the waterfall since the brightest areas of the falls will be just shy of white in your exposure. Pay attention to the blinkies on your image review to make sure that you aren’t blowing out your highlights and work the highlight values in post to calm them down further. As long as you understand what you are up against, you can successfully capture a waterfall in less than appealing light.

On those occasions where you find that dappled light is falling on your subject consider focusing on isolations and making that light a part of the composition as I did here. Looking at the overall view of this scene would have been too contrasty as portions were in deep shadow and other parts were in full light. By figuring out this simple collection of shapes, I was able to make an abstract view where the highlights are actually instrumental to the color rendition. For those that are interested, I chose to shoot this at a 1/2 second exposure as it showed the motion of the water, but still indicated the power over the softness. In order to arrive at this shutter speed, I had to drop my ISO to 50 and stop the lens down to just f/16 in order to avoid any diffraction to the image. It is another example of how I am now using ISO for waterfall photography where I once would have just locked in that lowest native setting of 100 and forgotten about it.
Allowing myself to adjust the ISO a bit more frequently has opened up more possibilities for me photographically and it is something that I am not near as hesitant about as I once was. I still want to keep it as low as possible for the highest quality of image, but up to ISO 400 is just not an issue at all for me, and even going a further stop up is still very workable for the quality of image that I am wanting to create. For those that are shooting with mirrorless, you needn’t worry about ISO nearly as much as DSLR users do. Just experiment and find out what your personal tolerance levels are in regards to the digital noise and stay under that point.
I hope that this installment has answered more questions about how I photograph waterfalls and some of the changes that have occurred in my techniques here over the last year or so. As with just about any creative choice in photography, there are no wrong answer, just personal taste. Don’t be afraid to go against convention, or even what you have told yourself is the right way. Think outside of the box and find new ways of exciting yourself with your photography. If you are wanting to further your own waterfall photography, consider joining me on my upcoming Winter Waterfall Workshop at Hanging Rock in early December. I’m also happy to do some mentorship with you at waterfalls of you choice.
Thank you for joining me this month. Be sure to watch out for my next Behind the Camera on July 1st. If things go as planned, I’ll be looking at what makes fine art….well….fine art. This is something that I’ve been struggling to define for myself for quite some time now and I am about ready to give it a go. It should be a fun ride, so join me back here in a month!

Remember to use the code KISER10 to get 10% off your purchase