Tuesday, November 29, 2022
Disregard how I left off on my last blog. I know that I said that I was not going to have another trek until December because I was creatively worn out. Well, I still am, but I had one of those moments last night while getting ready for bed. I had seen that the weather was going to be warm and sunny through the day and I didn’t have anything that had to be done until 3pm when I had a virtual mentoring session. Knowing that I hated going out on sunny days, I strangely started to consider doing just that. I had an urge to capture angles and shadows which usually meant going around big buildings and commercial areas. It had been a while since I had been out to North Wilkesboro, and I had really never spent much time in Wilkesboro so there was a thought there as well. I didn’t have a specific idea of what I wanted, I was just wanting to get out and walk for a bit with the camera. While sunny days are lousy for landscapes, they tend to work pretty good for doing more urban settings.
I really didn’t have to do much to get ready for this trek since I wasn’t looking to go out at sunrise. In fact, the best light for what I was wanting to do was more in the middle of the day which really relaxed things significantly. That gave me time to get up and take care of the morning business stuff and getting the social media posting out of the way. After that, I contemplated what I might want to shoot, but never really came about anything in particular. I knew that I wanted to work around North Wilkesboro or possibly Wilkesboro which are the two areas with commercial districts. Both of these locations are rather historic, and the buildings are right up my alley for subjects that are showing their age. Normally when I get in the mood to shoot angles, I want more modern architecture, but I’ve found that these older buildings give me a bit more character to work with most of the time.
I ended up leaving around 11am and did the cursory drive through of both areas to see if anything jumped out at me. I saw nothing of interest in Wilkesboro and saw only some small potential in North Wilkesboro. That was where I ended up parking and I grabbed my bag for a little photo walk. I don’t do nearly enough of these and that is a true shame. There is something freeing about just going for a walk with the camera without an idea of what to capture. This is different with hiking where you know that you will be photographing landscapes, and you generally have an idea of what you are after on these hikes. With a photo walk in a commercial district, you are purely reactive to what you see. This could be patterns on the sidewalk, a window, geometric patterns, or even something as simple as a shadow being cast. You go into these things with no preconceived notions about what to shoot and you just read the light and let the scenery decide for you. Essentially, I was just looking for scenes that would work when viewed from a camera.
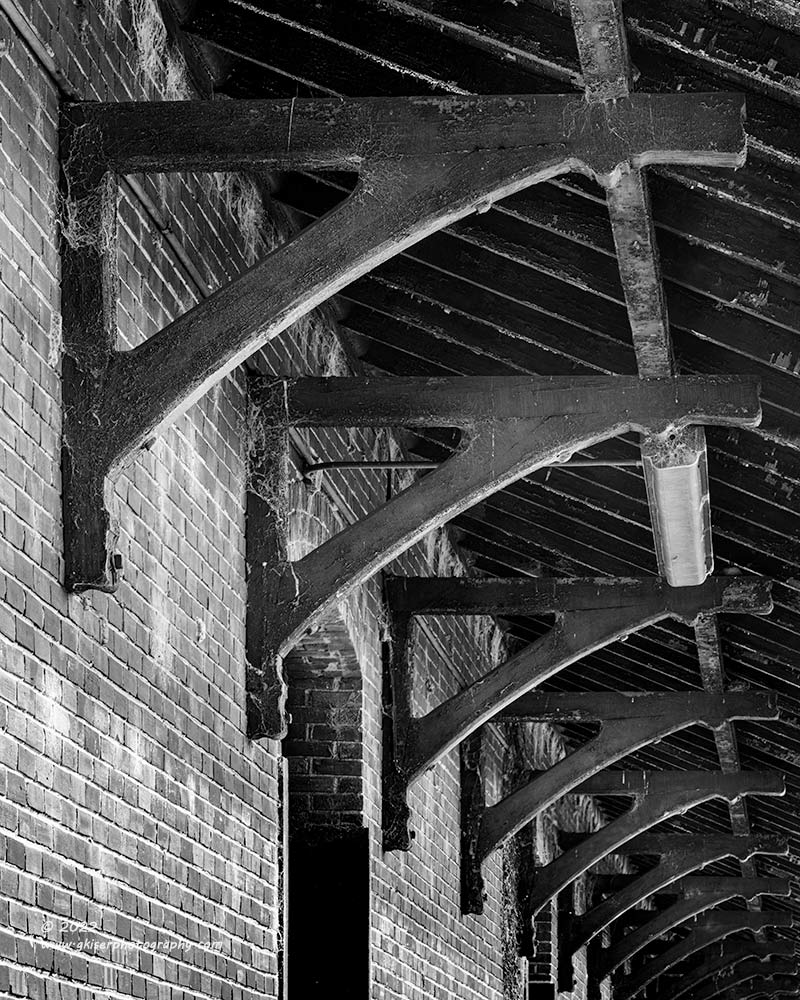
Since I was parked in the public parking area, I wasn’t far from the train depot which is on the register for historic places. It has fallen into disrepair over the years and this change has even been noticeable over the last couple of years since Toni and I moved to Purlear. It is an interesting building, and one that I think works very well for people photography because of the various backdrops that it offers. I didn’t have any people along with me today, so I was just going to be looking for scenes that worked the way that they were. I walked around the building taking note of the light and the textures that it offered. Nothing was popping out at me so I was content to just walk knowing that at some point I would get inspired…or I wouldn’t. It really didn’t matter to me today. I was just looking for a bit of creative exercise and that could certainly be mental only without even pulling the camera out.
Of course, since you are reading this blog, you should be fairly certain that I captured some photos, and you have already seen one. If I go out like this and don’t capture any photos, you won’t really read about it unless I had come back later and shot something that I had seen the first time. When I got to the halfway mark around the building, I started to look at the supports for the roof and found them just as interesting as I always had. The lighting was looking decent, if just a little bit bright beyond the shadows. I pulled out my cell phone and framed up a shot to see how it was looking. It showed promise, and I knew that I was zoomed in quite a bit which meant that I would need the 70-200mm lens.
That was the lens that I pulled out and worked on getting the framing right. I had to do a little foot shuffling to get the camera in the right position since this was all about perspective. Once I had settled on the location, I started to look at the exposure which was quite contrasty. The shade from the roof was casting a division line just beneath the supports and the brick wall was quite bright beneath that line. To keep that from blowing out, I was having to sacrifice the shadow detail of the supports which was the main reason for the photo. Had I bumped the exposure to capture them in full detail, the bricks would be so bright that they would pull my eyes away from the interest. With a hard line separating the shadow from the highlight, I decided to use a 2-stop hard edge ND Grad filter, upside down in order to darken the bright part of the frame. I went with a 2-stop so I could keep the shadow line visible when I could have made it disappear quite easily with a 3-stop version. Using the DoF preview button on the camera, I was able to see precisely where the division line was on the filter, and I got it lined up perfectly with the shadow line.
From there it was just a matter of making a couple of exposures with slightly different depth of field and focus points. I was sure that I had something that would be workable after this, so my first shot was in the bag. I didn’t know if I would like it enough to keep, but it was something that for the moment I was happy with. I kept looking around the building to see if there was anything else that might be worth shooting. I kept seeing compositions that I had done before and didn’t want to just reshoot the same things that I had done previously, so I kept my eyes out for new points of interest.

One of the doors that I had shot a while back caught my eye once again. This time it was not for the door’s texture, but for the branch that was caught on it with the dried leaves still attached. I could see this being an interesting black and white photograph and started to figure out the composition. The branch was close to the corner of the framework and that was what I used to frame the composition. I used just enough of the framing boards to establish the shape and then placed the branch in a solid position within the door. I knew that this was going to have to be black and white because the colors here were all pretty uniform and it was only going to be through differentiating through contrast that the shapes would appear.
I didn’t spend a long time on this because I wasn’t sold on the composition. I wasn’t worried about it though because I had already decided that if I came home with absolutely no new images, I would be fine with that. I knew that I wasn’t going to be able to push since I only had a couple of hours before I needed to head home to be there for the mentoring session at 3. Having that hard end point didn’t allow me the luxury of going to different locations in search of a photo, so it was here or nothing. I was just walking and trying things to see what I might like.
I was noticing that the sky was starting to get cloudy which wasn’t really forecast, although there were supposed to be some spotty low clouds moving through around midday. I guessed that what I was seeing was that bit of clouds moving through. I wasn’t really in a position to be able to make great use of the sky, but I was also in a great location for using a stable anchor for a long exposure in order to capture the movement of the clouds.
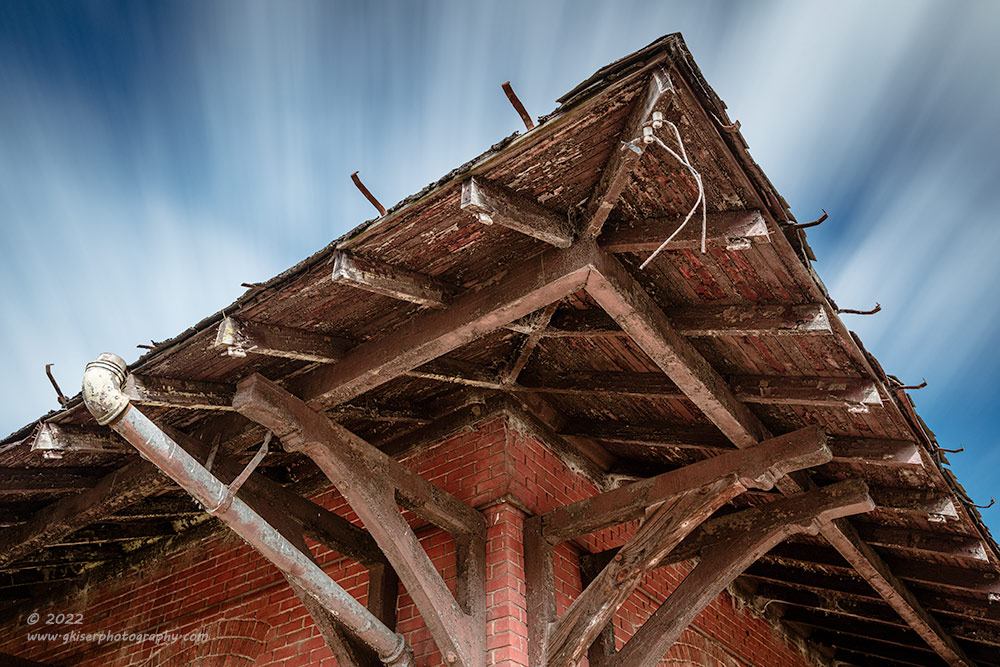
I took note of the direction of the clouds and found that they were largely going West to East, which would be perfect for getting the corner of the building. That is one of those things with long exposure photographs of the sky. They look best when the flow of the clouds goes from near to far, or far to near as that adds depth. If they are going from side to side, you don’t get the depth, and it actually will affect how the eyes go through the image. The current direction of the clouds was perfect though for getting a shot of the corner of the building.
I started to look to see how best to make an image that utilized the clouds. I had to find a composition that was dramatic and one that offered plenty of detail to contrast with the streaked sky. What I decided on was looking up at the underside of the roof with all the great textures present. Of course, that added a huge problem that I was going to have to work through. That problem was the exposure latitude in the image would be very wide for shadows and highlights. I didn’t know how well this was going to work out, but I wanted to try.
I set up the composition and decided that I needed to switch to my 24-70mm lens for the right focal length. I got everything organized in the composition that I wanted and took a quick text exposure. That gave me the base exposure numbers that I was going to need to calculate what a 10-stop filter was going to do for me. I worked out the math to get to a 60 second exposure and then adjusted for the addition of a polarizer for a bit more contrast in the sky. I added the 10-stop filter and the polarizer just before blocking off my optical viewfinder. I made another test exposure to see if my math was right. It was pretty close, but I needed to open up the aperture a bit more to get the right exposure. Once I did that, I had the right histogram on image review. It wasn’t ideal, but I had the highlights just clipping which I knew I could recover in post. It was the shadows that I worried me. I had room on the left side of the histogram which told me that there was detail there, but I wouldn’t know how much detail until I got home and pulled it into Lightroom.
It was the best that I could do, so I just waited for the sky to start looking right with an even amount of clouds moving towards the roof. I ended up making several exposures here as there is no way of knowing how the long exposures are going to turn out until they are done. Each one was getting better and better as the clouds changed up. I ended up making a dozen exposures and the one that you see here was the eighth in the series. It had the best balance of clouds streaking across the sky, and when I got it into Lightroom, I was able to get all the detail that I needed out of the underside of the roof. I had been worried for nothing because this was probably the easiest photo to edit from the day. There are times when I surprise myself and this was one of those times.
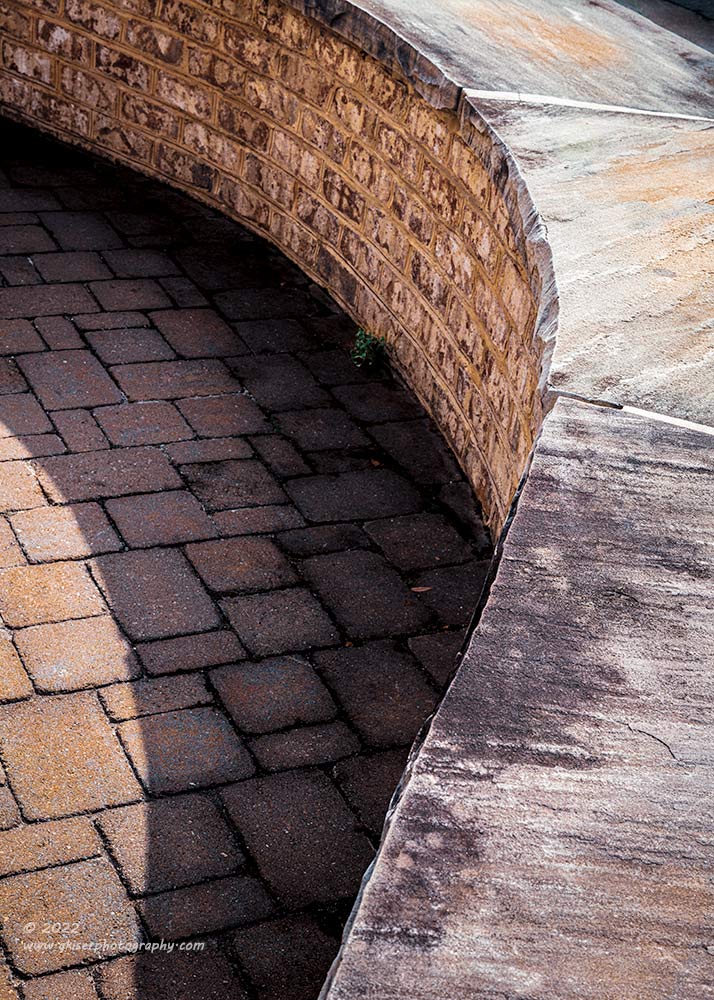
With the clouds now starting to clear, I decided to go on with my walk and see what else I could get into. Just up the road I came across a section of the sidewalk that I had photographed before. I was pretty sure that I had done a very close crop of it since I remembered using only my telephoto lens that day. I wanted to try something a little broader and hopefully incorporate some shadows. The first side that I looked at had no shadows at all and seemed rather flat. I crossed the street and looked at the other sidewalk that was a mirror image of the opposite side. This side had a bit of a shadow which was varying with the position of the clouds. I liked this side better and set the camera up. It took a little work to get the composition just right as I was looking to balance the shadow, the sidewalk, the brick wall, and the raised bench portion while accentuating the curve of it all.
I wasn’t overly impressed with how this was appearing on the back of the camera, but when I got it home and worked with the color tones, it became exactly what I was after. This is an example of how shadows are so important to compositions. This one added a whole new shape and dimension to the image, not to mention giving depth to the bench so that it made sense to see the brick wall. The varying textures also came into their own right with this photo once I got it on the big screen. That aspect was lost on the little camera LCD. The last little detail was the little weed that was growing at the base of the bricks which added that little organic element that I thought fit the scene nicely.
From here, I just kept walking down the main stretch through town. There was a little alleyway that I had shot before which I liked. Since that point, I had intended on coming back to try some more different compositions but just hadn’t done it. It was going to be one of the locations that I was going to spend some time in for the photo walk workshop that I had put together for the Wilkes Art Gallery that had to be cancelled twice due to lack of interest.
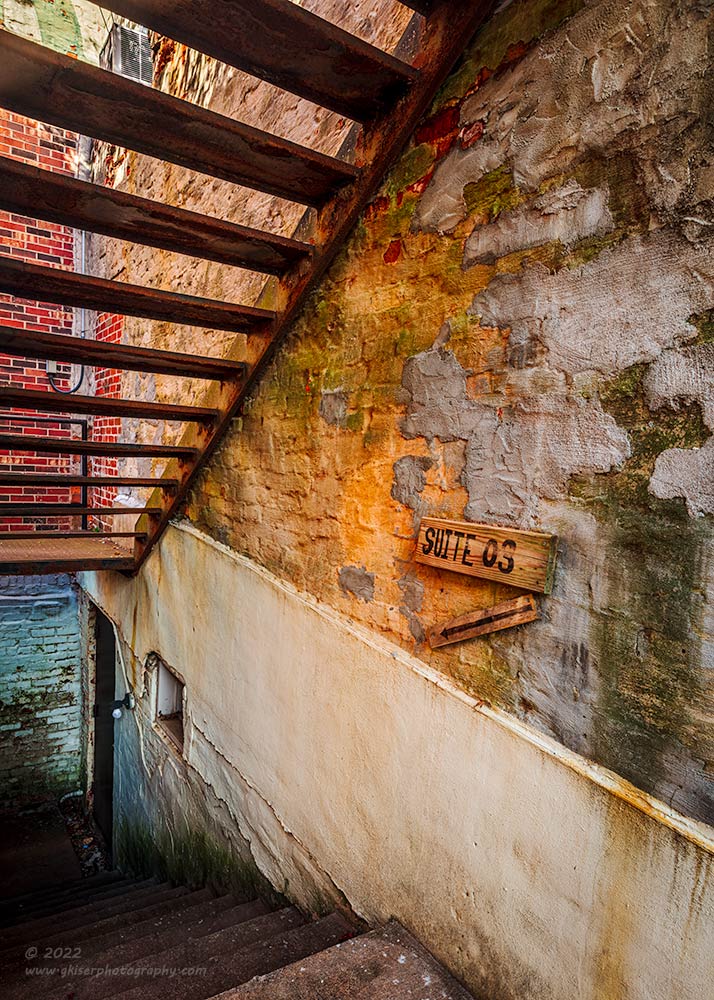
When I got to the alley, everything was pretty much as I remembered it. I started to look around for new ideas for compositions. One of the ideas that I had been wanting to try was one where I was shooting down the stairs which I had captured the sign for the last time. The lighting was good for this composition today because down at the base of the stairs was deep shade and a blue color cast. Above it was lit by the sun and was much warmer. I worked on figuring out how to compose this scene and kept running into problems. I realized that part of the problem was that I wasn’t able to go wider than 24mm and I was feeling limited with that. I swapped in my 16-35mm lens which allowed me to go wider, but that was too wide it seemed. I adjusted the zoom and found a sweet spot at 22mm and that made all the difference in the world.
I had to decide how much room to give each portion of the scene which was not as easy as it seemed. There were issues on the left side of the frame that I had to deal with which caused me to crop in kind of close on that side. The higher the frame went, the harsher the light got. I did like the stairs going up which helped to draw the eyes away from the close crop at the bottom, so I intended on keeping that height of the image. I could tell after the first exposure that I was going to have a hard time keeping detail in the highlights if I kept detail in the shadows. There was no way to use an ND filter here which could have helped keep the brighter parts exposed better. Fortunately, there was nothing moving in teh scene which made doing an HDR blend a piece of cake. I decided to do a three-shot series with exposure times ranging from 1/5-2.0 seconds. That gave me plenty of information to work with and allowed me to come up with this image which had a beautifully even tone despite having such a huge range of luminance values throughout the scene.
I was feeling pretty good about how that composition was working out, so it was time to move on to the next one. I had been looking at this tree that was growing between the buildings which was still bathed in bright red leaves. It just seemed like such an oddity in this location, but yet it fit in so well at the same time. I wanted to figure out how to get this tree included in a composition. I tried shooting straight up, but I didn’t like that at all, and I had to include a strand of lights which was strung right next to the tree. I backed up and used the part of the building above where I had been shooting as a background. I allowed the sky to enter into the frame for this one as well for a bit of depth. I really liked how this worked when I saw it in the camera but wanted an alternative in case it wasn’t as good as I was thinking. I’m glad I kept looking because the resulting image from this angle just didn’t feel right and seemed more like a snapshot than a considered photograph.
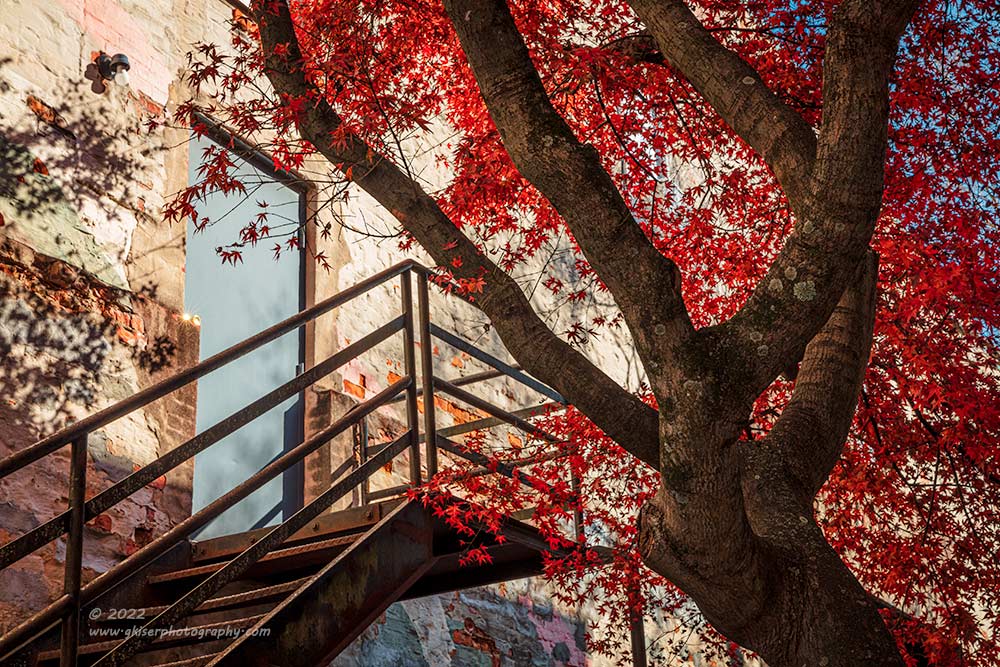
The next composition that I worked on here was from the other side of the tree. I still used the side of the building as a background, but I had the stairs as a leading line and balancing element to the tree. The back lighting on the leaves caused them to glow which I loved. I swapped out to the standard lens once again and worked out the composition. I normally hate a floating tree, but in this case, since the stairs aren’t grounded, the tree seems to fit in that same concept. The hard angle of the trunk matched the angles of the stairs as well. The gray door and the blue sky above added just enough coolness to the scene to make all that warmth work. The scene looked amazing in the viewfinder, but the minute I turned on the live view, I could see that the exposure difference was going to be difficult for the camera to deal with. The tree trunk was in total darkness it appeared, but the histogram showed that there was a good amount of detail there to work with. I let the highlights clip by a third of a stop knowing that I could recover that easy enough and I would be able to pull out the shadows better with that bit of extra exposure. I used a polarizer to keep the glare down on the door and hopefully to saturate the leaves a bit.
Once I got the composition and the exposure set up, I fired off several frames with slight adjustments to the focus point to make sure that I had everything sharp in the scene. I could see clouds moving overhead and I figured that if I was lucky one of them would diffuse the sun just enough to take the edge off of the highlights. The logic was sound, but I was not in a position to be able to see the sun which meant I had no way of knowing when or if the clouds would be moving between me and the sun. It was just going to be a matter of waiting this one out. I waited for 10 minutes and saw no appreciable change to the exposure on the wall. I wanted to move on and be happy with what I had, but I know from experience that the minute I move, the light will do just what I wanted it to do. With that in mind, I decided to stay five more minutes and then five more minutes. I had been here for 20 minutes waiting on a sliver of a cloud to no avail. I had been asked if I was taking pictures and said hi to about ten people walking through the alley. I was looking weird to them I’m sure, and I was starting to feel weird. It was time to call it quits on this composition.
I picked the camera up and moved to another area that I had wanted to photograph. I looked back to see if the sun had changed like I was fully expecting it to. Strangely enough, the light was still the same, so I hadn’t made the choice to move a second too early like normal. The next composition never materialized, and this turned out to be my last photo in the alleyway. I didn’t have much hope for it because of the extreme dynamic range that was being captured, but when I started editing it, I was amazed at how much shadow detail I had captured. In fact, I had plenty of information to make this image look just like I had seen it through the optical viewfinder. Images like this are so rewarding for me because it builds more faith into my gear and abilities to use that gear. Dynamic range is all the rage with the new cameras coming out, but here I am using a camera that was developed in 2015 and getting more than enough detail out of the highlights and shadows in this very difficult scene. Using only a histogram to determine if the exposure was right, I was able to get it nailed for this final image.
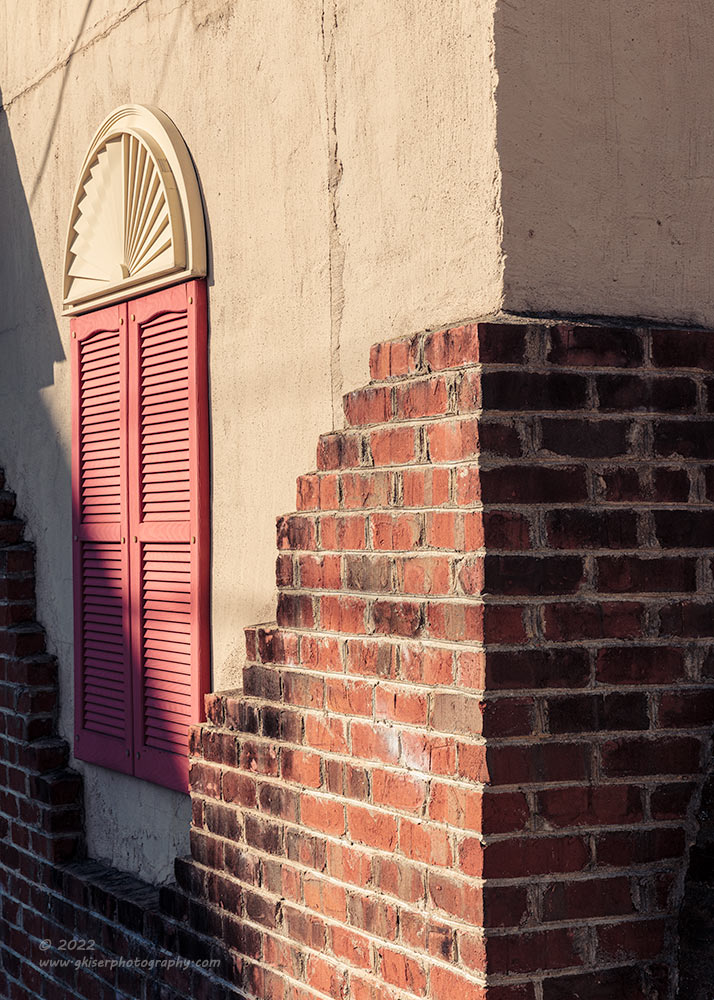
Once I was happy that I had everything from the alley, I started back on my walk. There wasn’t much time left as I needed to be on my way home by 2:30 in order to be ready for my virtual appointment. There was still time to find another scene or two and work them, so I wanted to make use of that time. I just followed the backs and sides of the buildings because those were the areas that I found most interesting. The storefronts were prettier by normal standards, but I was looking for character and textures which just weren’t out front. As I was walking, I remembered where I was from my last photo walk in the area. There was an interesting building where the brick facade was done in such a way that it looked like it was partially torn down. I had shot it several different ways last time, but I hadn’t done anything from an angle before.
I looked at the scene and saw that the shadow was going across the shutters again in a diagonal line that intersected the far side of bricks which was also at a diagonal. The side of the building was in shadow, and that hardline shadow was another area of interest because it showed dimension. I worked on framing up the scene and ended standing slightly in the roadway to get the right perspective. I had been paying attention to the traffic and hadn’t seen any cars come through here, but I wanted to get the shot and move so as not to impede traffic.
Working quickly here was not all that easy though. I had to pay particular attention to how level the camera was. If I tilted it up or down, I would end up with verticals that weren’t parallel which would ruin the image. that meant that to adjust the framing of the image, I had to elevate the camera to the right height. This took time because every time I changed the altitude of the camera, I had to pan it slightly to get the side to side composition back. It took some work, but I finally had the camera at the right height that allowed me to keep it level. I fired off a couple of exposures with slightly different values to make sure that I had the right depth of field since I wasn’t able to see well enough to check it in the camera.
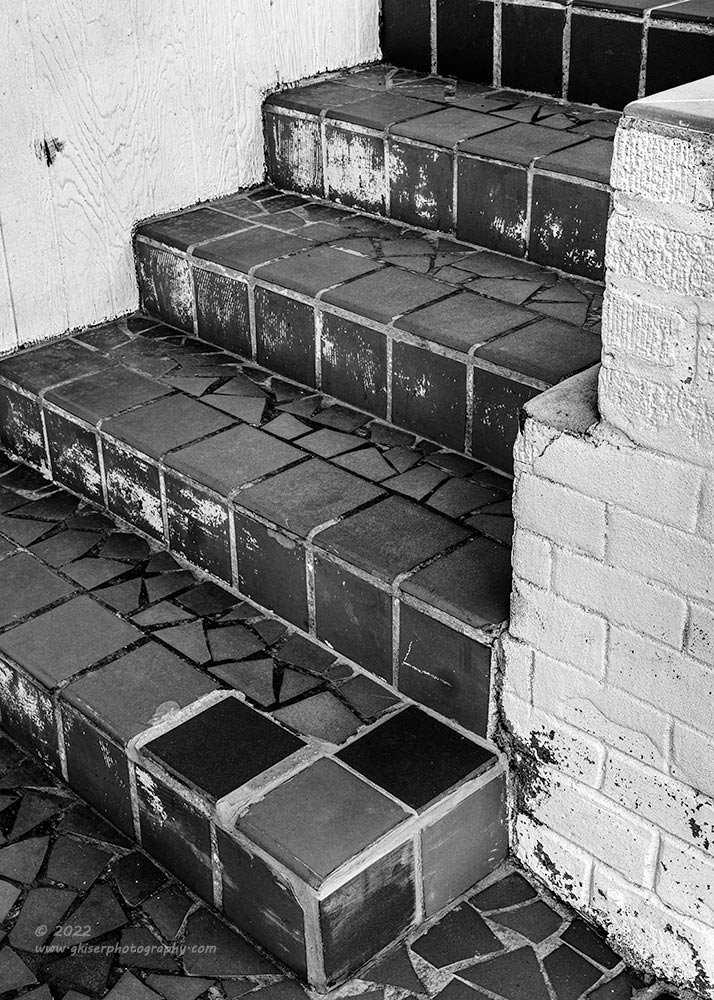
Once I was happy that I had what I needed from that building I looked around the area that I was in hoping to find something else of interest. There was a recessed entry for a store that had a nice set of steps leading up to the landing. The steps were bordered by a white brick wall as well as a white wooden wall, which I could see added all kinds of contrast to the scene. I could also see a slight curve to the composition which I wanted to capture as well. I got the camera into position and started to frame up the composition. As with so many of this kind of image, it was a game of inches to get the camera positioned right where all of the lines came together as I wanted them to. I knew that this was going to be a black and white image, so I dialed up that picture style to help me see it as monochrome. That gave me a better understanding of the contrasts that were involved. It also allowed me to get the most appropriate exposure because I certainly wanted to keep the detail in the bricks that were painted white.
Sure, this is another photo of stairs, and Toni was quick to point that out. She is right, I have done a lot of stairs over the years, but I find that they offer some fantastic geometrical studies. The bricks here added a texture which I liked and the tile work on the steps was yet another texture that contrasted with the wood wall. The tiles were different shades in places for more interest and by doing this as black and white, those tonal changes became a huge part of the story of this image. It is always a treat to stretch my black and white wings on an image like this.
When I got done with that composition, I decided it was time to head back to the truck. It was about 2:15 at this point and I needed to get home and get the computer up and running for my appointment. As I was starting to walk away, I saw a fire hydrant that I had seen here before and again today. There was nothing really special about it, but from the angle that I was looking I could see the bricks stepping down in levels to the right of the hydrant. That was an aspect that I had not paid any attention to before. The way that the bricks stepped down made for an interesting framing element and I decided that this was something that I wanted to photograph.

I had to get down pretty low to get the right perspective here, so I collapsed the tripod legs. This should have been a very simple composition to make, but I kept having issues with the relationship between the hydrant and the bricks which forced me to again engage in the game of inches. I kept thinking that I am just too old for this game as my knees don’t like bending this much anymore. However, I had to do what I had to do in order to get the shot. After a few minutes, I finally landed on the right position and was able to get the shot. I didn’t care much for the color since the bricks were red, and the hydrant was a very faded pink at this point. There just wasn’t a good color balance, but I knew that by doing this as a black and white image, i could concentrate on the tonality of the scene which was much more impactful than the color.
Once I got the composition squared away, it was only a minute or so before I had the shot and was ready to head back to the truck. I had a total of 70 images captured which wasn’t bad for a bit over two hours. I didn’t really have any expectations for how many I would be editing and felt that if I had two or three, I would be happy. I was pleasantly surprised that I ended up with nine keepers out of the batch. This represents a bit better than my normal 10% hit rate which was great news. I had left a few hours earlier with zero expectations for the day and really no plan at all. I just walked around and shot things that interested me. The hope is that some of these scenes might interest you as well.
I do hope that you enjoyed walking along with me on this little photo walk. If you like the idea of doing a photo walk, they are very easy to do and require very little gear. Just grab your camera, even if it’s a cell phone and go walking. Don’t worry about trying to capture images that fit in a certain category, just get images that excite you. Let your creativity blossom and learn about yourself as you go along. I hate that this concept has failed as a workshop twice now because there is really so much potential in doing photo walks with someone that knows the area and has worked the odd compositions before. Who knows, I might offer something like this during 2023 without going through the Art Gallery to host it. I’m still working on the workshop schedule for next year so anything could happen between now and then.
If any of the images included here speak to you, won’t you consider making that image into a print? There is just no better way to enjoy photography than in a tangible format that was the intention of the photographer. Purchasing a print helps to motivate me to get out and create more images and goes a long way to help fund these treks. Liking and commenting on social media is nice, but it only goes so far to actually support this business. Selecting and purchasing a fine art print is a much stronger way of showing your support which actually helps me be able to create more art.
Be sure to join me on December 1st as I talk about my views on the mirrorless cameras. I have been using one since early Summer, but as you can see from this entry, my main camera is still a seven-year-old design that I’ve been using for a bit over two years. I do my best at explaining why that is, and I offer some advice if you are thinking about making the move into mirrorless. I’ll see you in a couple of days.
Until next time….

Remember to use the code KISER10 to get 10% off your purchase