Wednesday, November 15, 2023
I’m going to start this entry off with a little bit of background to get everyone up to speed. The location for this trek has been discussed for probably a year or more now and was originally brought up by one of my mentorship clients. It was mentioned innocently enough as a location that I might like to go shoot. I knew nothing about it, but as part of the mentorship, I was willing to go to locations that he wanted to shoot so that he was invested in the photos rather than just trying to push my favorite locations on him. We never really got beyond the occasional mention of the location because other locations kept presenting themselves and we had some specific things to work on which could be done closer to home in most cases.
More recently, the suggestion came back up again, and John showed me a book from the place he was talking about. I thumbed through the book and found lots of interesting subjects and scenes that would make for good photographs. It was something that I was sure to enjoy, but the purpose of going here wasn’t for me. I had to look at this from the standpoint of would it benefit John at this stage in his journey. One of the things that we had been working on was difficult exposures in high contrast scenes with less than ideal lighting. The photos that I was seeing in the book was showing a situation just like that with an enclosed canopy and lots of dappled lighting due to the trees. The primary subject matter was historic buildings and little vignettes which would prove difficult to photograph on a sunny day which was evident in many of the photos in the book.
I was happy that we hadn’t really tried to go here earlier because it was looking like a more advanced location than what he was quite ready for. However, he has progressed a lot over the past months, and I thought that it was probably time to give it whirl. We discussed when would be the best time to go and figured that it would be less crowded when the temperatures started to drop and there would be better lighting with the leaves missing from the trees. In order to keep from going out there in the middle of winter, we decided on going in the late Fall after the leaves dropped. This would give us about a month to get things planned and in order.
The location was a place that I had never heard of before situated in Vale, NC. It is called Hart Square, and it happens to be the nation’s largest log cabin museum. Again, I have no idea how I’ve never heard of this before, but that didn’t matter. What mattered was that this location had a bunch of cabins and other buildings from the 19th century. By a bunch, I mean that there were over 100 examples on a 200-acre property. Looking through the book that John had I could tell that this was set up for easy access for those wanting to explore the different buildings. Photographically though, it presented a problem because all of the buildings were very close together. This would make it difficult to isolate the different buildings for a cohesive composition, but that was something else that John was working on. I saw a lot of opportunities to put different skills that had been taught to work and to possibly teach him some new skills along the way.
You might recall that a week ago, John and I went to Mabry Mill in Virginia for a mentorship session. This was actually supposed to be our trip to Hart Square, but the best weather day happened to be a holiday and they were closed. We went with the alternate plan with hopes that we would find decent weather again before it got too cold outside. By the time the weekend rolled around, it was looking like either Wednesday or Thursday would be the best days with more cloudy than not skies. After checking with John, I found out that both days were good with him, and we had another plan in place for the Square.
Initially, I was leaning towards Thursday since there would be a deep overcast with high and mid-level clouds while Wednesday looked to only have high altitude clouds which usually doesn’t drop the light levels significantly. By Tuesday, I was seeing a change in the weather with the thick overcast coming in on Wednesday. This was going to need to be the day to go in order to get the best quality of light for the subject matter. It was finally all coming together, and we were going to give this a go.
We arrived right at 9am and took a quick tour of the grounds by vehicle before we got out and started to walk around. Since this was John’s idea, I let him direct where we went for the most part. He had a particular interest in capturing a church from across the pond which was the first place that he went. We talked through the compositional possibilities and the use of foreground before he started to set up. I showed him a few tricks to speed up the setup and he was up and running very quickly in comparison to our previous outing. We also discussed knowing when to say when on trying to get a photo. Once he had what he wanted, it was OK to abandon the scene and move to the next one. We stopped at the grist mill next and talked about compositional possibilities here as well. He originally leaned towards a composition from the left thinking that one from the right was a bit uninteresting. We started from the right, and he changed his mind about the effectiveness of using the leading line from that side. When we moved to the left, he was less impressed with the composition after seeing how things went from the other side. I really saw this as growth because he was seeing the benefits of a more advanced compositional technique, and he now recognized the power of it.
Something that I was even more impressed with was that he was moving through the compositions at a much-accelerated pace compared to previous outings. He had been doing his homework after Mabry Mill it would appear. We were moving right along and the next stop that he wanted to make was the church on the side of the pond where we were working. He had the key to get inside of that one and had asked about how to properly set up the shot of the pond looking through the window of the church. This was going to be a great learning opportunity for him, and I was excited to see how it was going to go..
We got inside and discussed the different issues that would be faced with the blending of an unlit interior and a daylight landscape beyond. We worked out a composition that he liked and then worked through the exposure issues with the help of filters. To add to the complexity of the scene, a bunch of geese came swimming into the scene that he wanted to be in focus and frozen. The narrow aperture and the fast shutter speed didn’t work well together, so we worked through the right compromises in order to get the end result that he wanted. It actually turned out quite nice judging from the LCD. It was a great time to teach him how to cheat focus using hyperfocal distancing with a wider aperture by using the depth of field preview button. So far, this location was doing just what I wanted it to do. John was getting a lot of real-world experience using techniques that haven’t really been necessary up till now.
I know it sounds like I’m just chronicling John’s trek at this point, and for the most part that is what has been happening. When I am doing a mentorship session, if I do any shooting at all, it is a secondary concern to the client. My inclination has been to leave my gear at home during these sessions, but John has echoed the thoughts of several others I have talked to about my workshop experiences where they benefit from seeing me work. I totally get it because watching how I get the shot does reinforce what I am suggesting through my instruction. Since John has specifically asked me to go out and shoot during these sessions, I did bring my gear and I was about to break it out, but not for the shot that John just worked.
While he had been working on his composition, I had been looking at the interior of the church for little details that I could photograph. Having done inventory of all the photos that I have made this year, especially since the beginning of Summer, I wanted to be a little picky about what I shot during this trek. I wanted to get special photos that were a bit different from what I would normally shoot. I was going to use this time to experiment a bit, and by doing that show John some other ways of seeing things beyond the postcard shot.

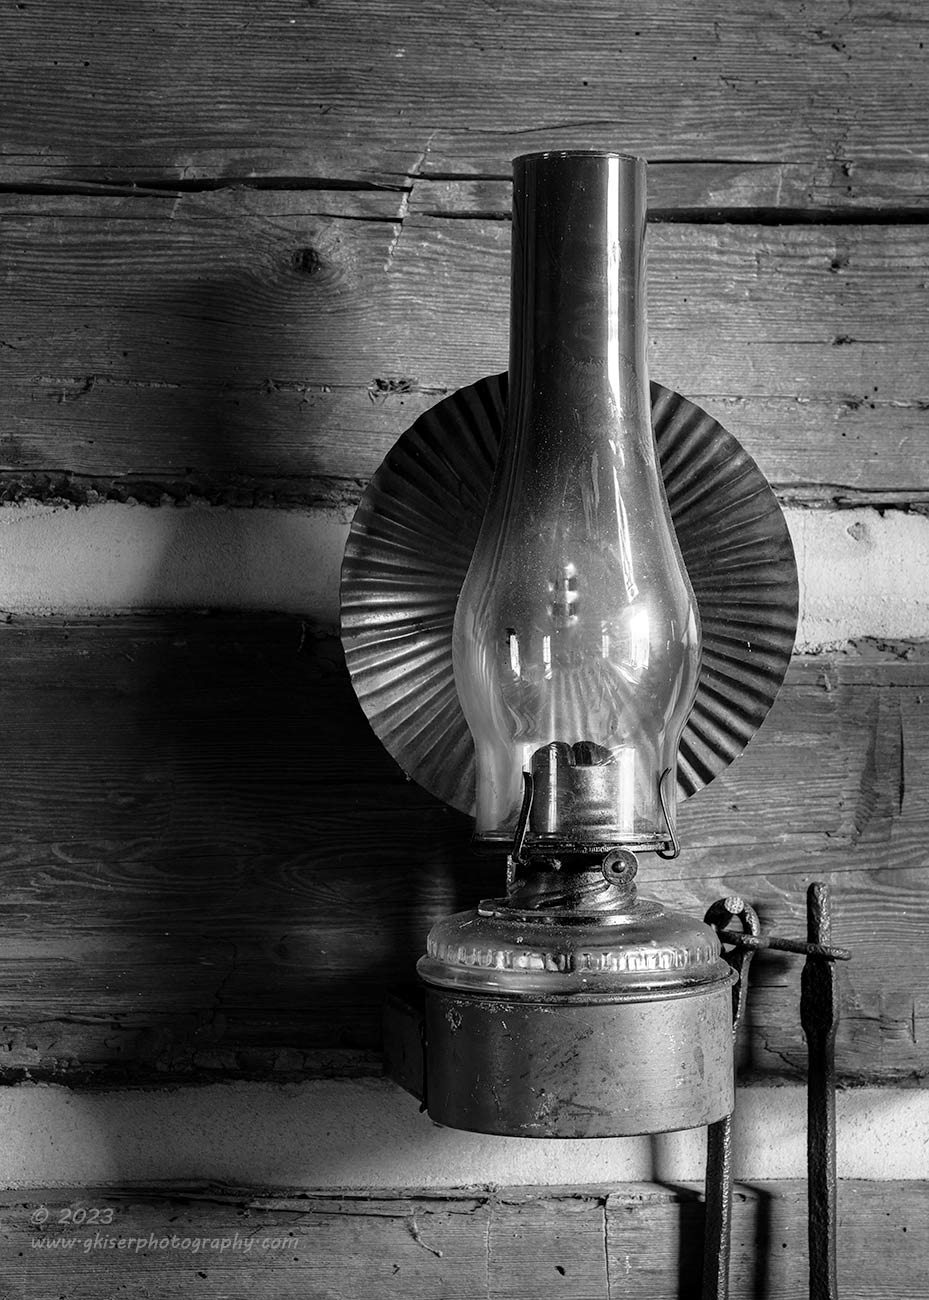
The first scene that drew my eye was an oil lamp which was on the wall to the left. It just kept catching my eye as I would look around. The soot in the globe added so much character to it, and the wooden siding behind it made for a very interesting background. I wasn’t quite sure how I wanted to photograph it, but I knew that it was worth a try regardless. When John was satisfied with his shot, I went ahead and put the camera together with the telephoto lens so that I could get a nice tight crop on the lamp from far enough away that I wasn’t going to appear in the reflection. I didn’t have much room on the wall to work with, so I oriented the camera vertically and framed up a basic shot. I made the exposure and felt that this wasn’t quite what I was after. However, seeing the image review, I could see a hint of a shadow on the wall from the light through the window. It was getting stronger, and that shadow was looking like a great secondary element to the photo as it mimicked the shape of the lamp quite nicely.
The scene was recomposed to include the shadow fully and move the lamp off center. I made another exposure which looked really good with the shadow. Not seeing much difference in the color, I switched the picture style over to black and white to see if that improved the photo. It did without question, so I began to work out the right exposure seeing the image as a black and white presentation. I underexposed it a tad to deepen the shadow, and to control the highlights in the reflections a bit. It was looking really good, and I was glad that I had given this a try.
John looked at the image progression and asked some questions about my choices along the way. He had been concerned about the highlights in the globe being distractions, but I insured him that they just helped to establish the shape of the glass for a bit more depth to the scene. It also established where the light was coming from that cast the shadow. After that, he was fully onboard and wanted to shoot his own version of the composition. I still haven’t seen the final result, but after looking at the LCD, I imagine that it worked as well as mine did.
When I got done with working the lamp, I looked around to see if there was anything else that I wanted to capture inside the church. The only other aspect that really caught my eye was the two candelabras which were flanking the large open window. Each one had three candle holders, but there was one which stood out from the rest. This is one of my tricks when finding subjects to photograph. I simply look for the one thing that stands out from the rest of the scene. This one candle was covered in spider webs that added a whole new texture to the scene. The other ones were all pretty much smooth with the candle and the holder lacking much texture at all. As luck would have it, this web covered candle was near the window enough to where there was a nice rim light on the left side of the candelabra which also brought out the web.
It was the lighting that really inspired how I was going to shoot the photo. I admit that a candle in a straight candle holder is not all that interesting of a subject, even when it is covered in a spiderweb. However, as John and I had discussed earlier in the morning, a photo will consist of three parts. The first is an interesting subject which this barely counted as. The second was good light which I certainly had thanks to that open window and the rim light. Being able to put most of the photo into shadow made the subject more interesting. The third ingredient was composition. The idea of these three aspects is if you can get two of the three to be strong, you would have a very good image. If you could get all three to be present, it would be an amazing photograph. If I could figure out a strong composition here, I would have two of the three locked down. I spent the most time on this aspect honestly, because there wasn’t much to work with.
The last thing that I wanted to do here was to overcomplicate a potentially beautiful and minimal image. Placing the candle in the center was a lousy idea, and filling the scene with negative space wasn’t going to work well since the main subject was rather simplistic in shape. As I looked through the scene, I could see that the wooden wall behind had a vertical board that framed the window, and the chinking provided a horizontal aspect of a lighter color. The two together formed a frame of sorts on the side that was lit by the window light. I wanted to keep this a low key image to really bring out that light though which would minimize the framing aspect that I was liking. The trick I used was to expose for that highlight and the candle while letting most everything else go into shadow. There was just enough detail to make out the framing aspect as well as a small amount of texture in the background. It was subtle, and it almost counted as negative space, but there was enough there to give a little sense of space and depth. The final element was establishing my depth of field where the candle and web were in focus, but the background was very soft. There was probably eight inches or so between the candle and the wall which made this kind of difficult. Since I was already using my telephoto lens, I made use of the smaller depth of field at these focal lengths and worked out the right distance from the candle to achieve the desired result.

What I ended up with was a very minimal photo that showcased the light more than the subject. The web became a very important aspect of the composition which I loved as it was the story that I was struck by when looking at the two candelabras originally. There just seemed to be something missing though. I wanted a warmer tone on the candle than what was in the background. I could have done that in post, but I saw an opportunity to establish more of the structure of the candle holder here in the field. One bit of gear that I carry all the time is a 12″ reflector with a white and gold/silver side. This was something that I learned the benefit from during one of my early decay workshops. One of the participants brought one since they normally do macro flower photography. She used it to diffuse the sun for emblem isolations as well as bounce light onto details of the cars that we were photographing. I found this to be an excellent tool for this type of photography and have been carrying it since. I saw the potential to use it here as well. I pulled it out and popped it open. Using the gold/silver side, I grabbed the light coming in from the window and I bounced it onto the candle. It provided a subtle amount of fill light to the subject while the wall was largely unaffected. It was the perfect addition to the photo, and that made the favorite of the batch.
John didn’t choose to work this same subject which didn’t surprise me at all. He is not a fan of shadows at this point and prefers brighter photos with more pop. For me though, this turned out to be a stellar photograph and one that I am so glad that I took the time to work on, even though it as during a mentorship session. I actually love everything about it and was very pleased that it came out so close to how I saw it in my mind before I aimed the camera at it.
When John had finished working on the lamp composition, we grabbed our gear and locked the church back up again. It was time to move onto something new. From this point on, we were pretty much shooting together. There were things that he wanted to work on and things that I wanted to work on. Obviously, I won’t take the time to cover every scene that we each shot. That would become difficult to do since I don’t have photos of all the different subjects that he worked. I will focus on the scenes that I shot and what I was trying to accomplish with each of them.
We had discussed planning for the types of photographs that you might encounter before you even get to a location, and I talked about how I had hoped to find objects in windows when I was headed out to Old Salem years ago. By thinking about that possibility, my mind was already looking for that kind of scene. When I came upon it, I instantly recognized the potential photo. I guess because of that discussion both of our minds were on the objects in windows idea. We both started to spot different scenes that would work. One of them that we came across was a simple teal colored chair sitting off to the side of a window. I liked that the chair was off centered because it brought in a visual tension that I really liked. The teal worked well with the dominant warm tones in the scene as well.
Since I had brought it up and John had just finished shooting a scene that he liked, I offered to go first on this subject so he could see me work through the process. He agreed and we walked in closer to the window. As a side note, the house that this window was attached to had belonged to John’s wife’s family and they had donated it to Hart Square some time ago. I liked the connection here and I wanted to do the photo justice for that reason.
I really thought that this was going to be a quick demonstration, but I found that the framing of the shot was a bit more difficult than I had originally thought. The composition started out as a horizontal shot but quickly moved to a vertical one which felt better. I talked through all my choices with John as I proceeded with the tweaking of the composition. I moved around to make sure that I had the chair positioned just so within four frames of the window. I wanted ample separation of primary elements of the chair, while having the continuity of form present so that the viewer could easily complete the shape even though it was interrupted by the window. There was also the matter of the reflection of a tree which I chose to split equally in order to give a little extra visual weight in the upper left of the frame.
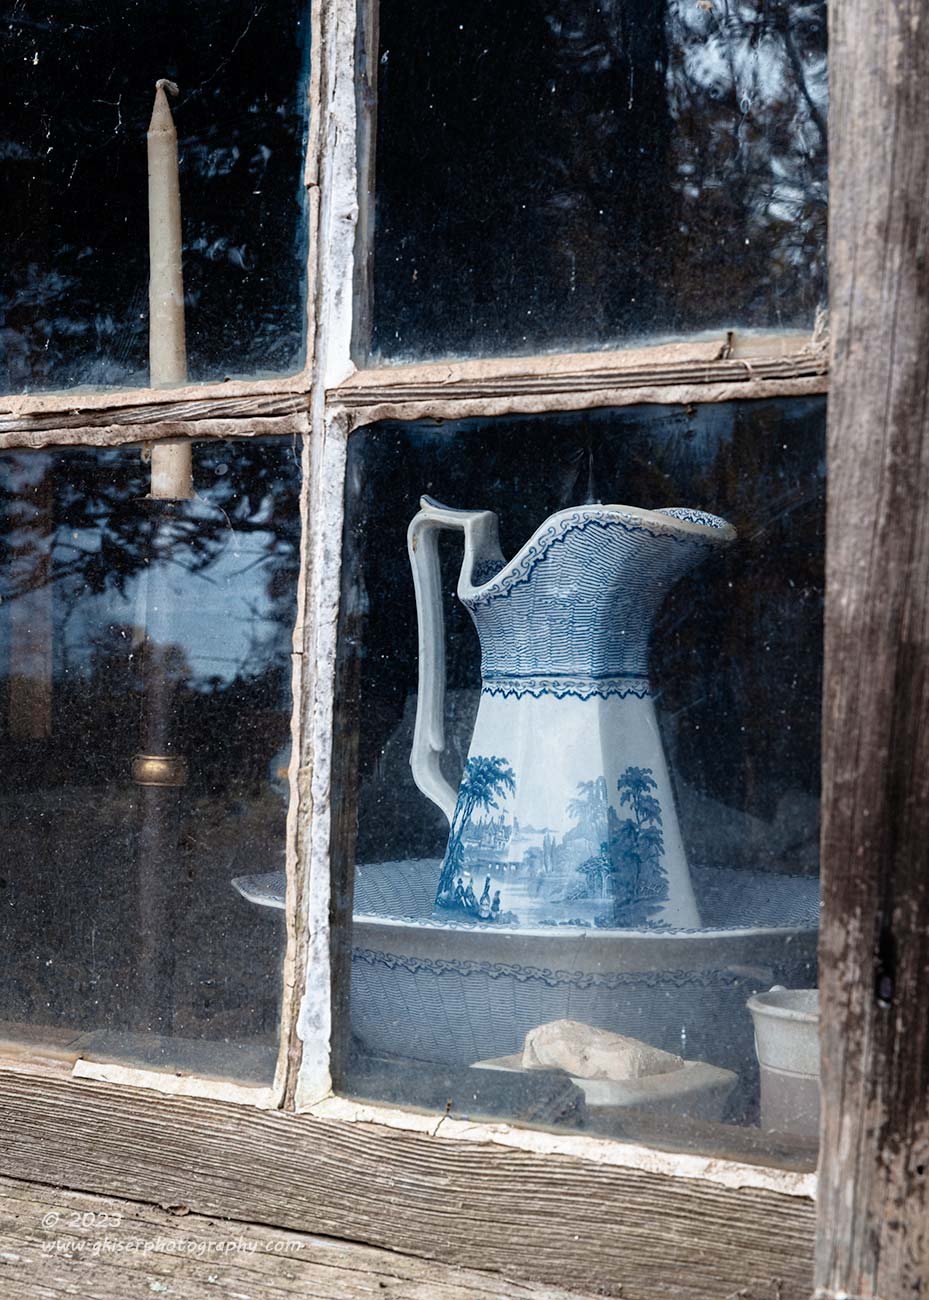
Even with all of that work, the scene still wasn’t quite right. I noticed a yellow leaf that had come to rest on the window sill that looked perfect with the teal of the chair. It was a small leaf, so it was kind of insignificant to the composition, but it really got my imagination going when I saw it. I didn’t want to remove it, which would have simplified the scene, but it was effectively a distraction as it was. Something I have never liked doing is manipulating a scene. I much prefer to shoot it like I found it and have written about the concept many times. I have a particular aversion to strategically placing leaves for that iconic Fall scene, yet here I was considering doing just that.
Let me explain myself, as I did to John in a hope to make myself feel better about what I’ve done. The whole idea was because a small leaf had fallen onto the window sill naturally at some point before we got there. It was place in the perfect spot for the composition, it just wasn’t big enough, or visually strong enough to accomplish the goal that I would have wanted. Looking around on the ground, there were tons of leaves that had fallen recently. I wasn’t bringing anything into the area that wasn’t there naturally. I found a bright yellow leaf and placed it randomly in the same area as the existing leaf. Looking through the viewfinder, that helped the scene, but as John reminded me, even numbers don’t make good photos. I needed a third leaf and found another bright yellow on which was placed near where the original one had been. At this point, I had created a scene out of elements that were present within a very small space. I thought about the placement and liked that they were on the same side as the chair because they kind of drew the eye to the chair, adding visual weight to that side of the frame.
I shot a couple of frames with slightly different framing, but still vertical. I felt that was the end of it and started to talk to John about things I had gone through with this photo. As I was talking, I had the idea to go with a square format since it kind of worked as a horizontal and worked as a vertical a little better. By switching to the 1:1 the composition came right to life. This was how I should have been shooting it to begin with, but it certainly does show the power of talking through your photo to arrive at the best outcome.
While John gave this a try, I moved over to try and photograph one of the houses a bit further infield from our location. I thought that I had something pretty good, but when I got the photos home, none of them worked out like I had hoped. I think that John had better luck with the window shot which he was finishing up on at this point. Once he and I were satisfied from this spot, we made our way down to another house where I had seen a porch that I wanted to photograph.
When we got there, I started to try and find a composition which proved to be darn near impossible because of the railing that I was trying to shoot over. I probably spent 10 minutes here trying different angles and lenses without success. While I was bashing my head against a wall, John had gone around the corner to obviously laugh at my inability to photograph two chairs and a table. Well, he might not have been laughing, but he was putting his energy into a much more fruitful option which happened to be another window with some interesting elements inside. Just before I became overly frustrated with the porch, I went around to catch him laughing at me….I mean to check on him. I immediately saw what he had found so photogenic and applauded him for finding the scene. We went through his composition and why he had chosen to photograph it from the left side rather than the right side. With just a little nudging, he switched sides and worked it from that angle.
This turned into another chance to learn about using the depth of field preview button to establish what will be in focus and what won’t be. This helped him to arrive at the right focus point and he was much happier with this composition than what he had started with. I made no secret that I loved the scene that he had found, and after spending time working with him on a composition, I felt invested in the photo enough to where I wanted to give it a try myself. I also needed to clear my mind from the failure on the porch. I went through many of the same steps to get to the composition that John had, but I placed a slightly different spin on it this time in regards to relative scaling of the elements. I didn’t have to spend long on it at all thanks to helping John work it out minutes earlier.

By the time I had finished up with the window, John had moved around to the front of the house and was photographing….say it ain’t so….the porch. I think he took my failure as a challenge and went over to try it himself. I might have said something to the effect that if he was able to get something when I couldn’t, I would possibly be mad. Well, while he was working on it I diverted my attention to the barrel that was placed at the corner of the house. I have this thing with barrels and have enjoyed photographing them at Old Salem several times before. This wasn’t going to be one of those photos because what was catching my attention was the fact that there were freshly fallen leaves in that barrel. No, I didn’t strategically place them in there, and didn’t even move them around inside. I simply made a composition with them as they floated. The hardest part of this scene was establishing the best depth of field to tell the story that I wanted to tell. Well, that and the discussion that I was having with myself as to why I was taking a photo of some leaves floating inside a barrel filled with water runoff. Strange things catch my attention when I am out with a camera sometimes…and it was sometimes.
Any success that I achieved here at this barrel was overshadowed by the fact that John was able to get a photo of the porch furniture. It wasn’t quite what I had in mind when I started, but his composition worked well and showcased the very unique chairs quire well. I didn’t even feel bad about it because he had got the shot when I hadn’t been able to do so. That was a proud moment for me, I was so proud that I didn’t even use his composition as a springboard for another attempt. I just let him have it.
We found out that the key for the church worked for this door as well, so we went inside for a few minutes to see what it looked like. There were several scenes that I liked on the inside, but nothing that I was able to work out a photograph of quickly. Not wanting to spend too much time at any one location, and since John wasn’t interested in photographing the interior, we exited and locked it back up.
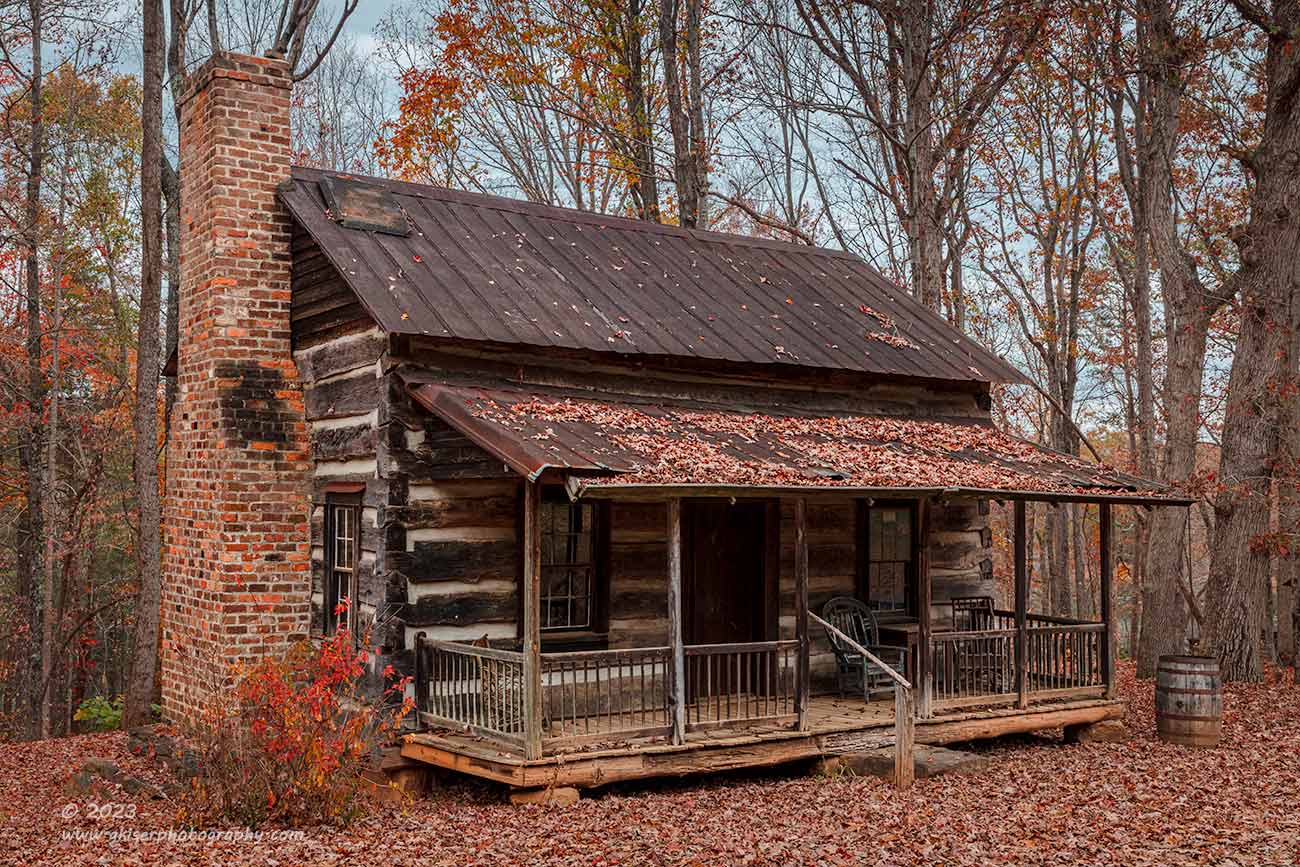
As I stepped away from the house, I turned and realized that from this angle, there were no other buildings in sight. I was going to get my porch photo after all, but it was going to be a part of a much broader composition. I quickly found the spot to put the tripod where the windows and doors were not split by the posts on the porch. I used a bush with bright red leaves as a foreground point of interest and the barrel I had recently shot as a framing element. There wasn’t much at all to stress over with this photo as the exposure was pretty even across the scene with the sky staying properly exposed even when keeping plenty of information in the shadows. Because of how simple this composition was, I only shot two frames with the second being a safety as there were leaves constantly falling. I didn’t want anything streaking across the scene.
The property is laid out to where residential buildings were on one side, while the more business-oriented buildings were on the opposite side. Not wanting to miss out on any opportunities, we started to walk to the other side of the property. We did this on the roadway that neighbored a n open field. I couldn’t help but notice that there were some trees that stood out in this field and a few of them still had their leaves. I asked John if he minded if we took a slight landscape detour as I tried to capture a couple of trees that really stood out to me. He didn’t mind, and even started to work the scene himself.
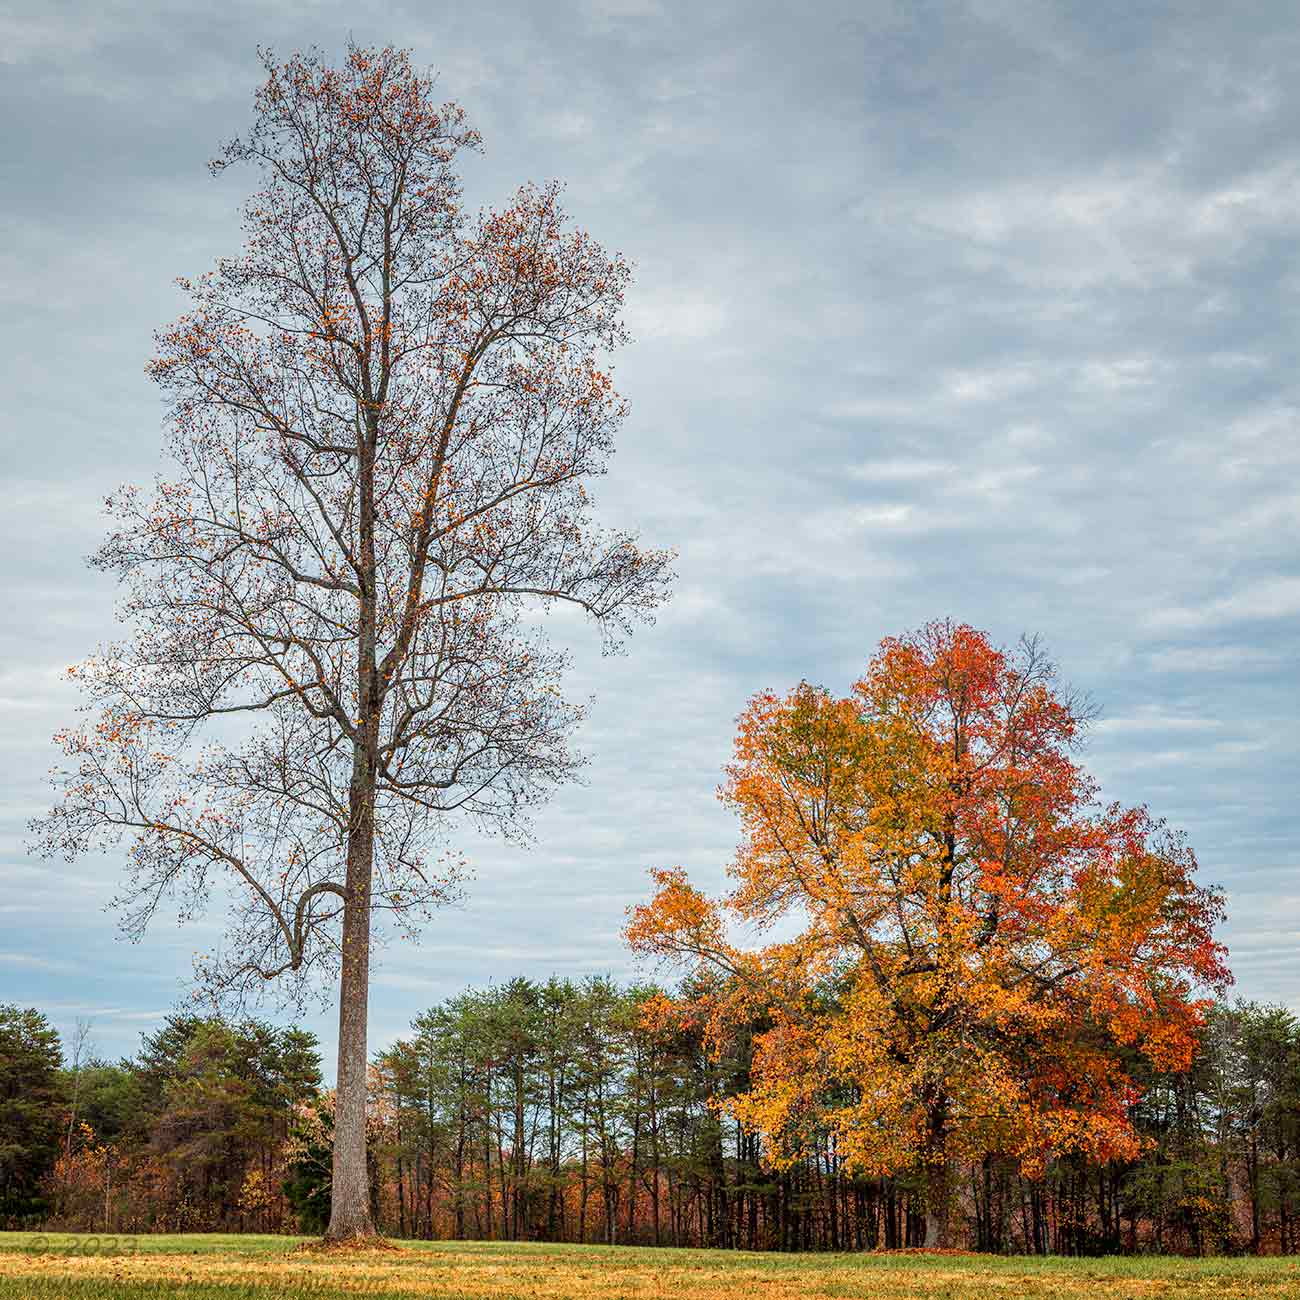
For me, it was the juxtaposition of the tall tree with no leaves and the shorter tree full of Fall color. This was the scene that I wanted to capture, I just needed to figure out how I was going to go about doing that. Since the tall tree was very tall, I started with the idea of a vertical composition, but that turned into an oversimplified version of the scene. The sky was nice, but not quite that nice. I flipped it to a horizontal orientation and found that to look better. The framing brought the attention to the background trees since they stretched from side to side, while it made the two trees which were the focus stand out a bit more.
I tried several angles but found that I liked the one where I could put the tall tree in a divot formed by a dip in the background trees. This stretched the tall tree even more visually as compared to the short one. I then tried individual shots of both trees before heading back to John to help him with any questions that he might have. He was in good shape working a different tree on the other side of the field. We worked out a tweak to the angle he was working to showcase the bends in the tree a bit more and the established what the correct exposure was going to be for the scene. Once he got that dialed in, we wrapped up our little landscape sideline.
As you look at the photo above, you will surely notice that it is neither vertical nor horizontal. You would be correct because when I got it into Lightroom, neither orientation felt right. By turning it into a square crop, I was able to focus all the attention on the two trees and left everything else as secondary. This had a much better flow in my opinion, and it suited the scene. The added calm that the 1:1 ratio provided worked with the mood created by the sky and the image became much more cohesive. It is too easy to forget the power of aspect ratio in photography. More often than not, I find that photographers will shoot at the native aspect ratio of their camera system and never waiver from that. The frame that we compose our image in is as much a part of the photograph as the main subject.
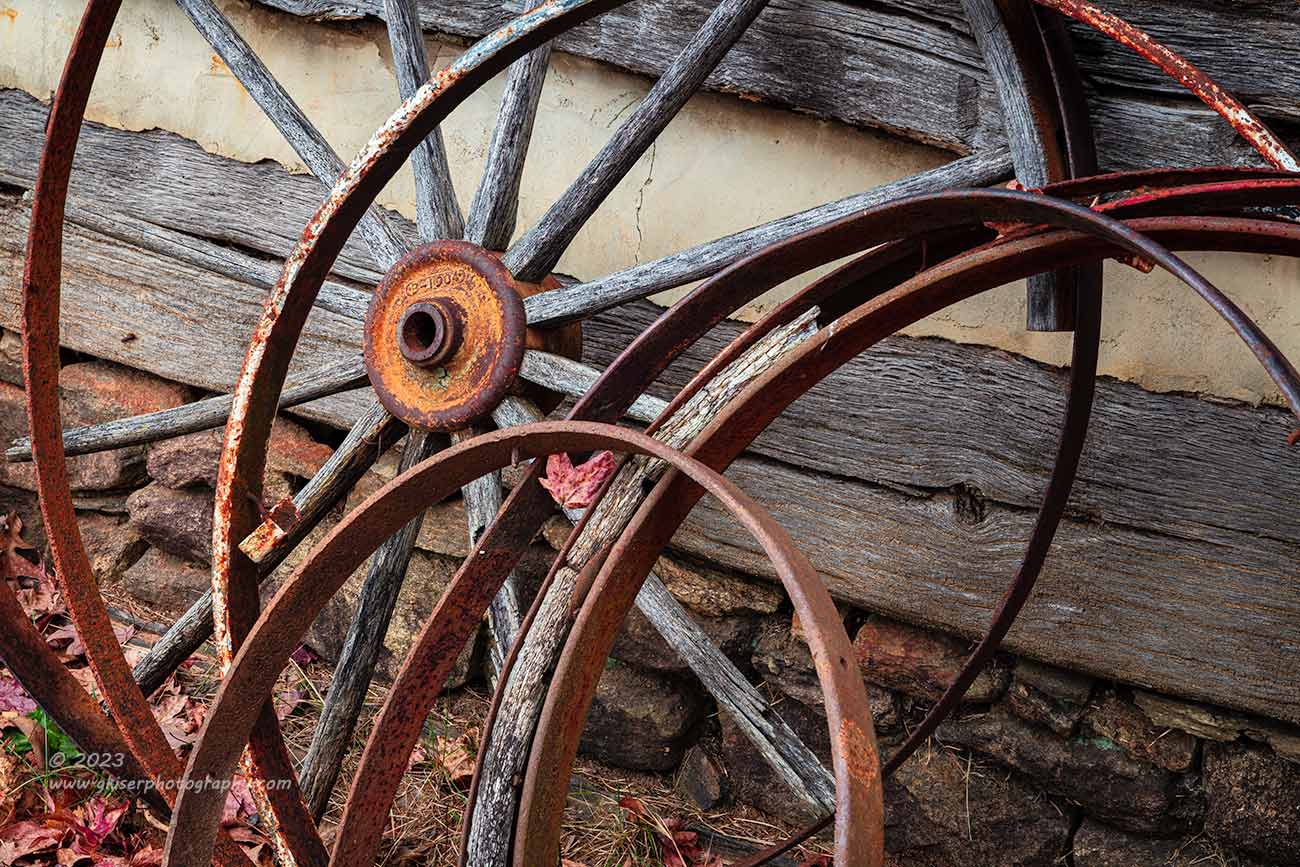
When we finally did get to the other side, we started to look for things that caught our eye. One of the first things that grabbed my attention was a collection of wagon wheels leaning up on the side of a building. I wasn’t sure what I was going to do with them just yet, but I knew that they were interesting. I was wondering if John wanted to work anything nearby which would make it easy for me to work with the various rings. When I asked him if he saw anything that interested him, he identified the same scene that I had just been contemplating. That was easy, we would just both work the scene together.
We each got ourselves into position with me off to the right shooting in at an angle while John shot it square on. I started asking him how he intended to shoot it so we could start a dialog about how we were going to make this scene into a photo. Part of that was to get him thinking about the composition, and part of it was to help me get a good handle on how I wanted to shoot it. We both agreed as to what the visual anchor was and how important that one wheel hub was to the scene. The scope of the scene was a point that we initially didn’t agree on as Jon wanted to include more of the scene than I did. I was seeing a very intimate capture concentrating on just some lines and shapes.
As we got started making exposures, I kept adding more to the scene as I saw repeating patterns developing. I added until I had almost all of the area of interest in my photo. I was liking it and shot it from a couple of different angles and heights. When I was pretty happy with what I had, I checked on John and found that he had gone the opposite from his idea as well. He was now shooting tighter than he had indicated that he wanted to. Essentially, we have reversed our original assessments of the scend and were shooting each other’s concepts, although from different angles. Our base composition was very similar with the positioning of the wheel hub.
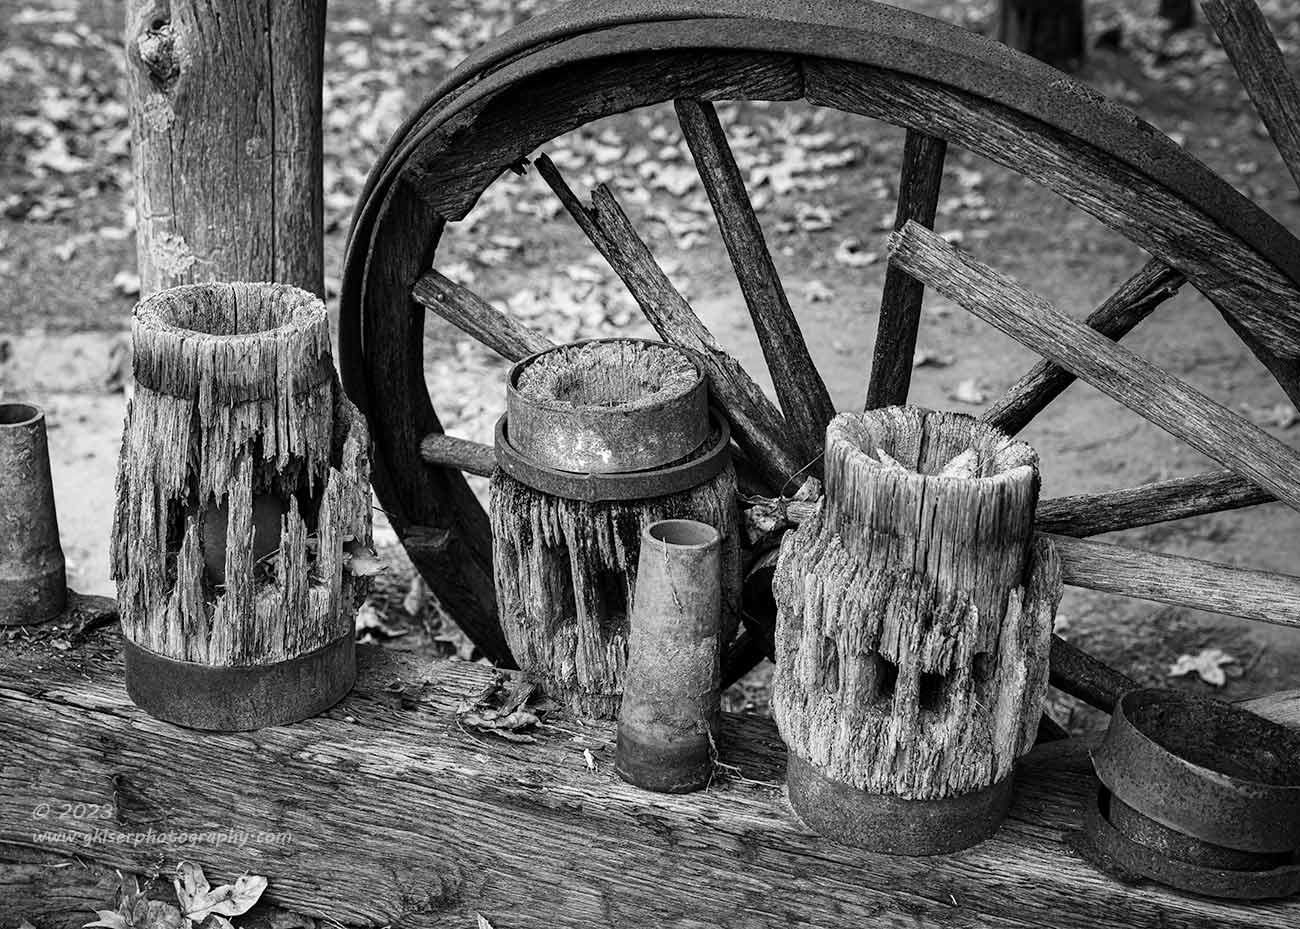
When I was happy with what I had, and John was seeing happy with what he had, I moved over to another section of the building where there were some wheel parts laying out next to a broken wheel. I’m sure that this was not a staged scene, just where things ended up, but I saw something beautiful here with the textures. While I set to work on this scene, John moved over to where I had been working and started to capture the scene from a similar angle to what I had been working.
It took me a little while to organize the chaos of the broken parts into a composition, but when I finally did, I liked the scene before me. I was pretty sure that this was going to be in black and white because it was all about the contrasts and textures within the scene. I didn’t see any need in overcomplicating it with color as there was already enough going on within the frame. I didn’t spend too long with this scene because it would have been all too easy to get way too obsessed with trying to get that perfect composition. Instead, I went with my gut and just shot it the way that I saw it. Once I had that, I was happy to move on. There was no way to tell if this scene was going to work out or not, but I had given it a try at least.
John was now looking into the square where there was a view of many of the buildings surrounding where he stood. I went over to see what he was wanting to capture. There was a very dominant building in front of him that had two sections which had been joined together. It was arguably the most interesting structure in view, so I had no argument at all with his selection. We talked about it for a bit, and he started to work out a composition.

Meanwhile, I had spotted a carriage in a shelter just behind John and went over to see about isolations that could work. The thing that really stood out to me was the rope that was draped on the front. It was a nice thick rope and one that had a lot of texture. I’ve been looking for a good photo of a rope like this, so I was happy to give this a shot. I brought the camera in close and started to look around the different areas of the rope to see where the visual interest happened to be. I knew that I was wanting a small section, and likely a limited depth of field. For this, I might have been better off using the telephoto lens, but I also knew that I was going to have to be in very close which the standard lens was better able to accomplish with a moderate macro capability.
The part of the rope that I landed on what a section where I could see three distinct sections of the rope with the nearest one curving at the bottom. It was that curve that would frame the other two and establish the composition. I fiddled with the camera until I had the right composition and then started to dial in the right depth of field. I knew that blur was going to be a part of this shot but didn’t know how much a part I needed to make it. I used that depth of field preview button to see what the changes were as I selected the different apertures. I couldn’t quite tell what I wanted, but every time I released the DoF button, I liked the way the fell off while the camera was focused on the middle bit of rope.
Since I liked how it looked without the button pressed in, that told me that I would like the shot with the lens wide open. I opened up the aperture to f/2.8 which is wide open. I double checked focus and just as I was about to press the button, John called over to ask my advice on his composition. I got the shot and went over to see what he was having issue with. He showed me the composition that he had come up with and actually nailed my point before I had a chance to say anything. He recognized this as a flat composition because he shot it square on to the building. It was also placed pretty much in the middle of the frame, so it lacked any dynamic qualities.
I went through a few suggestions of how to improve the composition from this angle, but he didn’t really like any of those suggestions. I can’t really blame him because there just wasn’t much that could be done from this angle. I started to look around to find something that would work better and show off an angle or two. As I got closer, I saw an old kettle on the ground which I felt would make a decent foreground should he want one. Even if he didn’t, the angle on the building was perfect, and allowed for a good deal of isolation from the other buildings in the area.
I had him come down to where I was, and we figured out that he wanted to shoot it without the foreground element. I have him a few tips on the composition and went back to the rope that I had started to photograph. I already had one shot in the bag, but wanted to try a slightly different exposure since I was going to increase the shadows anyway to make for better sculpting. It was the third exposure that I made which turned into the keeper. They were all shot with the lens wide open which was the right choice to make for my vision. It allowed the two outside bits of rope to be used to frame the center piece which was the one in focus. The composition was simple and effective and probably my favorite rope photo I’ve even taken.
Having seen the potential for a really good composition on the subject that John was working, I went over to him so that I could get a few frames here as well. I set up to the right of him and began getting everything figured out. What I hadn’t spent any time thinking about was the window on the wall facing the smaller section of the building. From where I was standing, that window was only partially visible which I didn’t like. I moved over to the left slightly which brought that window between the post on the porch and the corner of the wall. The window fit perfectly in that slot and that simplified the scene for me.
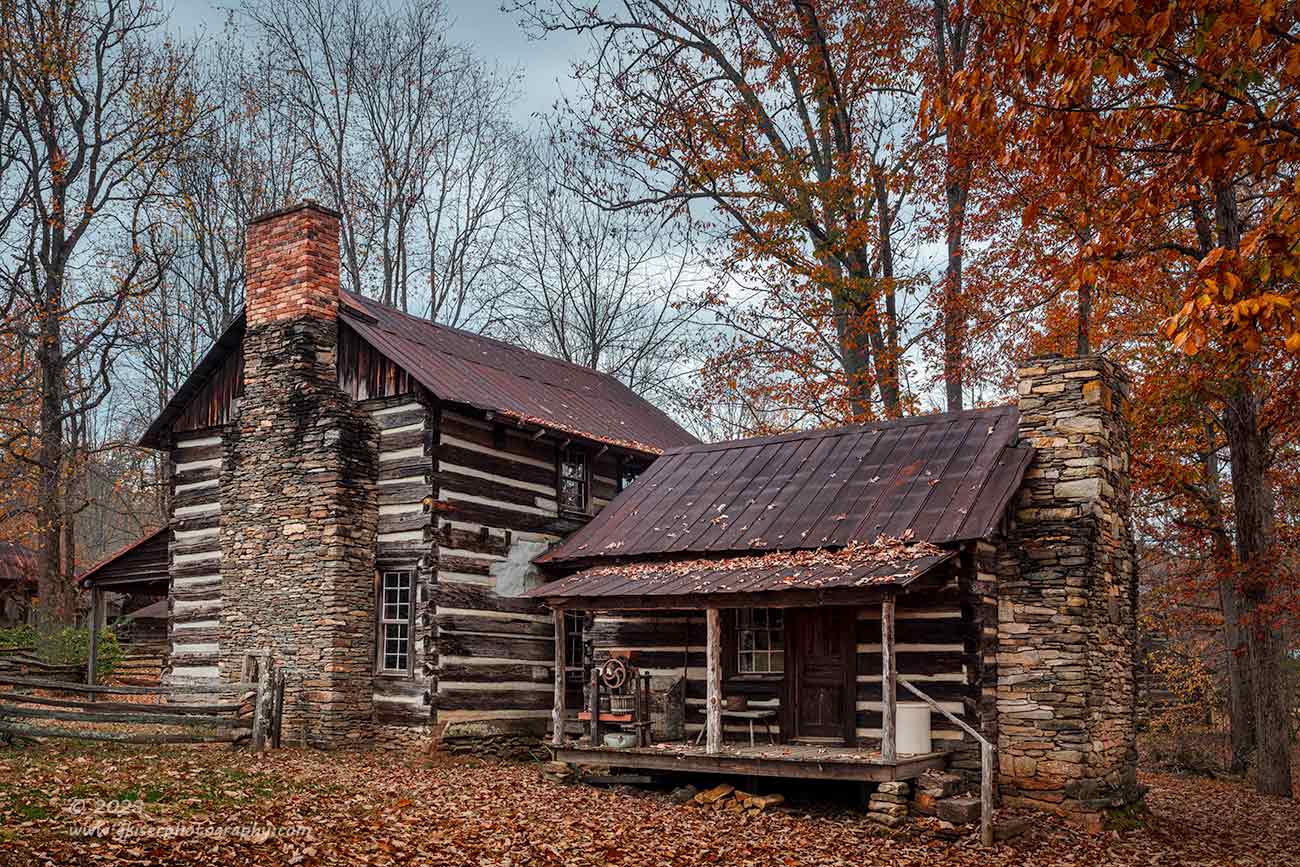
As I had discussed with John, there was going to need to be a grad filter included on this one because of how bright the sky was in comparison to the very dark wood on the building. The 3-stop soft grad did the trick and pulled the sky down just enough so that I could get the building out of the shadows. I shot three different frames with slightly different exposures to make sure that I pushed the right side of the histogram as far as I could. It was that last image that turned into the keeper. I was kind of excited about this one because it was another example of a scene where the Fall color was still present. The tree in full color to the right matched up nicely with the fresh masonry at the top of the chimney on the main section. The composition managed to exclude the surrounding buildings which kept the focus of the photo right on the main subject. The sky had some detail in it and a slight blue hue which balanced out with the warmer tones throughout the photo. There was a lot to like about this one.
John had mixed feelings about his though. He liked the composition much better than what he had started with, and he tweaked it to address the window issue that I had run into which I thought helped a lot. His choice was to just remove the window entirely, so he moved from my left to my right and effectively hid the window behind the smaller section of the building. What he was not sold on was the exposure. This brought us to a point that he has been making for some time now. He has been thinking that our concepts of correct exposure are fundamentally different. He has been feeling for a long time that his photos are underexposed compared to what he wants them to be. I’ve checked them many times, and even put them into Photoshop to confirm with a histogram that they are as bright as they can be. I know that what he is having issue with is the shadow detail, and this building is a prime example of where this can become problematic. When dealing with a bright sky, you can only push the exposure so far, and this building is made out of dark wood, with a large portion of the smaller section in shadow from the covered porch.
I had already suggested that he use a 3-stop grad as I had done, but that was still not getting him the results that he was after. Looking at the image review and the histogram, I assured him that he was right on the money with the exposure. We added another 2-stop grad and staggered them both to pull the sky down some more, but he didn’t really see any difference there. I could see his frustration and wished that there was an answer that I could provide to fix it. Well, there was an answer, but it was not one that he was particularly interested in.
John and I have had the discussion about post processing many times over the years, but he has not been quite ready to delve into that part of photography. I haven’t pushed too hard because I want him to become very proficient with operating his camera first and foremost. There is a lot that can be done in camera with picture styles and filters. This has been our main focus for the majority of the mentorship time. In all honesty, I have really appreciated the opportunity to teach photography from a non-post processing point of view. This was how I learned, and it made me a stronger photographer which is what I hope will be the outcome here as well. It is nice to get back to my roots and really think about the fundamentals of exposure without the safety net of Lightroom or Photoshop. I would be willing to bet that the time spent teaching John how to get the best possible image from a jpeg capture has benefitted me beyond words in my own photography.
That being said, with two grad filters and a polarizer installed on the end of his lens, a neutral picture style selected with the saturation and contrast reduced to a minimum and a correct white balance set, he still wasn’t getting the detail that he was after on the building. The only way to achieve this was to raise the exposure by 2/3 of a stop which then blew out the clouds which was unacceptable for the end use of the photo. I was stuck for a solution, and John was left with a composition that he liked, but an exposure that he felt was underexposed. To be fair, the main subject was underexposed, but the photo as a whole was dead on perfect in terms of exposure. It was time to bring up post processing once again as the only solution.
Now, I’ve talked about my views on post processing quite a bit here over the years, and fundamentally nothing has really changed. I refuse to think of post processing as a “fix” for a mistake in the field, and I don’t take it so far as to be considered image manipulation. I definitely run the other way when it comes to replacing elements with AI generated content on any appreciable scale. For me, post processing has always been about polishing the photograph that you shot in the field so that it fits your personal vision. The polishing can be extreme, or so subtle that you don’t even recognize it. Most of my edits are around 15-20 minutes with another 5 spent fine tuning after my eyes have a chance to rest. There are some edits that will take around an hour, but those are few and far between. I do 99% of my work in Lightroom and save Photoshop for some of the more involved tasks, but I don’t really get that involved even on my longer edits. How far I go depends on the image and the result that I’m after. If I go overboard with an edit, I will share what I did above and beyond to remain above board with those who are interested in my work.

I don’t normally post RAW images here, nor do I get into detail about my edits, but I felt that this occasion deserved a bit of an overshare. It is a way of being forthcoming with you, my audience, as well as demonstrating a point to John, and any other clients that I might have along the way who are reluctant to get into the world of post processing. Hey, I get it. I resisted for years anything beyond what a bare bones image editor would do. I look back on that time as time wasted in a lot of ways because I just didn’t shoot those scenes that had higher contrast to them. I missed a lot of opportunities because of a self-imposed limitation which once I lifted, opened the doors for all kinds of fantastic scenes.
So, here is the before and after of the last photo of the day, and the one where John was unhappy with the shadow detail. John, if you are reading, I assure you that the issue that you are having has nothing at all to do with your camera, or your technique. Look at exhibit A on the left which is my RAW image. The only thing that has been done to the photo is a color profile assigned which is the Adobe basic profile. You will notice that the image has the same issues that your jpeg file has. The building is dark, and the sky is on the verge of being featureless white. It is skies like this which I would just avoid shooting when I was starting out because I hate a blank sky with a passion. The photo is dull and not particularly inviting, it certainly is not “bright” like most of my other portfolio which you mentioned.
Would I be happy with this as a final image? Nope, not at all, so I do understand where you are coming from in your frustrations. This image was shot with a polarizer and a 3-stop grad filter. It was carefully composed and exposed to the best of my ability…just as you did, with the addition of one more filter in an attempt to get the sky to calm down a bit more. There is nothing else that can be done here, even the difference in cameras mean nothing at all at this point. It wasn’t until I got it home and spent maybe 15 minutes on an edit where I brought back the detail in the sky as well as lifting the shadows. The contrast was reintroduced as I saw fit, and the colors were brought out in the trees. I finished up by correcting the perspective distortion and adding a bit of clarity to the main subject. Essentially, I redirected where the eyes went within the scene based on lighting. Each of the adjustments that I made were small, but the culmination of all of the adjustments made a huge difference.
This is the power of post processing, and you can still be true to the scene even using all of the different tabs (accept that stupid lens blur one) at your disposal. I think that you can agree that the edited photo is much closer to how the scene looked when we were out there. The exception being a bit of the color grade between the tree and the sky just to keep the scene harmonious. I firmly believe that my recognizable style is in large part because of how I choose to edit my photos. I love being able to have control over the presentation of an image and have become so familiar with the post processing tools that I have access to, that I regularly shoot scenes for how I intend to edit them. I have no limitations other than what I put on myself. In the end, photography is a creative process, and we should never stifle our creativity, or our ability to enjoy the end result.
By the time that John and I had finished up with that building, we had been at Hart Square for about six and a half hours which made for a very long day for both of us. I don’t know how many photos John shot, but I ended up with an even 50 frames which was a lot considering most of my time really was spent working with him. I really hope that he is as happy with them today as he seemed to be yesterday. I’m really looking forward to seeing how they turned out and to have further discussions on whether or not to dive into post processing or not.
For those that might be interested in joining me for a mentorship session, let’s start a conversation about it. The consultation is free with no commitment. I just want to make sure that we are compatible and that I will be able to help with what you are wanting to improve on. There are many different levels of mentoring from quick image critiques, online assistance with post processing, hourly field work, or advanced sessions that will encompass pretty much anything that you can dream up. It all starts with a call or email to begin building your custom session.
Thank you for joining John and me on this trek. I was pleasantly surprised at how good Hart Square is, and highly recommend it for those that like to see how our ancestors lived. The photographic possibilities are endless, and I’m betting I’ll be returning there again in the future. Let me know if any of these photos speak to you because I would love to see any of them in print form headed to a new home.
Until next time…

Remember to use the code KISER10 to get 10% off your purchase