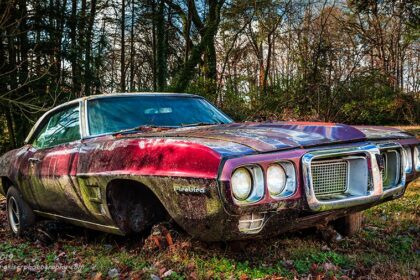
Friday, November 8, 2024
Welcome back! In case you missed the first part of this trek, you can catch up here and see how it all started. When we last spoke, I had finished up working some compositions with the Oldsmobile that I have spent way too much time with over the years. There is a lot to really like about that car, and I guess that makes for a lot to photograph. It concluded my first walkthrough of the property and had resulted in quite a few photos. Now that the sun was getting lower in the sky and the clouds were starting to provide a bit of diffusion, I wanted to revisit some of the areas that I had started out with as I knew the lighting would be very different at this point.
My first stop was where things had started earlier in the day. I had come out specifically to photograph Dean’s Dad’s old Ford which he had bought brand new from the dealer. When I had started photographing it, the light was kind of strong and it forced me to photograph the driver’s side which wasn’t idea thanks to the different distractions in the background. Now that the light was softer, I was able to work the car from the passenger side which gave me a better background to work with. The softer light also allowed for more detail to the car and the immediate surroundings.

Since I was currently using my telephoto lens, I just kept that on and started to look for a composition that made sense. I started with kind of a broadside shot of the car because I thought I would like the tree and car being closely related, but that just felt too cluttered. I moved to the right which eventually separated the car from the tree and gave me a more balanced composition. The background from this angle was a bit more complicated with some brighter light to deal with, so I had to decide on how to incorporate that. I chose to limit my depth of field to give a bit of a glow to the background which would hopefully give some depth and separation since the car was mostly in the shadows. I got the camera at a height where the roof of the car was below the ridge to keep the lines from causing distractions.
The composition eventually came together in a way that I was happy with. After that, it was just a matter of waiting for the light to work with me. What I was waiting for was the right positioning of the clouds to diffuse the light, and possibly bounce some fill light into the scene while still keeping some of the brighter parts going in the background for depth. This took longer than I would have thought, and I spent a lot of time looking up at the sky and the bright sun to see where the clouds were. Eventually things came together for me, and I was able to capture this frame that had just the right levels of light going on. There was plenty of detail in the tree as well as the car. What I really liked was that you could see how the tree had dumped all of the leaves just right there under the limbs. This almost gave a sense of motion to the scene that added life to it in a way.
I felt so confident with the composition that I stuck this one out for much longer than I probably should have. It paid off because this frame captured the right combination of light that just wasn’t present in the other versions that I shot. This shot represented 20 minutes of time and 22 frames as I tried to get it right. This one was around frame 15, so I went just a little longer in case something better happened. I did want to make this a good photo because I had heard so much about the history of the car from Dean and it was special to me as well at this point. I did like the mood that was showing up with the lighting and the fact that the missing rear window is not overly visible makes this a keeper in my book.

With the softer light falling on the Ford, I started to look for some isolations that I could do with it. So many of the areas of this style of car have been photographed over the years that it is really hard finding something new and different to focus on. I went though my normal spots and found that the most interesting area for me was the front of the car, but contrary to what I would typically do, I didn’t include the headlight. A lot of that was because the light was missing from the bucket. The main reason that I did this was that the most interesting part of the car was the way that the bumper and grill chrome came together with the broken turn signal lens. I worked on a way to photograph this and found that I could get an interesting angle here by getting the V8 badge included in the upper left of the frame. To keep the balance in the photo, I did a crop into the front bumper which bulged out a bit. This creative choice changed the visual weight of everything and allowed me to spend more time examining the areas of interest rather than the mass of chrome.
When I shot this one, I was really thinking that I would want to do it as a black and white since color didn’t really come into play. When it was time to process the photo, I wasn’t sold on the black and white thought. I kind of liked the blue to the chrome and the bit of fender offered a warm counter to that cool shade. However, I didn’t really like it in full color either because the colors became a distraction. My compromise was to use one of my favorite color profiles that allowed me to desaturate the colors significantly and then build them back up as I liked in order to make the photo.
The end result is one that works quite well as I had envisioned. The colors helped to tell the story but really didn’t take away from the little details like the pine needles and other dried out vegetation resting on some of the surfaces and the broken lens on the turn signal. These were the areas of the photo that really drew my attention as the rest of the photo just provided a visual pathway through the frame.
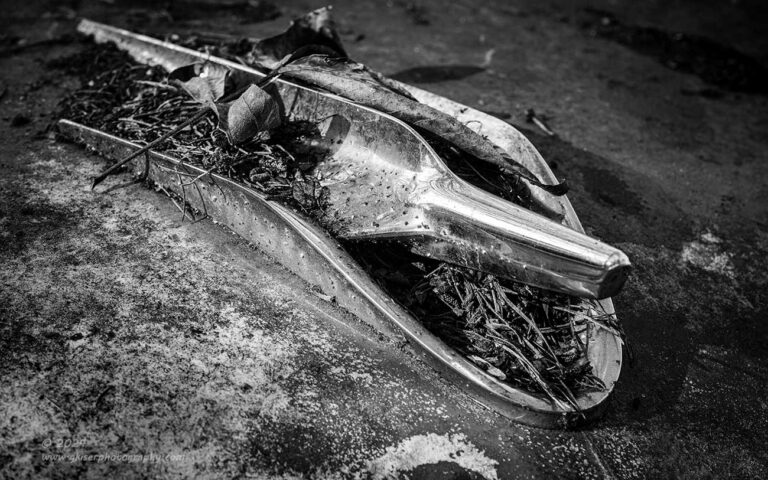
One other area on all ’50’s cars that I enjoy working is the hood ornament when they are still present. All too often, these bits of trim are long gone by the time I get to them. This one was still there and in really good shape. As with the bumper, I liked the fallen vegetation that had started to nestle into the scoop shaped base of the ornament. The patina around the brightwork was interesting and full of texture as well. This could have very easily been a color image, but I have so many of those that I wanted to do something different with this one. Since the main feature was the amount of deadfall around and laying over the chrome, I wanted to really keep the focus on how all of that covered up the main part of the story.
The processing on this one had a lot to do with how it appeared and that was planned for. When it comes to photos like this, I am less interested in photo realism and much more into how it looks artistically. I really worked the contrast with this one to get all the textures and details to show through. Had I left the color in it, the photo would have been all too busy, especially with the pine needles and leaves cluttered around the main subject. Losing the color made this so much more of a simple image which was what I was going for all along.

Now that I had gotten the normal angles worked and put some slightly different twists on them, I turned my attention to the rest of the car. I looked at the sides, the rear, areas where panel lines came together and the wheels. Nothing was really jumping out at me, although I did try to get a photo of the chrome trim on the side that indicated that this was a Customline trim car.
Just as I was about to give up and move on to the next subject, I caught an interesting view of the front wheel on the driver’s side. It was from an angle that I would usually never think to capture. I was looking from the front of the wheel to the rear. With the wheel turned into the car, I could see the face easy enough, but that wasn’t what interested me. I could see the chrome from the front grill and bumper coming past the fender wheel arch, which was a very cool feature, but still not the part that I liked best.
Once again, it was the V8 badge that grabbed my attention right there on the leading edge of the Fender. It fit well into the otherwise negative space, but somehow seemed to throw the overall orientation of the scene out of whack. It was that right bit of visual tension that I wanted for this photo. I framed up the composition and found that the wheel pulled too much of my attention, and the elements that I liked the best were losing ground in comparison. I framed things in a bit closer so that the wheel didn’t take up as much room in the frame. This helped quite a bit, but my eyes still went into the dark void all too easily. By creating a very limited depth of field, I was able to pull the attention back to the fender where I wanted it to be while still including the wheel for a bit of balance and setting.
Now that I had that one in the bag, I took one more look around the car and determined that there was really nothing more that I could find to photograph in the existing light. It was time to move on. I wanted to go back behind the barn where there were three old trucks that I had photographed several times in the past. I had not visited them yet today and there was a chance that there was something there to photograph. The light was good back there with most everything in shadow by this point which made it easier to find compositions.

After walking around for a few minutes, I found myself looking at the blue Chevy that I always make a point to mention during my workshops because I think that it is perfect at telling a story. I wasn’t looking at my normal subjects this time though. What I gravitated to was the hubcap on the front left corner. I’ve shot this before, but I have done it with a concentration on the curve of the fender. This time, I was more interested in just the hubcap sitting behind the tan vegetation. The overall blue tones of the hubcap worked well with the tans, and I found that by including a bit of the blue fender that the color balance was even better.
In order to make sure that the attention went to the script on the cap, I used a shallow depth of field that rendered the fender as more color than texture which is odd for me to do. I do think that this worked very well though, and the end result has me looking right where I wanted to.
I’ve spent a very long time with this truck in the past, so I know most of the angles which meant that I didn’t need to linger here any longer. There was another truck right next to it that I wanted to spend a bit of time with because I usually go for an all-inclusive composition with that one and neglect the details. Since I was still using the long lens, I figured that detail shots would be very easy with this truck and felt motivated to give it a try.

One of the first things that caught my attention was the fallen needles that were collected on the Chevrolet badge on the side of the hood. This fell right into a composition that I have shot many times on similar vehicles, so I knew just what to do. Instead of going for a broadside shot, I went at a slight angle to the side of the truck for a bit more visual interest. I didn’t go too far because I still wanted this to be a calming photograph that fit the mood of the fallen vegetation.
The composition came together smoothly, and I really liked how the textures looked. There wasn’t much variety in the colors which prompted me to do this one as a black and white image. I think that was the right choice because I have several of this composition in color where the colors make the image. This was not one of those, and the best part about it was the debris laying around the badge. By removing the color, I knew that the eyes would go to the brightest part of the image first and that was where the emblem was. The contrast around the needles would keep the attention there even though there were other areas to visit within the frame.

One last area of the truck that I wanted to work with was the grill. I’ve done quite a few photos of this grill over the years, but most of them have included a headlight, or at least a turn signal. What I was finding interesting about the grill on this occasion was the moss that was growing on the slats and the fallen leaves sitting on the bumper finisher. Adding any lights would be too distracting and I decided that a more or less simple abstract with the shape of the grill would suffice.
I set the camera up in way to capture the bend along the side of the grill with the bottom edge of the frame filled by the diagonal line of the bumper finisher. The top of the frame captured a bit of the grill on the top left to balance out the leaves at the bottom right. The rest of the grill had a diagonal movement through the frame which I really liked. The moss gave some wonderful texture to the scene, but the most important aspect for me was the color here. The contrast between the red and the mossy green was quite complimentary and worked for the scene very well.
In a matter of minutes, I had captured two detail shots on this truck that I have worked with for many years at this point. I liked them both and there were both plays on compositions that I have tried before with it. Apparently, I was in a better place for creating isolation compositions this time. It really is a matter of how the creative energy develops during my time here as to what I end up capturing.
By this point, I had already talked to Toni and had dinner plans worked out. I just had a couple more places that I wanted to check out before I left. One subject that is still here is something that I consider a treat at this point because it was long ago supposed to be in the shop for a complete build. This White Firetruck has been sitting in this same spot since I first laid eyes on the property something like seven years ago. In that time, it has aged very gracefully and has really started to fit my description of decay.
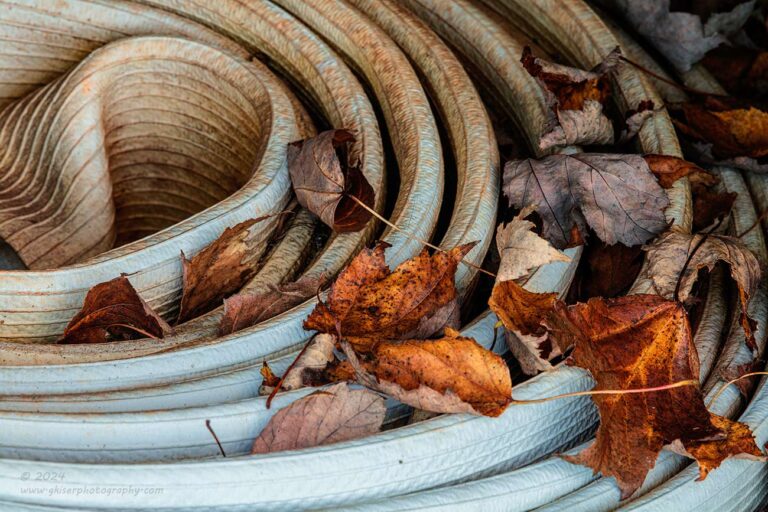
I went to the other side of the barn to check it out, but having shot it many times over the years, nothing was really jumping out at me. However, I remembered the fire hoses that were in the barn and how I ended up with a really nice detail shot of one of them during a previous visit. I started to look at the hoses and found an interesting section of one that had some fallen leaves laying on top of it. I liked how it all looked and started to look for a composition.
It took longer than I had thought it would to find something that I liked, but once I had it, I really liked how it was looking. Finding out the right depth of field took a little bit of thought which surprised me after working in a sort of auto pilot so much here recently. I was getting tired at this point and was looking for something to add a bit of creative flare to it all. If I used a limited depth of field, I would need to determine what the focal point was, but that was a problem as I didn’t have a specific point of interest. What I liked about the scene was the pattern of the hose and the way that the leaves were laying on it. The best way to render that was to make sure that it was all in focus which is what I did.

Having finished up the photo of the hose, I again turned my attention to the firetruck. I walked all around it but didn’t find any details that interested me in the current lighting. Instead, I continued on to the Chevy sedan that was parked a short way across the yard. I did stop and look back at the firetruck one more time and remembered shooting this angle on one of the early visits years ago. That time, I had used a standard zoom and captured a good bit of the sky above the barn. That wouldn’t work here because the sun was in that direction, above and to the right of the barn.
What I did like about this view was the backlighting that was illuminating the yellow and orange leaves in the trees. It just looked unlike anything that I had photographed here before. With the long lens still attached, I realized that I could completely omit the sky and focus my attention on the barn and the truck.
With that, I got the camera positioned and framed up the shot. I took care as to where I cropped the barn because of the fact that the siding on the right side was very bright and would have pulled the attention away. By cropping at the doorway, I omitted that problem and still was able to keep the composition tightly framed. I made a few exposures as the light was changing until I thought that I had one that would work out well enough.
It was at this point that I turned my attention back to the Chevy once again. The light was not all that great on it, but I did see a compositional opportunity that I hadn’t had before. With the Ford in the yard over by the tree, I had a nice complimenting element to include in a photo with the Chevy. It was a great chance to use the compression of the telephoto lens to keep the Ford a little larger in the frame than it would have been normally.

I spent some time looking at the relative positioning between the two vehicles in order to find the most pleasing relationship. Since they were so far apart from each other, I needed to make sure that there was some sort of visual link between them so that they didn’t appear random. This was accomplished partly because of the lens choice, but also thanks to the elevation of the camera. I chose a height and position of the camera so that the cars filled opposite corners with the Chevy pointing towards the Ford. There was a little bit of sunlight splashed in the open field between the cars that helped to link the two sections.
Now that I had the composition figured out, I had to get the depth of field worked out. I knew that I wanted to have everything in focus for this one. That was going to be difficult using the telephoto lens considering the distance. What I ended up doing was setting the aperture to f/22 which was a full stop away from the tightest aperture to avoid diffraction. I then tried to focus on the headlight of the Chevy. That gave me plenty of focus on the Chevy, but the Ford went soft in the distance. Looking at the distance scale on the lens, I saw that I was nearly at the infinity mark to focus on the headlight. I knew that for hyperfocal distancing, I would need to have my focus spot situated in the grass, to achieve that 1/3 distance. By adjusting the focus that slight bit to infinity, I was probably right where I needed to be. A quick check of the DoF preview showed me that my focus was right on the money. There was no need for focus stacking here as I was able to get a single frame with sufficient depth of field for my needs.
If this concept is something that you would like some help on, consider joining me for a mentorship at some point. I will also offer workshops where this topic is discussed at length. I’m hoping to have my 2025 workshops released here in the next month or two, so keep an eye out for that. Focusing is one of those very simple things that everyone seems to overcomplicate and ultimately miss. I try to explain it in a simple way that will allow you to get the right focus in the majority of situations without having to go to software to make it happen.
When I was satisfied that I had the right image of the two cars, I looked at the sky. The clouds were looking good and there was a very good chance that there was going to be a great sunset, but I had other plans for the evening. I checked my final frame count at 127 before putting the camera away.
After chatting with Dean for a bit longer, I was on my way to meet Toni for dinner. When we got home, I went downstairs to get the photos imported into Lightroom and culled. I ended up knocking those 127 frames down to 24 images that I wanted to look at further. Of those, I had 19 processed before I went to bed around midnight. This morning, I made some slight changes to those images and processed two additional ones from the original list before beginning the process of making the blog.
I’ve actually finished the blog slightly before 6pm but will wait to publish it until tomorrow morning to give folks a chance to read through the first part. Had I wanted to inundate everyone with all 21 photos in a single day, I would have just made it one blog. I took pity on you all and figured it would be better to break them all up over two days this time.
Hopefully, you have enjoyed the day as well as the photos. This location never fails to deliver great photos, and I always have a great time when I shoot here. The only downside is that every hour spent there equates to 3-4 hours on the back end between processing the photos and getting the blog done. It is worth it though because it is one of those locations that I can really track my own progress and personal growth over a very long period of time.
Now that I am done, I am going to take a break and rest some. I’ll get this published on Sunday morning and will update the gallery rooms at some point later in the day. As far as future treks, I have a couple of ideas of locations which I hope will work out. They won’t be anything like this for number of subjects, but I hope to get a few photos from each spot.
Until next time…